Booting the computer system involves loading an operating system from the various boot devices like drivers, network, and USB drives when the computer is switched on. Once the startup sequence finishes loading the operating system, the system hardware will be ready to perform complex operations. The Boot log is a record that maintains the list of successes or failures of various pieces of the Windows system during the booting process.
Enable or Disable Boot Log in Windows 11/10
The Boot log keeps a record of everything that has happened while loading from the computer storage system to the memory during the boot process. It is compatible with various devices, including network hardware, operating systems, and other hardware, which assist in identifying problems during the boot process and troubleshooting other issues. With the help of the Boot log, users can determine which drivers were unloaded and loaded during the boot process from the start of the system. In Windows, users can either enable or disable the Boot log feature.
The log file is named as ntbtlog.txt which lists all the successfully loaded processes as well as an unsuccessful process during the boot process. The log is saved to drive C:\Windows\ntbtlog.txt. Users can enable or disable the Boot log in two ways. One is by using System Configuration (msconfig), and the other way is to use a Command Prompt. In this article, we explain how to enable or disable Boot log in Windows 11/10.
Enable Boot Log in System Configuration
Open Run by pressing Win + R key. To open System Configuration, type msconfig and click on OK.
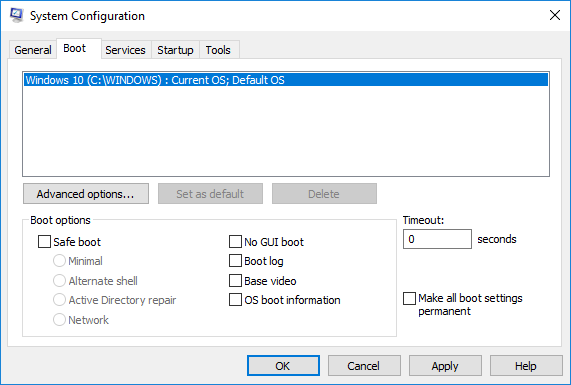
In the System Configuration window, Go to Boot tab and check the with option Boot Log under Boot options to enable the Boot log feature.

Click on OK to save the changes.
Click on Restart button in the prompt window to start the Boot log process.
Once the restart is complete, navigate to C:\Windows\ntbtlog.txt to access the boot log.
The log file consists of a list of all the successfully loaded drivers as well as the list of drivers that failed to load during the startup sequence. Every time the user restarts the system, the log file keeps updating and eventually increases the list entries. To easily locate the drivers and make your troubleshooting easier It is recommended to disable the boot log after troubleshooting.
Disable Boot Log in System Configuration
Open Run by pressing Win + R key. To open System Configuration, type msconfig and click on Ok.
In the System Configuration window, Go to Boot tab and uncheck the option with Boot Log under Boot options to disable the Boot log feature.
Click on OK to save the changes.
Enable Boot Log using Command Prompt
In the Start menu, type Command Prompt in the search bar. Right click on Command Prompt option and Run as administrator.
Type bcdedit in the command prompt and click Enter.

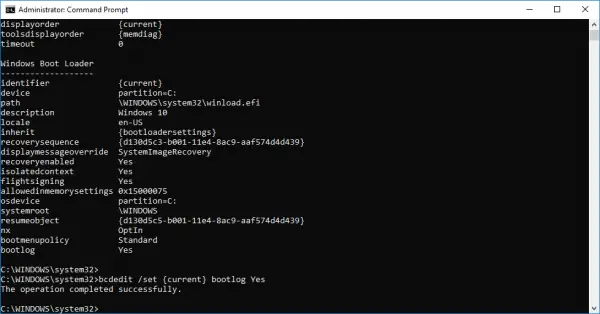
To enable the Boot log, you need to first find the Identifier of the current operating system. You can find the OS under the Windows Boot Loader section in the field called “Description”. In our case, it is Windows 10.
You can find the operating system identifier under the Windows Bootloader section next to the field name identifier. Generally, the identifier will be {current }. To know if the boot log entry is enabled or disabled, check the field “Bootlog” under Windows Boot Loader. If the “bootlog” entry is enabled, the entry will be ‘Yes’. If the boot log is disabled, the entry will be ‘No’.
To enable the boot log, type the following command with the operating system identifier.
bcdedit /set {identifier} bootlog Yes
Make sure that you substitute your operating system identifier in the field {identifier } above.
In this case we replace {identifier} with actual operating system identifier as {current} shown below.
bcdedit /set {current} bootlog Yes
Restart the system to start the Boot log process.
Once the restart is complete, navigate to C:\Windows\ntbtlog.txt to access the boot log.

Every time the user restarts the system, the log file continues to update and eventually increases in size. To easily locate the drivers and make your troubleshooting easier, it is recommended to disable the boot log after troubleshooting. Follow the steps below to disable the boot log using the command prompt.
Disable Boot Log using Command Prompt
In the start menu, type Command Prompt in the search bar. Right click on Command Prompt option and Run as administrator.
Type the below command to disable the boot log-
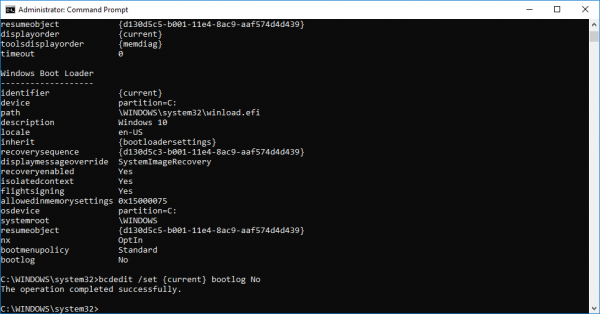
bcdedit/ set {identifier} bootlog No
Make sure that you substitute your operating system identifier in the field {identifier } above.
In this case, we replace {identifier} with actual operating system identifier as {current} shown below.
bcdedit /set {current} bootlog No
Once done, close the command prompt.
That’s all.