We all use web browsers for our day-to-day computing requirements. However simple they may seem, they are very complex and perform a lot of stuff under the hood. One such task is rendering the content on your computer’s screen. Rendering pages is a graphics-intensive task, consuming many resources on your computer. You might have already noticed Edge or Chrome taking up a lot of resources in the Task Manager. In this post, we have discussed how to enable high-performance GPU for Microsoft Edge Chromium browser so that it can leverage the best performance available.
Enable high-performance GPU for Edge browser
There are two types of GPU: one that came integrated with the motherboard of your computer and the second that was either installed by you or by the manufacturer later. Integrated GPUs are just fine and do well for normal day-to-day tasks. However, given the complexity of modern websites, browsers just cannot rely on the integrated GPU. Conversely, the second GPU is more capable and performant but consumes more power. So, if you are okay with lesser battery backup but want optimum browser performance, you can follow these steps to enable high-performance GPU for Microsoft Edge.
This feature lets you control what GPU is used by an application. Using this feature, we will set high-performance GPU for Microsoft Edge.
- Open Windows Settings
- Click open System
- Select Display from the left side
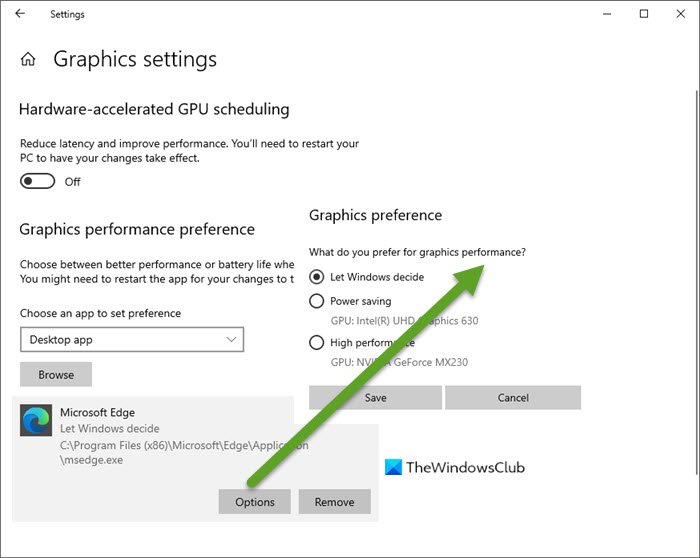
- Scroll down and click on Graphics Settings
- Under Choose and app, from the drop-down, select Desktop app
- Browse to the Edge Program folder.
- It is C:\Program Files (x86)\Microsoft\Edge\Application
- Select msedge.exe
- Now set its options as per your choice:
- Let Windows decide
- Power saving
- High performance.
Save and exit.
A way of verifying whether Edge is using your external GPU is by using the software that came with the graphics card. For instance, if you are using NVIDIA GPU, then your PC must have NVIDIA GPU Activity or any other similar tool installed. You can usually access them from the system tray, and it displays the list of programs that are using this GPU. From here, you can verify whether Edge is using this GPU.
Read: Fix Microsoft Edge High Memory Usage
Very similarly you can set a different GPU for any other application. High-performance GPU has its own perks and trade-offs, it can give you better performance but consume more power at the same time. So, you might not want to use it when you are on battery. If that is the case, you can easily switch back to Power saving GPU.
Better browser performance means more responsiveness, fewer loading times, and fewer frequent crashes. If you are looking for all of these, go ahead and make these changes and do not forget to share the results in the comments below.