Windows tablets offer both touch and mouse/keyboard input, but if you want to disable the touch screen on your device and use it as a PC with a classic mouse and keyboard combination, you can do so using the Device Manager. In this post, we will see how to disable the Touch Screen in Windows 11/10.
Disable Touch Screen in Windows 11/10

If you wish to permanently disable the Touch Screen feature in Windows 11, you can do so using Device Manager. Follow the steps mentioned below to do the same.
- Right-click on the Start button to open the WinX Menu.
- From the WinX Menu, open Device Manager
- Search for Human Interface Devices.
- Expand it.
- Then, right-click on HID-compliant touch screen
- From the list of options displayed, select ‘Disable device’.
TIPS: List of Touch Screen and Touchpad Gestures in Windows 11
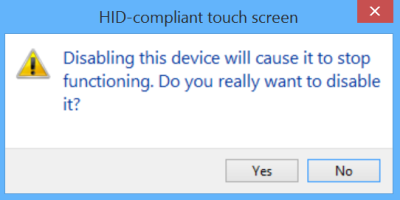
Instantly, a confirmation pop-up will appear on your device screen, requesting you to confirm the decision:
Disabling this device will cause it to stop functioning. Do you really want to disable it?
Click ‘Yes.’
Your touchscreen functionality will be disabled immediately.
At any point, if you would like to enable touch screen functionality again, simply go back to the Device Manager, right-clicking HID-compliant touch screen, and select Enable device.
Remember, you will be required to restart your PC to enable the touchscreen functionality again.

Read: TouchScreen not working in Windows
How do I turn off touch screen in Windows 11?
Since Windows 11 does not have any built-in option to disable the touchscreen, we need to disable the device driver that allows your operating system to operate with touchscreen hardware. To do the same, check out the guide mentioned earlier.
Read: Ghost Touch Circles and erratic mouse behavior on Windows
How do I turn on the touchscreen on my laptop Windows 11?
If touchscreen is disabled on your computer and you wish to enable it back, open Device Manager, expand Human Interface Devices, right-click on HID-compliant touch screen, and select Enable Device. You will get a pop-up asking you to confirm your actions, so, do that and check if the issue is resolved.
Also Read: HID-Compliant TouchScreen Driver is missing from Device Manager.