The Microsoft Store is the most trusted place for Windows 11/10 users to obtain copies of applications and games. Not only does the Microsoft Store feature hundreds of applications, but it also offers a wide range of features, some of which we need and others that we can do without.
You can set the Microsoft Store to automatically download new versions of your applications whenever there are any. This is an excellent feature but can also tell on your data bandwidth usage and battery, as with any process that runs in the background.
If you’d prefer to update your applications by yourself, you have to turn off the automatic update feature. This guide will show you how to disable or enable automatic updates in the Microsoft Store. We’ll also teach you how to update the applications manually if they are disabled.
Turn off Automatic Updates for Microsoft Store apps
We have seen how to stop Microsoft Store apps from auto-updating via its Settings. Now we will show you how to turn off automatic Microsoft Store app updates using the following 4 methods:
- Using the Windows Registry.
- Using the Group Policy Object Editor.
- Using PowerShell.
- Using Command prompt.
Continue reading this section for detailed, step-by-step guides for the above methods.
1] Disable automatic updates of Microsoft Store apps from the Windows Registry
You can also disable Microsoft Store automatic updates from the Windows Registry. For this, press the Windows key and search for regedit. Right-click on the Registry Editor and select the Run as an Administrator.
Navigate to the following folder in the Windows Registry:
HKEY_LOCAL_MACHINE\SOFTWARE\Policies\Microsoft\WindowsStore
Here, right-click on a space on the right-hand side and go to New > DWORD Value. Name this DWORD AutoDownload and assign it the value of 2.
2] Disable auto-updating of Microsoft Store apps from the Group Policy Object Editor
Open the Microsoft Management Console. If you don’t know where this is, search for MMC in the Start menu and select it. Click on Yes when prompted to open the MMC.

In the Console window, go to File > Add/Remove Snap-in.. and find Group Policy Object Editor from the left-hand list. Select this snap-in and click the Add button in the middle.
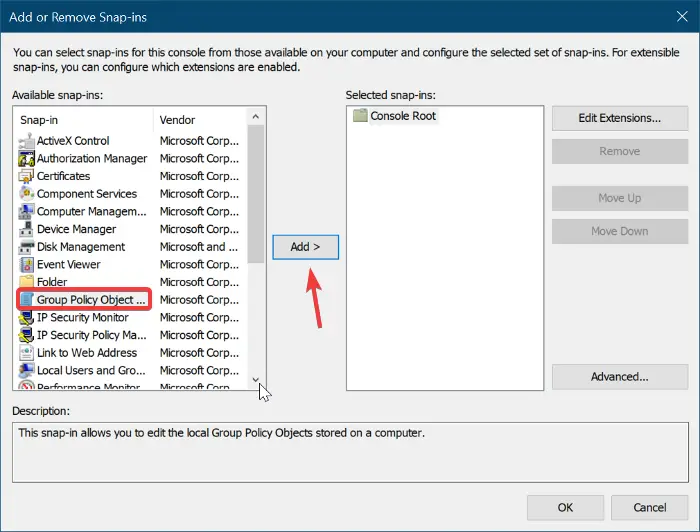
Click on Finish in the window that pops up. Finally, hit the Ok button to finish adding the Snap-in.
Next, navigate to Local Computer Policy > Computer Configuration > Administrative Templates > Windows Components > Store.
Double-click on Turn off automatic download and install of updates.
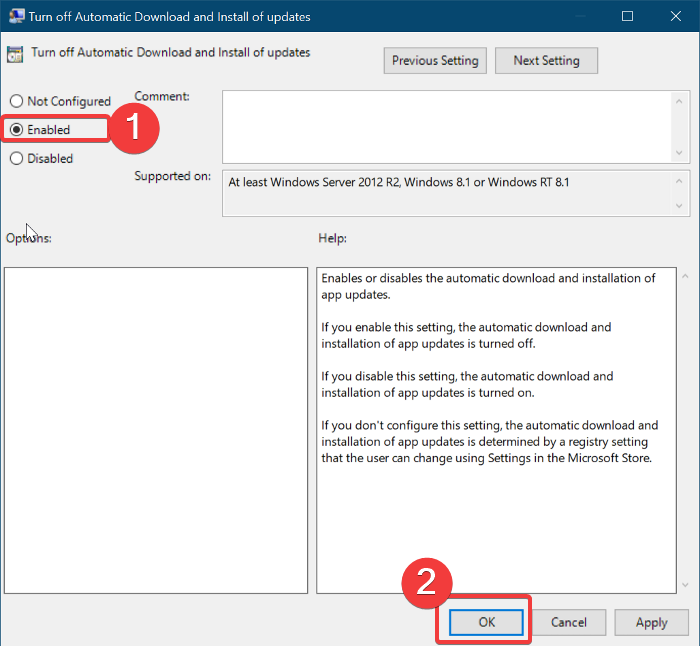
On the window that opens, select the Enabled radio option and click on OK.
3] Disable auto-updating of Microsoft Store apps through PowerShell
Right-click on the Start menu button and select PowerShell (Admin). Copy and paste the following code onto the PowerShell window:
$Name = “AutoDownload”

$Value = 2

$Path = “HKLM:\SOFTWARE\Policies\Microsoft\WindowsStore”

If ((Test-Path $Path) -eq $false){

New-Item -Path $Path -ItemType Directory

}

If (-!(Get-ItemProperty -Path $Path -Name $name -ErrorAction SilentlyContinue)){

New-ItemProperty -Path $Path -Name $Name -PropertyType DWord -Value $Value

}

else{

Set-ItemProperty -Path $Path -Name $Name -Value $Value

}
4] Disable auto-updating of Microsoft Store apps from Command prompt
Press the Windows key and search for cmd. Right-click on Command Prompt and select Run as Administrator.
Type the following command into the Command Prompt window and hit enter to run it:
reg add HKLM\SOFTWARE\Policies\Microsoft\WindowsStore /v AutoDownload /t REG_DWORD /d 2 /f
That’s it.
With automatic updating disabled in the Microsoft Store, your applications will remain out of date until you update them manually. Follow these steps to update your Microsoft Store apps manually.