
To set up how you want to use passwords for BitLocker removable drives, follow this guide. This tutorial explains everything about using passwords for BitLocker removable drives in Windows 11 and Windows 10 computers using Local Group Policy Editor and Registry Editor.

How to configure use of passwords for BitLocker removable drives
To configure the use of passwords for BitLocker removable drives in Windows 11/10 using Group Policy Editor, follow these steps:
- Search for gpedit in the Taskbar search box.
- Click on the search result.
- Navigate to Removable Data Drives in Computer Configuration.
- Double-click on the Configure use of passwords for removable data drives setting.
- Choose the Enabled option.
- Set the password requirements.
- Click the OK button.
Let’s go through these steps in detail.
First, you need to open the Local Group Policy Editor on your PC. For that, search for gpedit or gpedit.msc in the Taskbar search box and click on the search result.
Then, navigate to this path:
Computer Configuration > Administrative Templates > Windows Components > BitLocker Drive Encryption > Removable Data Drives
Then, find the setting called Configure use of passwords for removable data drives on the right side and double-click it.

Choose the Enabled option. Then, set things up as needed. For example, you can enable or disable the password requirement for removable data drives, configure complexity, and set the minimum password length.
After you set these up, click OK to save the changes.
How to configure use of passwords for BitLocker removable drives using Registry
To configure the use of passwords for BitLocker removable drives using Registry, follow these steps:
- Press Win+R to open the Run prompt.
- Type regedit > click the OK button > click the Yes button.
- Go to Microsoft in HKLM.
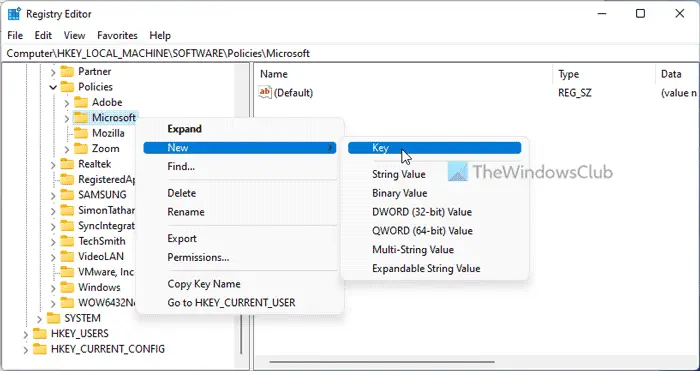
- Right-click on Microsoft > New > Key and name it as FVE.
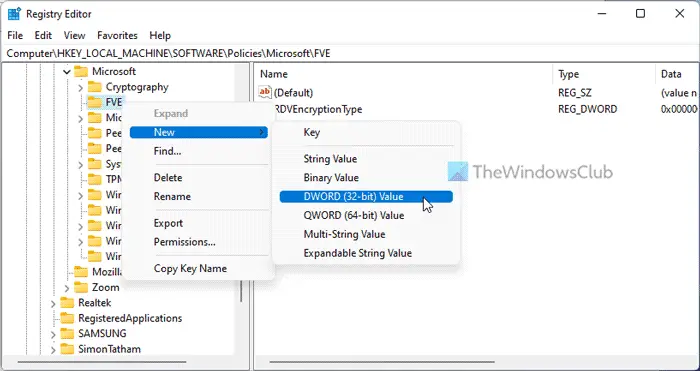
- Right-click on FVE > New > DWORD (32-bit) Value.
- Set the name as RDVPassphrase.
- Double-click on it to set the value data as 1.
- Repeat the same steps to create RDVEnforcePassphrase, RDVPassphraseComplexity, and RDVPassphraseLength.
- Set the Value data accordingly and click the OK button.
- Restart your computer.
To learn more about the aforementioned steps, continue reading.
To get started, press Win+R to open the Run prompt, type regedit, click the OK button and click the Yes button to open the Registry Editor. Then, go to this path:
HKEY_LOCAL_MACHINE\SOFTWARE\Policies\Microsoft
Right-click on Microsoft > New > Key and set the name as FVE.
Right-click on FVE > New > DWORD (32-bit) Value and name it as RDVPassphrase.
Double-click on it to set the Value data as 1.

Following that, you need to create three more REG_DWORD values. Do that and name them:
- RDVEnforcePassphrase
- RDVPassphraseComplexity
- RDVPassphraseLength
For your information, RDVEnforcePassphrase is to enable or disable password requirements for removable data drives. That said, you can set the value data as 1 to enable this setting.
RDVEnforcePassphrase REG_DWORD value denotes the activation of password complexity level. You can set the Value data as 0, 1, or 2.
The last one is RDVPassphraseLength. By default, it is set to 8. However, you can choose any value from 6 to 20.
Finally, click the OK button and restart your computer.
Read: How to delete BitLocker Recovery Key from OneDrive in Windows
How do I put a password on my BitLocker?
To add a password to your BitLocker-protected data drives, use Command Prompt or Windows PowerShell. First, open Command Prompt or PowerShell with administrator permission and enter this command: manage-bde -protectors -add c: -TPMAndPIN. Then enter the PIN twice to confirm.
How do I change BitLocker settings?
To change BitLocker settings in Windows 11 or Windows 10, you have three options. You can use Control Panel, Local Group Policy Editor, and Registry Editor. Control Panel offers the fewest options, while Local Group Policy Editor and Registry Editor offer the most.
Read: Turn On or Off the use of BitLocker on Removable Data Drives.
