Normally, we don’t bother about the space used for offline files. Sometimes we don’t know where the extra space on our drives is getting used. But being a smart Windows user, you should be careful about the disk space. By default, Windows 11/10 follows the policy of configuring and allotting 10% of disk space to cache offline files.
Configure amount of Disk Space to use for Offline Files in Windows 11/10
Automatic caching can be set on any network share. When a user opens a file on the share, the system automatically stores a copy of the file on the user’s computer. Sometimes this automatic caching consumes considerable disk space. In other cases, if the temporary cached files don’t matter for you then you may want to have no caching of disk space on your drive. To do that, you need to configure the offline files tab in order to disable the amount of disk space to use for temporary offline files.
In this article, we’ll show you the advanced way to disable the settings to store temporary cached files automatically.
Disable Automatic Caching Of Temporary Files Using Registry Editor
1. Press Windows Key + R combination, type put Regedt32.exe in Run dialog box and hit Enter to open the Registry Editor.
2. Navigate to this registry key:
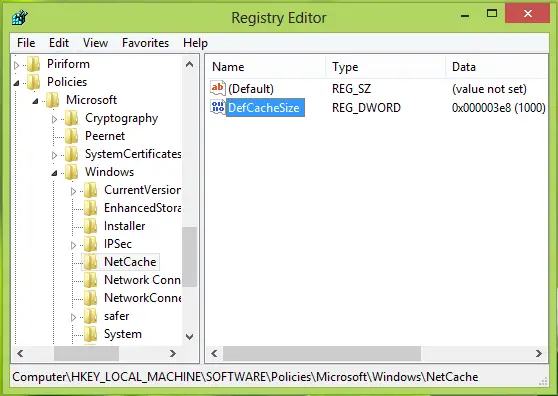
HKEY_LOCAL_MACHINE\SOFTWARE\Policies\Microsoft\Windows

3. In the right pane of location, create a new sub-key using Right Click -> New ->Key. Name it as NetCache.
Now come to right pane of this sub-key, create a DWORD value using Right Click -> New -> DWORD.
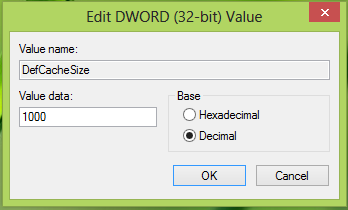
Name it as DefCacheSize. Double click on the DWORD so created in order to modify it, you’ll get this:

4. In the above box, firstly select the base type as Decimal. Then input the Value data according to the requirement you want the computer to use the disk space percentage. For eg. If you want your computer to use 15.45% of the total disk, then you should input 1545 there.
To disable the amount of disk space to use for temporary offline files, input 0. Click OK when done.
Configure Group Policy for Default Offline Cache Files
1. Press Windows Key + R combination, type put gpedit.msc in Run dialog box and hit Enter to open the Local Group Policy Editor.
2. Navigate here :
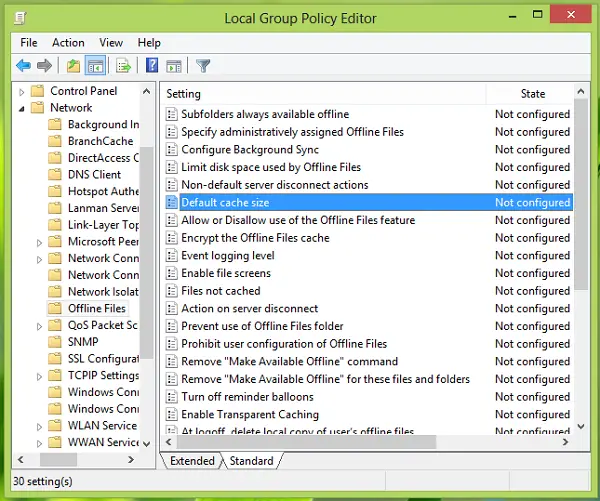
Computer Configuration -> Administrative Templates -> Network -> Offline Files

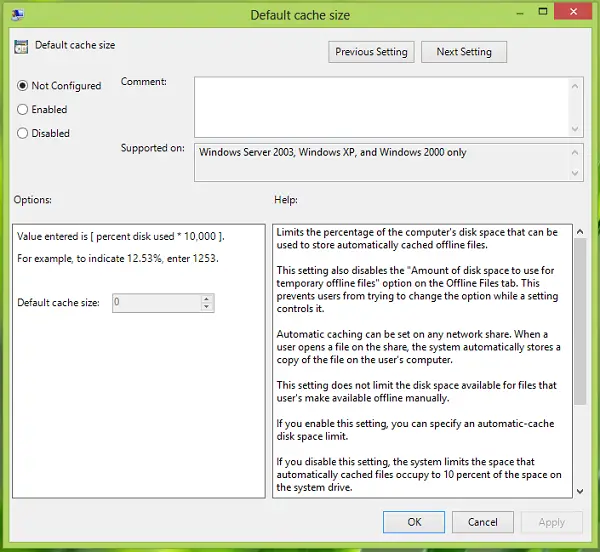
3. In the right pane, look for the setting named Default cache file, it must have Not Configured status by default. Double click on the same setting, you’ll get this:

4. In the above window, click on Enabled and specify your requirements to store offline files according to the percentage of disk space.
You can enter 0 to completely disable caching. If you select Not Configured / Disabled (default setting), Windows will automatically use 10 percent of disk size for caching. After configuring, click Apply followed by OK.
That’s it! You’ve configured the disk space percentage for caching.
If you configure the disk space using Local Group Policy Editor, then entry for Registry Editor is automatically created by Windows and vice versa.
Leave a Reply