If you are a night owl and spend long hours working in darkness, having an illuminated keyboard can be a big help. A backlit keyboard is one where the keys are illuminated to get better visibility in low-light environments. But do you know how to configure the backlit timeout settings for your keyboard? If not, we’ll cover it in today’s topic.

Please note that not all Windows PCs and laptops are equipped with a backlit keyboard. To confirm whether your computer supports a backlit keyboard, visit the manufacturer’s Customer Support page and search for your notebook model. Also, review the product specifications for your computer model. If your computer supports the Backlight function, then do the following.
Change Keyboard Backlit Timeout settings in Windows 11/10
If you find that the backlight of your keyboard stays on for only a few seconds and then goes off, you will need to configure the backlight time-out settings. The backlight timeout setting might require configuring the BIOS. If you’re okay with this procedure, proceed with the following steps.
- Use BIOS/UEFI
- Use OEM software
- Use Windows Settings
- Use Power Options
- Use Keyboard.
1] Use BIOS/UEFI
Enter BIOS/UEFI Setup
Restart the notebook, and then immediately press the F10 repeatedly until the BIOS opens. Other keys that may open your device’s BIOS are F2 or DEL.

When the BIOS opens, use the arrow keys to navigate to the ‘Advanced’ tab.
Navigate to ‘Built-in Device Options’, and then press Enter.
Read: How to change Keyboard Backlight Color in Windows
Access Backlit Keyboard Timeout Settings
In the Built-in Device Options, from the list of options displayed, select Backlit keyboard timeout.
To expand its menu, continue pressing the spacebar key. This action will force the BIOS settings to open the keyboard backlight settings.
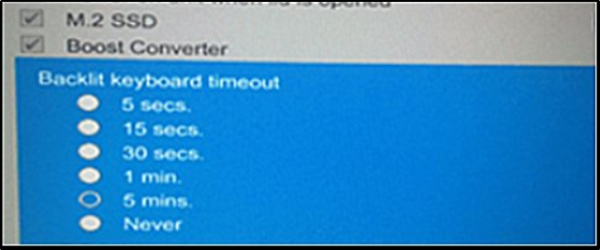
Here, select the timeout setting you want.
If you choose to select the ‘Never’, the backlight will remain ‘on’ for an extended period of time, which could take a toll on the notebook battery power.
Finally, if you find that there is no setting for the backlit timing in the BIOS, this behavior might not be supported on that PC or laptop.
In such a case, you will need to check the product support documentation for your notebook model to confirm support.
2] Use OEM software
Some manufacturers may provide software or utilities to control keyboard backlight settings. For instance, use Dell QuickSet or Dell Power Manager, HP Command Center, ASU Armoury Crate, Lenovo Vantage, or Acer Quick Access. Locate the setting within your chosen tool and use it.
3] Use Windows Settings
On some laptops that support this feature, you will find a setting in Windows Setting > Windows Mobility Center > Keyboard Backlight settings. You can adjust the Keyboard Backlight brightness and timeout here.
4] Use Power Options
Open Control Panel > Hardware and Sound > Power Options. Locate your active power plan and select Change plan settings. Click Change advanced power settings, look for Keyboard Backlight and set it to Always On or Never.
5] Use Keyboard
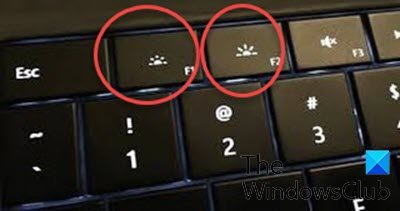
Locate and press the Key with the ‘backlight’ icon to turn off/on the keyboard backlight. You might have to use the Fn key with it. On some laptops, you can use Fn+Space or Fn+F5, in conjunction with the backlight key, to adjust the timeout.
Read: How to change Keyboard Backlight Color in Windows
Change Lenovo Backlit Keyboard Settings
Open Lenovo Settings and select Backlighting. Change your backlighting setting as per your wish:
- Always On
- Off
- Auto
To adjust the level of backlighting, you can use the keyboard’s brightness controls.
Configure Keyboard Backlight settings in Dell laptop
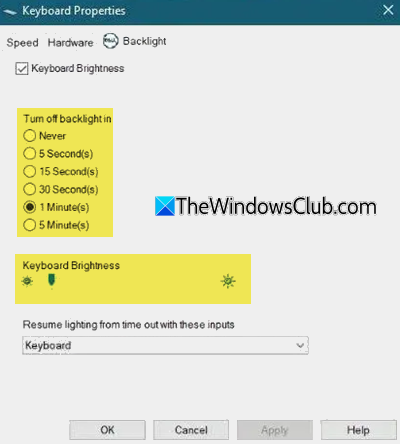
Download the Dell Feature Enhancement Pack Application driver. During installation, select Custom install and install only the Keyboard and Devices component. Next go to the Control Panel > Hardware and Sound and click on Dell Keyboard Backlight Settings > Backlight tab. Here you can change the timeout duration, or set it to always on by selecting the ‘Never‘ option. You can also change the brightness using the slider.
Customize Asus Backlit Keyboard settings
Download and install the Asus Keyboard Software, launch it and go to the Backlighting tab and select the mode you want:
- Static or On
- Off
- Breathing or Pulsating
- Wave effect
- Custom effect
You can also adjust the level of backlighting.
Related: Backlit keyboard not working or turning on.
How do I turn Keyboard Backlight on or off?

On most laptops with a backlit keyboard, press the key with the ‘light’ icon. It is usually on the F5 or F4 key. You may have to press the Fn key at the same time to turn the Keyboard Backlight on or off.
Customize HP OMEN Keyboard Backlight
To customize the HP OMEN Keyboard Backlight, open OMEN Command Center > Lighting section and choose between static colors or dynamic lighting effects. Click Apply.
How to increase Keyboard Backlight time in Windows 11?
To increase the keyboard backlight timeout in Windows 11, you will have to change the setting via your BIOS/UEFI firmware or use the OEM software as explained in this post.
How to keep Keyboard Backlight always On?
To keep Keyboard Backlight always On, boot into the BIOS, go to the Advanced or Built-in Device Options tab, select Keyboard Backlight Timeout and choose “Always On”. Save and exit BIOS.