PowerShell scripts are used to automate repetitive tasks and make some changes to your system’s configuration. However, we have noticed that at times, Windows can’t run a PowerShell script in Windows 11/10. This issue can be frustrating as .PS1 scripts allow you to do a lot of tasks easily. In this post, we are going to talk about this issue and see what you can do to resolve the issue.

Fix Can’t run PowerShell script in Windows 11/10
If you can’t run a PowerShell script in Windows 11/10, follow the solutions mentioned below.
- Launch PowerShell as an administrator
- Bypass the execution policy
- Set Execution Policy to unrestricted
- Enable PowerShell Script Execution using Registry Editor or Group Policy Editor
Let us talk about them in detail.
Cannot be loaded because running scripts is disabled on this system
1] Launch PowerShell as an administrator
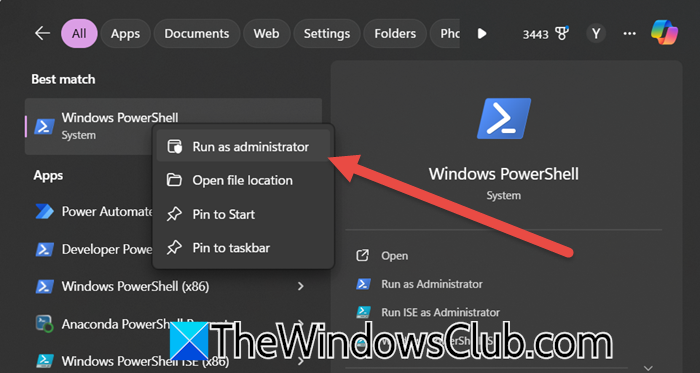
First, we need to verify whether the issue you are facing is indeed a problem. If you launch PowerShell as an administrator by searching for it in the Start Menu, right-click on the PowerShell, and click on Run as administrator. Then, try running the script and see if that helps.
2] Bypass the execution policy
PowerShell’s execution policy is a safety feature that prevents unauthorized or harmful scripts from running. Default policies like “Restricted” or “RemoteSigned” can block scripts unless they’re explicitly allowed or signed. However, if you run the following command, you will be able to temporarily bypass these restrictions for the current session, enabling the script to run without permanently altering security settings.
powershell -ExecutionPolicy ByPass -File ScriptFileName.ps1
The problem here is that this method will not work if automated processes such as scheduled tasks or runbooks operate in non-interactive sessions. These environments often enforce strict Group Policy settings that ignore temporary overrides, ensuring ongoing security.
3] Set Execution Policy to unrestricted
As mentioned earlier, the aforementioned method works only when running a standalone script, but if the script is scheduled, the method is ineffective. Therefore, you need to set the Execution Policy to unrestricted. However, this makes your system vulnerable, as anybody can run a malicious script on your computer if they have access to it.
To set the Execution Policy to unrestricted, run the following command in PowerShell.
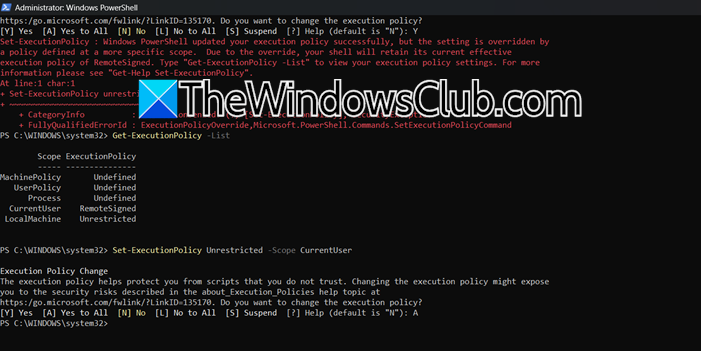
Set-ExecutionPolicy unrestricted
Since it is a change to your system’s settings, you will be asked to confirm your actions by hitting “Y” or “A”.
However, when I tried the same, I encountered the following error message.
Set-ExecutionPolicy : Windows PowerShell updated your execution policy successfully, but the setting is overridden by a policy defined at a more specific scope. Due to the override, your shell will retain its current effective
execution policy of RemoteSigned. Type “Get-ExecutionPolicy -List” to view your execution policy settings.
If you encounter this error, you need to run the command – Get-ExecutionPolicy -List to know if the system registered the change and what the issue is. It turns out that, in my case, CurrentUser was set to ‘Remote signed’, due to which any changes in the LocalMachine scope are not helpful.
So, we need to run the following command as well.
Set-ExecutionPolicy Unrestricted -Scope CurrentUser
Finally, check if the issue is resolved.
Read: How to automate tasks with PowerShell?
4] Enable PowerShell Script Execution using Registry Editor or Group Policy Editor
You can also enable PowerShell Script Execution using regedit or gpedit. First, let’s try the same using the Group Policy Editor. Open the Group Policy Editor by searching for it in the Start Menu. And then, navigate to the following location.
Computer Configuration > Administrative Templates > Windows Components > Windows PowerShell
Look for Turn on Script Execution and double-click on it. Set it to Enabled, and then you can use one of the following Execution Policies.
- AllSigned: This only allows signed scripts
- RemoteSigned: This only allows local and remotely signed scripts.
- Unrestricted: This allows all scripts.
Finally, click on Apply > OK.
Now, we will use the Registry Editor. But before making any changes, create a backup of the registry. Then, navigate to the following location.
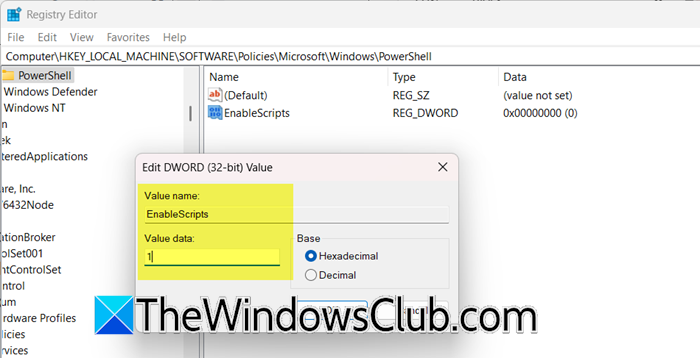
HKEY_LOCAL_MACHINE\SOFTWARE\Policies\Microsoft\Windows
Now, right-click on the Windows folder, and select New > Key. Name this “PowerShell”. You then have to right-click on the empty space and select New > DWORD (32-bit) Value, and name it “EnableScripts”. Double-click on the EnableScripts and set the Value data to 1.
Again, right-click on the space, select New > String Value, and name it “ExecutionPolicy“.
Now, double-click on ExecutionPolicy and set the Value data to Unrestricted. You can also set it to AllSigned, RemoteSigned, and Unrestricted.
Hopefully, with the help of this post, you will be able to resolve the issue.
Read: How to use Windows PowerShell ISE – Beginners Tutorial
How do I run a shell script in Windows 11?
To run a shell script (like Bash) in Windows 11, first install the Windows Subsystem for Linux (WSL) from the Microsoft Store, open a Linux terminal (e.g., Ubuntu), navigate to your script’s folder using cd, and type bash scriptname.sh. For PowerShell scripts, launch PowerShell as an administrator, use Set-ExecutionPolicy RemoteSigned (temporarily or permanently) to allow scripts, then run them with .\scriptname.ps1.
Also Read: Convert PowerShell script (PS1) file to EXE with IExpress in Windows.