Windows 11/10 brings with it multiple new features and Battery Saver mode is one of them. When, in the active state, the feature conserves battery life by limiting the background activity and adjusting the hardware settings. It then displays information related to the amount of battery life and the estimated time a user has remaining.
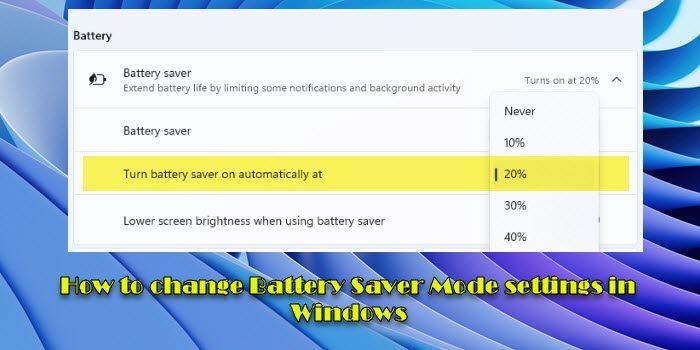
When you turn on Battery Saver in Windows, you will not automatically receive emails or calendar updates. Live Tiles may not update. Apps will not be allowed to run in the background.
Change Battery Saver Mode settings in Windows 11/10
To change Battery Saver Mode settings on your Windows 11/10 PC, follow these steps:
For Windows 10
You can enable or disable Battery Saver by toggling the Battery Saver is currently button to On or Off. You will find that the feature is disabled by default. If turned on, it becomes visible when the battery level falls below 20%. Nevertheless, you can change this setting and set the feature to a higher limit, say 30%.
Press Win+I to launch the Settings app and then navigate to System > Battery Saver. Here, depending on your requirement, you can turn Battery Saver on or off manually. If you wish to configure its settings, click Battery Saver settings to control its automatic activation.
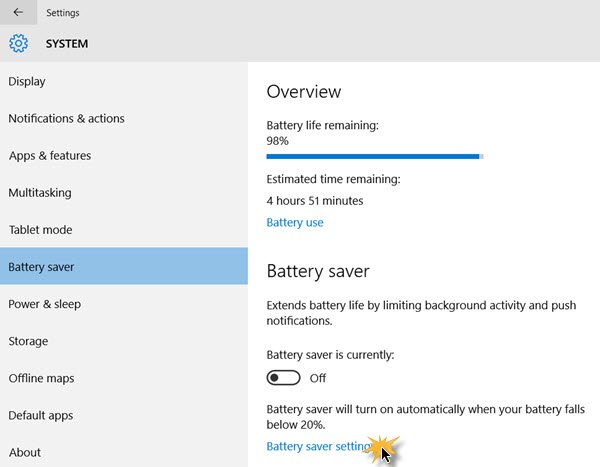
This Battery saver setting panel will allow you to:
- Turn the battery saver on automatically if my battery falls below.
- Allow push notifications from any app while in battery saver mode.
- Lower screen resolution while in battery saver mode.
You can also set when the battery saver should turn on automatically by moving the slider. To raise the limit just slide the bar to the desired value. The default is 20%, but you may move it to 30% if you wish.
Once activated, the icon will turn like this:

This panel also allows you to add apps that can run in the background, even when your Windows 10 computer is running in battery saver mode. Clicking on Add will open a list of the installed apps. Select the ones you want.
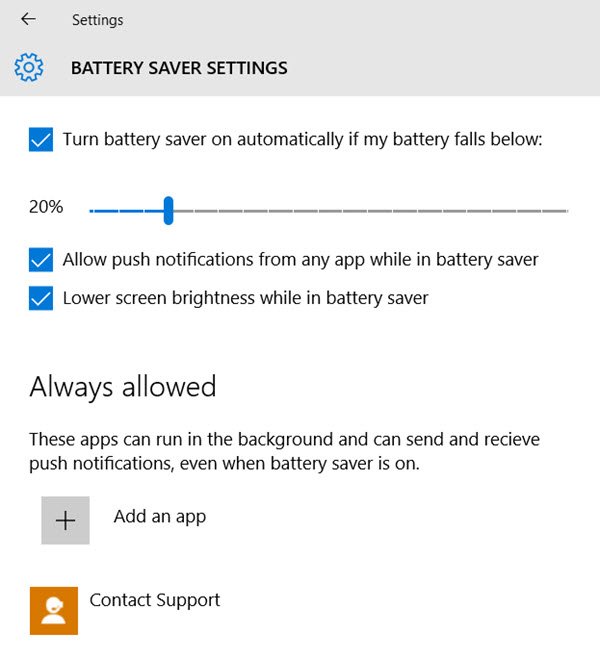
If you would like to disable the feature in case you do not find it of much use to you, follow the steps outlined above. In the end, uncheck the option ‘Turn battery saver on automatically if my battery falls below’.
In addition to the above settings, Windows contains additional Energy Saver settings under advanced power settings in the Control Panel.
For Windows 11
In Windows 11 you have to configure the Battery saver settings here:
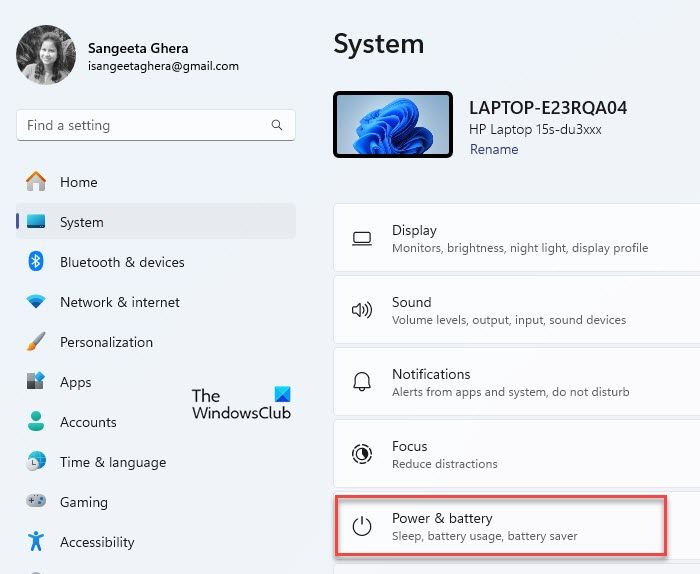
Press the Start button icon and select Settings. In the Settings window, navigate to System > Power & battery.
Scroll down to the Battery section. Click the down arrow icon next to Battery saver to expand the section. You can immediately switch to the battery saver mode by clicking the Turn on now button next to the Battery saver option. This works when your laptop is not plugged into a power source.
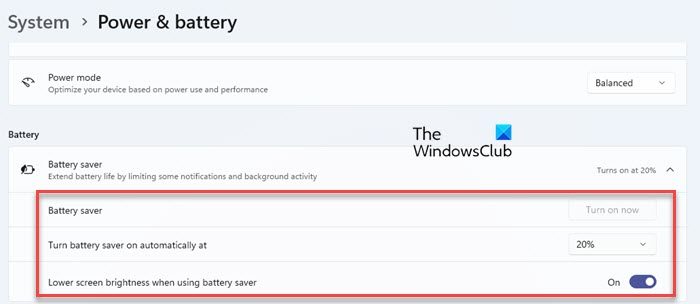
To change the default setting of Turn battery saver on automatically at 20%, click the dropdown that says ‘20%’ and select a different value (from 10% to 50%, Never, or Always).
Next, there’s a toggle that says ‘Lower screen brightness when using battery saver‘. When this toggle is enabled, Windows will automatically dim the screen to a predefined lower brightness level whenever Battery Saver mode is activated on your Windows 11 PC.
If you want to further monitor and manage your battery usage, click the down arrow icon next to the Battery usage option.
On top, you will see a graph indicating your battery level over the past 24 hours or the last 7 days. This graph helps you understand how your battery charge has fluctuated over time.
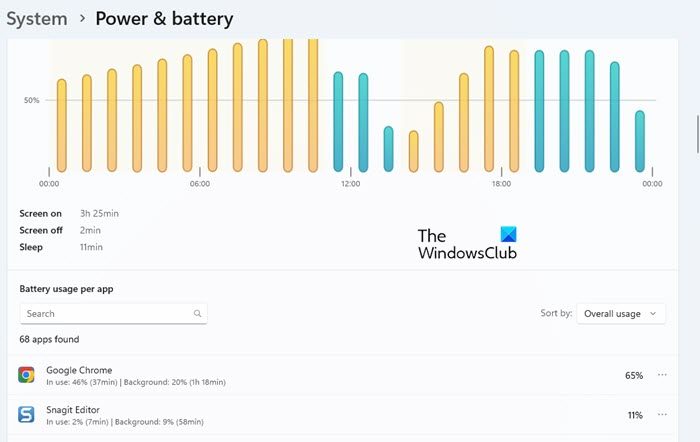
Just below the graph, you will see a list of apps and their corresponding battery usage percentages (how much battery each app has consumed during the selected time period). By analyzing the battery usage of these apps, you can identify which ones are consuming the most power and take steps to minimize their impact, such as closing unnecessary apps, adjusting their settings, or finding alternative apps that are less power-hungry.
That’s all! See this post if Battery Saver is not working on Windows Laptop.
How to turn off power saving mode on Windows 11 PC?
Click the Start button icon on your Windows taskbar. Select Settings (gear icon). In the Settings window, select System from the left panel. Click on Power & battery in the right panel. Scroll down a bit and locate Power mode under the ‘Power’ section. Click the dropdown menu on the right side and select Best performance. This option disables power-saving features to maximize performance on your Windows 11 PC.
Is battery saver good or bad for laptops?
The Battery Saver mode is generally beneficial when performance is not a priority. For example, you may switch to the Battery Saver mode when you’re away from a power source or need to conserve battery. However, while running resource-intensive applications, when the laptop is plugged in, or when screen visibility and real-time updates are crucial, it might be better to turn off Battery Saver to ensure optimal performance and a smooth user experience.
You might want to also take a look at Tips to Conserve Battery Power and Extend or Prolong Battery Life in Windows and this Laptop Battery Usage Tips & Optimization Guide.
