In this post, we will show you how to automatically empty in Recycle Bin and Downloads folder using Storage Sense in Windows 11/10.
Using Storage Sense, you can delete files in Recycle Bin & Downloads folder automatically after 1/14/30/60 days in Windows 11/10, using Storage Sense to clear up wasted disk space. Most people often download many files to their computers, but forget to delete unnecessary files. Windows 11/10 now has a feature where you can automatically delete files in Downloads folder & Recycle Bin after a specified number of days.
If you use a file daily or even weekly, keeping it in your Downloads folder makes sense. However, many PC users often download files but forget about them after a few days. The same thing happens with the Recycle Bin as well. Although we delete files from Desktop or other drives but often forget to empty the Recycle Bin.
To address potential low-storage issues, Microsoft previously included a feature called Storage Sense.

If you download Windows 11/10 now, you can get even more features alongside Storage Sense. Now you would be able to delete files from Recycle Bin as well as Downloads folder automatically after a specified number of days.
Windows 11 user? This post will show you how to use Storage Sense in Windows 11 to free up disk space.
Automatically empty Recycle Bin in Windows 11/10

In Windows 11, to delete files in Downloads folder & Recycle Bin automatically, do the following:
- Open Windows Settings
- Open System > Storage > Storage Sense
- Here you will see these options:
- Delete files that have been in the recycle bin for over
- Delete files in my Downloads folder if they have been there for over
- From the drop-down menu, you can select 1/14/30/60 days.
In Windows 10, follow these steps. Press Win+I and go to System > Storage. On your right-hand side, you will find an option called Storage Sense. If this is turned off, toggle the button to turn it on.
At the same place, you will see another option called Change how we free up space. Click on it to set it up. On the next page, you will see three options-
- Delete temporary files that my apps aren’t using
- Delete files that have been in the recycle bin for over 1/14/30/60 days
- Delete files in the Downloads folder that haven’t changed in 1/14/30/60 days

You need to check the 2nd and 3rd options. You can also use all three of them if you want to remove all the temporary files that your apps have used earlier but aren’t using anymore.
Do remember to not keep any useful files file in the Download folder as they will get automatically deleted after the specified days henceforth.
Auto Recycle Bin for Windows PC
There is a third-party freeware called Auto Recycle Bin that offers more options to automatically empty Recycle Bin in Windows. The Auto Recycle Bin program lets you configure rules to automatically clear data from different parts of the Recycle Bin, so you never run out of disk space.
This is a very tiny tool with a simple-to-use UI. This is not a replacement for any other tool; it just ensures the Recycle Bin is cleared periodically.

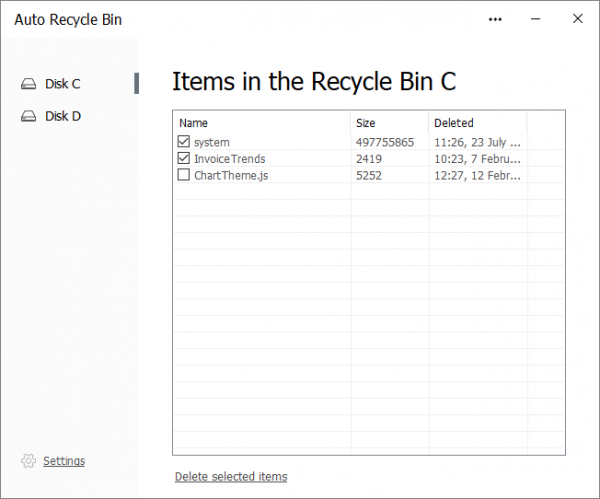
Auto Recycle Bin works by letting you configure settings for different drives separately. Click on the Drive you want to configure. The program displays some essential information such as the percentage of this drive that is used by Recycle Bin and the total free space.
Just below that, you can configure how many days the deleted items should be kept in the Recycle Bin. The next setting that you configure is the size of the Recycle Bin. You can specify a number in MB or a percentage relative to the drive’s size.
Moving on, Auto Recycle Bin also lets you view the items in the Recycle Bin in the order they were deleted. You can select the items you want to delete and use the Delete selected items ” option to clear them from your computer’s Recycle Bin. Also, there is a dedicated Process all button to delete everything from Recycle Bin for that drive.
Similarly, you can configure these settings for other drives and view their respective Recycle Bins. Since the program tries to automatically clear off the contents of your computer’s Recycle Bin, there must be a policy guiding this as well.
If you go to the program’s settings, you can decide when the files are deleted. There are two options currently available: the first is manual mode. In manual mode, the program will not delete files automatically. You will have to open the tool and hit the Process button manually.
And the second option is On the Windows OS startup. Auto Recycle Bin will automatically delete files from Recycle Bin on startup and then exit the program. The second one is more convenient and serves the purpose of this tool.
Auto Recycle Bin is a great little tool to have if you happen to delete a lot of files. There is no point in keeping the files inside Recycle Bin if you are not going to need them. But if you are not sure about the files that you have deleted, then we do not recommend using this tool as it might automatically empty the recycle bin at a pre-configured time.
UPDATE: Auto Recycle Bin software has been retired, but it is available for download at some popular download sites.
Related: How to empty Recycle Bin automatically while signing out.
I hope this helps!
What happened to the Recycle Bin in Windows 11?
If you can’t find Recycle Bin in Windows 11, then you can restore it as follows. Open Windows Settings using Win + I, and select Personalization. Then, choose Themes and scroll down to find Desktop icon settings under the Related settings section. Check Recycle Bin to restore it to the desktop.
How do I show the Recycle Bin in Quick Access Windows 11?
To show the Recycle Bin in Quick Access on Windows 11, right-click on the desktop and select Personalize > Taskbar > Start and toggle on the switch next to Show Recycle Bin. This will display the Recycle Bin icon in the Quick Access area. You can also show the Recycle Bin in your This PC folder.