Wouldn’t you like to have a built-in tool in Windows to capture all or just part of your screen with a few keystrokes? Well, Windows 11/10 supports that capability. The Win+Shift+S key shortcut will open the Snipping toolbar and allow you to capture a screenshot within moments. This article explains all the options so that you can start using the keyboard shortcut right now.

How to use the Win+Shift+S keyboard shortcut to capture screenshots in Windows 11/10
Most of us are aware of the ‘PrtScn‘ (Print Screen) option. The key that is seen your keyboard, adjacent to ‘Delete’ button. The option although good, had one major limitation – It can only be used to take a full-screen screenshot and copy it to clipboard. Following that, you could paste the screenshot image in your desired image editing software to edit it – such as MS Paint, Adobe Photoshop, etc and save the file. Likewise, you could also use ‘Alt+PrtScn’ key combination to capture a specific program window.
All these options, still exist but now we have an even better facility in the form of Win+Shift+S keyboard shortcut using which you can use to capture screenshots in Windows 11/10.
To use the Win+Shift+S shortcut to capture screenshots in Windows 11/10, follow these steps:
- Press the shortcut keys together
- Select an area
- Select a snipping mode
- Copy and save the image
Win+Shift+S key shortcut was once a part of OneNote’s popular screenshot feature, but it has been made an Operating System feature.
1] Press the Shortcut keys together
All you must do to capture the screenshot is press ‘Win+Shift+S’ keys together. Upon pressing the keys together, you will notice that the computer screen gets covered by a white/gray overlay.
2] Select a snipping mode
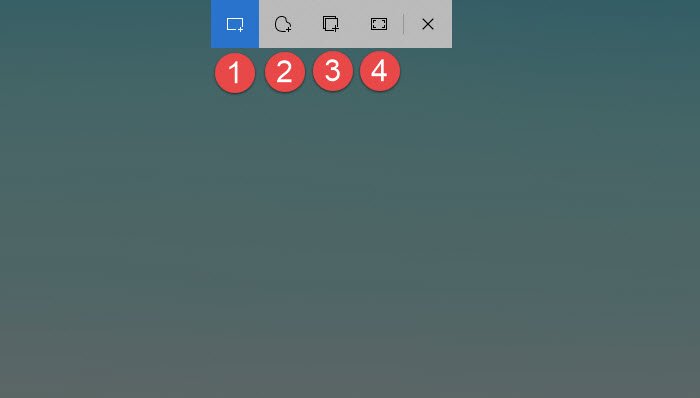
At this point, from the top of the computer screen, choose a snipping mode from the following options:
- Rectangular snip – Allows a user to drag the cursor around an object to form a rectangle
- Freeform snip – Lets you create a shape around your selection using a mouse or a pen if you are using a tablet (Microsoft Surface).When making free-form or rectangular snips, use your mouse to select the area that you want to capture.
- Windows snip – Helps to capture a part of the screen such as a browser window or dialog box
- Fullscreen snip – As the name suggests, the mode covers the entire screen visible.
TIP: See how you can use Snip & Sketch to capture and annotate screenshots in Windows 11/10.
3] Select an area

Once you make your selection, your mouse cursor changes into a ‘+’ sign, indicating the capture mode is ‘On’.

Select the desired area of the screen using your mouse cursor.
Read: How to use Web Capture in Microsoft Edge.
4] Copy and save the image
Once you have selected the desired area, release the cursor. As soon as you do it, the selected screen area screenshot will be automatically get copied to the clipboard.
From here, you can either choose to paste the screenshot image in Microsoft Paint, Photos app or other image editing software where you can edit and then save the file.
PS: This post will help you if Win+Shift+S is not working.
What is the shortcut key to take a screenshot in Windows 11?
Like the previous versions of Windows, the keyboard shortcut to take a screenshot in Windows 11 is the Print Screen button. However, there is yet another keyboard shortcut that you can use. It is Win+Shift+S. It opens the Snipping Tool so that you can have more options and flexibility in hands. You can choose a region as per your requirements if you use the Snipping Tool.
How do I take a screenshot on Windows 11 without the Print Screen button?
The easiest way to take a screenshot on Windows 11 without the Print Screen button is to use the Win+Shift+S keyboard shortcut. It uses the Snipping Tool to capture the screenshot. After capturing, you can open and edit the screenshot. Finally, it is possible to save the image anywhere on your computer. For your information, Snipping Tool allows you to use Paint to edit your screenshots.
Read: How to take High Resolution screenshots in Windows