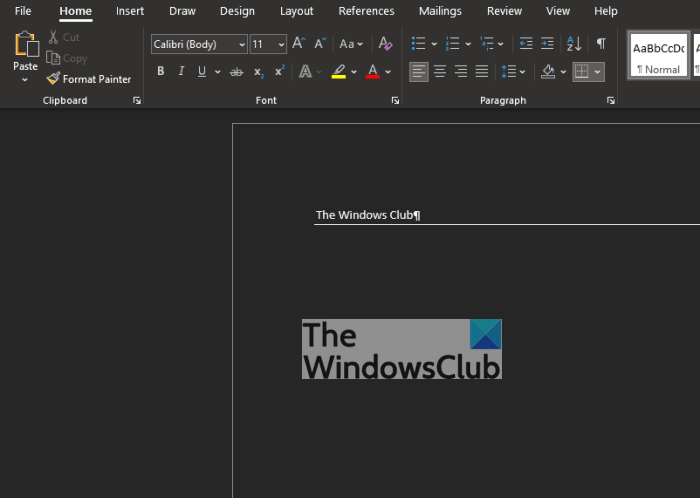
You may not know this, but whenever you type three or more hyphens in a Microsoft Word document, it will automatically create a horizontal line. In some cases, you did not plan to include this line into your document, and now you’re wondering how to remove it.
Why use horizontal lines in Microsoft Word?
OK, so you might be wondering why you may want to use a horizontal line in the Microsoft Word tool. Well, if you’re going to create a break in your page, then it makes sense to use a horizontal line. Furthermore, it is also great for starting a new topic, adding a new section, and more.
How to remove Automatic Horizontal line from Word
The task is effortless and will not take up much of your time when it comes down to removing the horizontal line in Microsoft Word. Simply follow the instructions we’ve laid out below, and you should come away as a winner.
- Open the Microsoft Word application
- Select the horizontal line you want to remove
- Click the No Border option to remove the horizontal line
- Disable the automatic horizontal line feature
1] Open the Microsoft Word application
Begin the process by firing up the Microsoft Word application. You can find the icon either on your Desktop or via the Start Menu. Once you’ve done that, please open the affected document so that we can get started.
2] Select the horizontal line you want to remove

To do this, you will have to place the mouse cursor above the line you want to have gone. You should have little to no problems getting this done.
3] Click the No Border option to remove the horizontal line

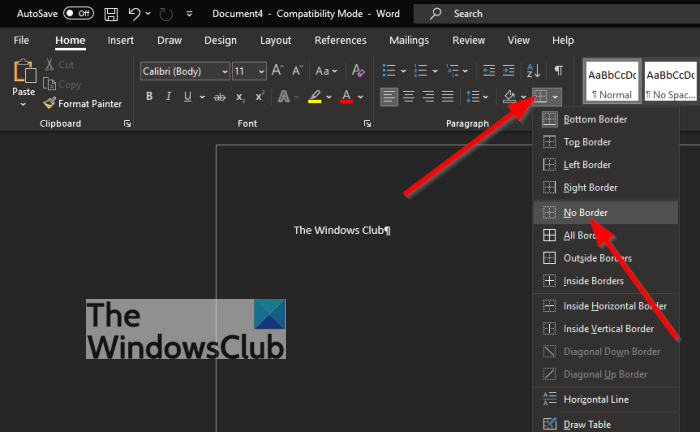
After you’ve accomplished the above task, please click on the Home tab; if you haven’t already, select the Borders icon located in the Paragraph area on the Ribbon. Finally, choose No Border from the dropdown list, and that should be good enough.
4] Disable the automatic horizontal line feature
Not everyone wants to have the horizontal line appear whenever they press the hyphen key multiple times. So, it makes a lot of sense to disable this automatic function in order always manually to create a horizontal line when needed.
To help with this, we’re going to explain how to disable this feature in the easiest way possible at the time of writing.

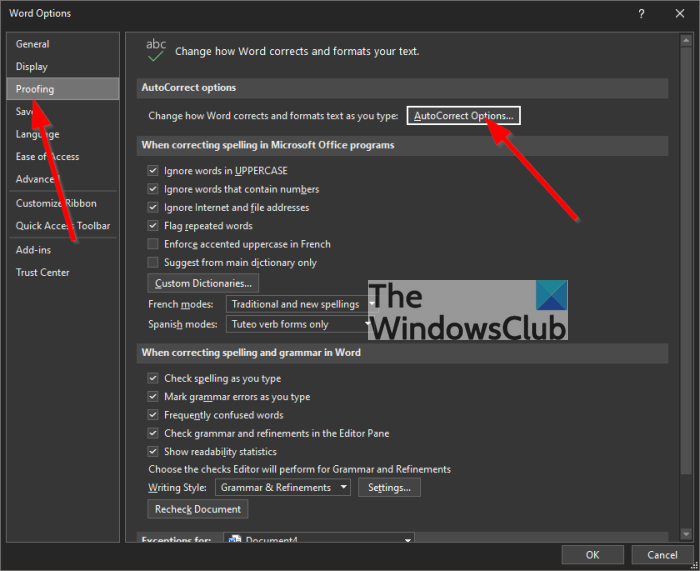
Navigate to Proofing: OK, so the first thing you want to do here is to go to the Proofing section of Microsoft Word by clicking on File, and from there, select Options. Finally, click on Proofing from the Options menu promptly. If you’re using an Apple Mac, then go to Word > Preferences.

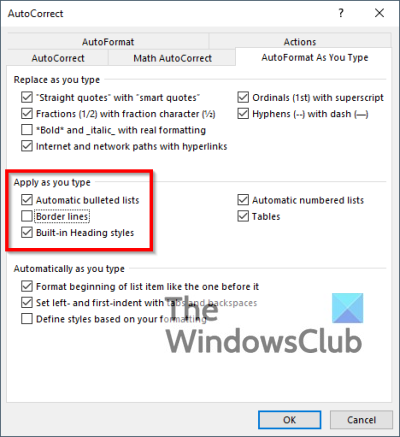
Select AutoFormat As You Type: In order to get this done, you must click on AutoCorrect Options or simply AutoCorrect if you’re using a Mac computer. You will want to select AutoFormat As You Type from the top to move on to the next step.
Disable automatic horizontal lines: The final step here is to look under the section, Apply as you type, then uncheck the box that sits beside Border lines, and that’s it, we’re done.
Leave a Reply