
All of us have experienced the fair part of a poor PowerPoint presentation. Certainly, it takes time and attention to create a presentation having a good impression. Well, then what would be the key feature for creating an effective presentation in the shortest time? That’s the place where you get it.
PowerPoint Tips and Tricks
In this guide, you will find 10 most useful tips and tricks that will help you to present your data to your audience in a well-organized way. So, let’s get started.
- Keep your Presentation Simple
- Apply a custom background
- Change the transition duration
- Play Music Across Slides
- Zoom in and out of slides
- Create an Organization chart
- Insert a watermark
- Add a shadow to the text
- Loop a PowerPoint Presentation
- Save PowerPoint Presentations as PDF Files
Let us see them in detail:
1] Keep your Presentation Simple
The first and foremost tip I recommend is to keep your slides simple. Your presentation should be similar to a visual guide that you tell like a story.
Having a whiteboard with a minimal effect is a good way to keep the audience focused on the subject and the main message.
However, you may be influenced by the graphical design of attractive themes, slide transitions, and animation effects. But keep in mind that it is not the talk. These effects serve only as visual aids to enhance your presentation.
Read: PowerPoint Tutorial for Beginners
2] Apply a custom background
PowerPoint comes with design templates and layout patterns that help you create a custom background and make your presentation unique. You can apply it to some or all of your slides depending upon your requirements.
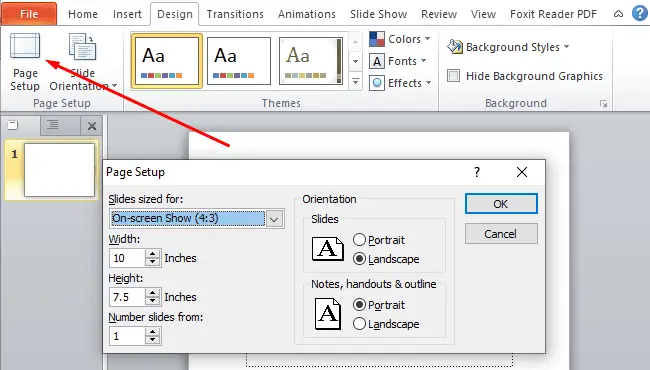
If you are also willing to create a custom background, then go to the menu bar and select the Design tab > Page Setup button.
In the Page Setup dialog box, enter the height and width of the background you prefer. You can also choose the number of slides for which you want to apply the custom background.
Note: In recent PowerPoint versions, then you will find the Page Setup in the File menu.
3] Change the transition duration
In Microsoft PowerPoint, a slide transition is a visual effect between the slides. You may see this special effect when you move to the next slide during a presentation. As important as the presentation is, it is also essential to coordinate the proper transition timing so that the presentation looks professional.
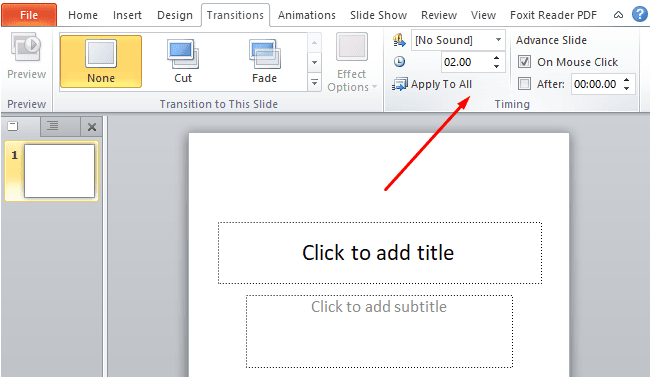
So, if your transition timing is also too slow or too fast, you can adjust it by going to the Transition tab. On the right side, you will see the Timing section. Here, you can specify the length of a transition.
After adjusting the timing of the current slide, you can set out the same length of transition even between all the slides. To set it, click the Apply to All button.
4] Play Music Across Slides
Adding background music across slides can take your presentation to the next level. It makes the performance more interesting and provides an overwhelming experience when you deliver your presentation to your audience.
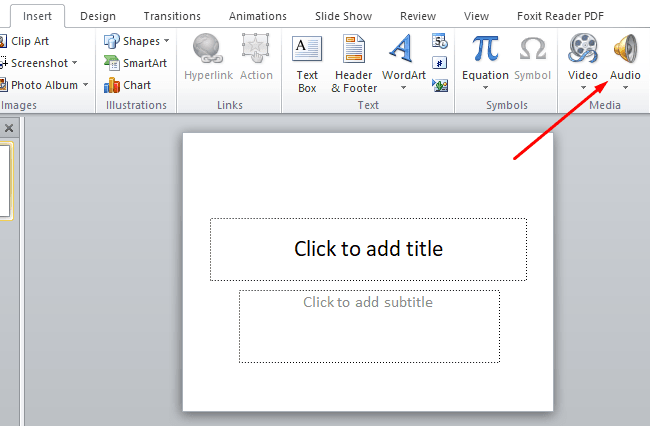
So, to insert an audio clip in your presentation, open Microsoft PowerPoint, and go to the Insert tab > Media section > Audio tool. Now, browse to the folder on your computer where the file you want to add is located, then click the Insert button.
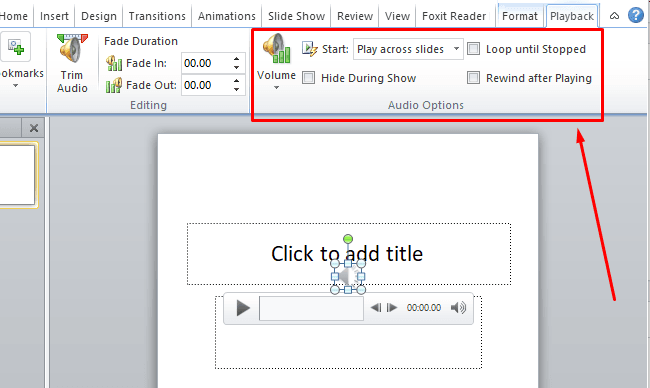
To activate the Playback tab, select the audio file from the current slide and you will see various options that are used to configure the background music.
In the Audio Options category, click on the drop-down button of the Start option and select Play across slides. It helps to play the audio clip automatically across multiple slides.
There are three checkboxes in the same section that you can use as needed. They are as follows:
- Loop until Stopped – This option will repeat your audio or video clip until it is stopped.
- Hide During Show: You can use this option to hide the sound icon during the slideshow.
- Rewind after Playing – The last option is to rewind the audio or video clip. It rewinds the clip once it has been played during the presentation.
5] Zoom in and out of slides
Sometimes it happens that you need to keep the audience’s attention during the presentation. A pie chart and a bar graph might be a good example. It can ensure that any specific part of the slide is clearly shown in the presentation.
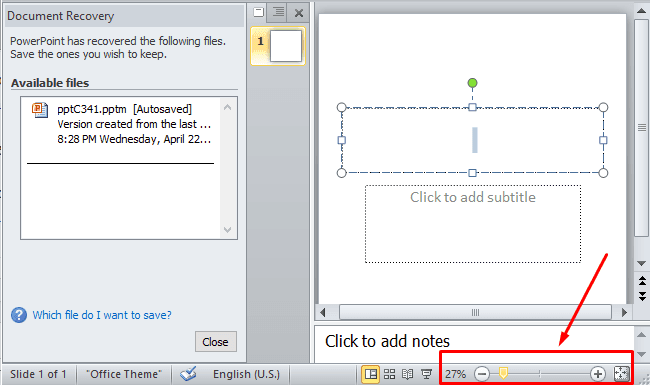
In order to use this feature in Microsoft PowerPoint, you can use the Zoom In and Zoom Out slider. It is available on the taskbar in the bottom-right corner of the slide page, as shown above. By dragging the zoom control slider bar towards the right, it zooms in on the page, and it zooms out when you drag the slider bar towards the left.
You can also control the zoom function using your keyboard. All you need to do is press & hold the Ctrl key and use your mouse wheel to zoom in and out of the slide.
6] Create an Organization chart
In Microsoft PowerPoint, SmartArt is an important tool that helps you communicate information visually using a Venn diagram or an organizational chart. It presents an organization’s structure as a reporting hierarchy. So, let’s get started.
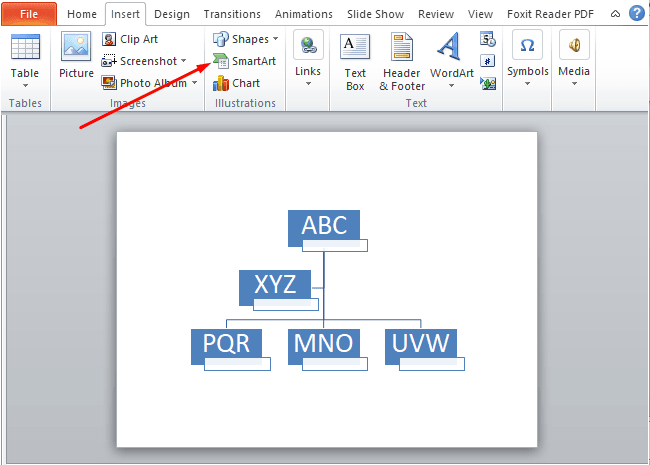
Go to the Insert tab. In the Illustrations section, click on the SmartArt graphic.
On the SmartArt Graphic page, select Hierarchy.
Move to the right pane, choose a layout for your Organization chart, and click the OK button.
To enter text, click on the hierarchical box and type your text.
7] Insert a watermark
Whether to protect your content against illegal copying or to add a transparent watermark, it’s easy to create a watermark logo in Microsoft PowerPoint. So, let’s begin to add a watermark to PowerPoint slides.
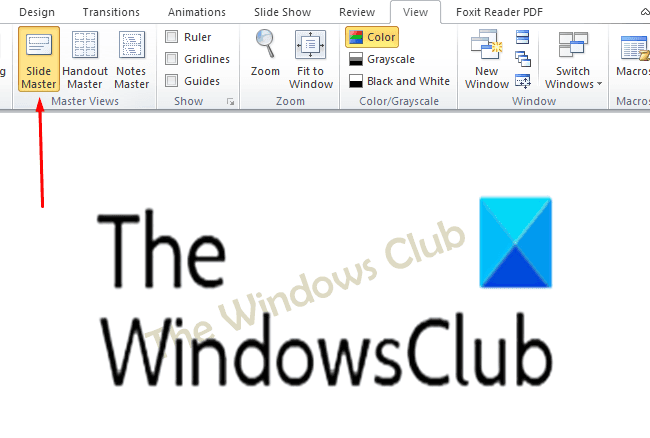
Open the PowerPoint presentation and go to the View tab > Slide Master.
Now, switch to the Insert tab and select the field you want to add such as text, chart, image, etc.
Once you have added the watermark, go to the Home tab and adjust it properly according to your requirements.
Now, move to the Slide Master tab where you will find the Close Master View option at the right end.
Click on this option to save the watermark.
8] Add a shadow to the text
Using the Shadow effect in PowerPoint, you can easily change the look of your text and make it fabulous. However, we don’t recommend using too many effects, as they can divert your audience’s attention from the main theme. So, use them suitably.
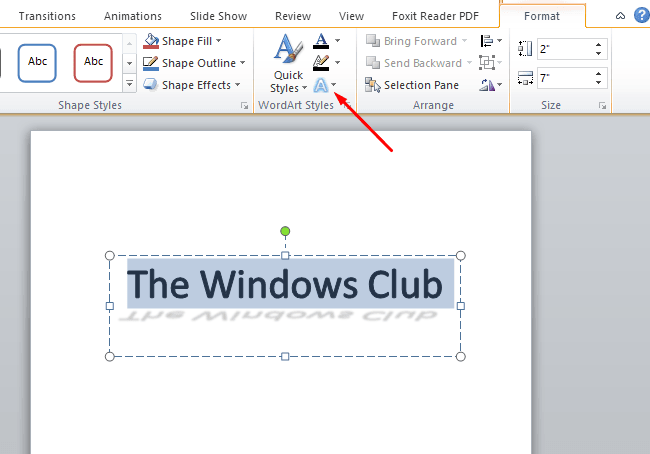
Select the sentence and you will see a new Format tab gets to appear on the menu bar.
From the Format tab, go to WordArt Styles section> Text Effects button > Shadow Submenu.
The Shadow submenu comprises a good collection of shadow effects such as Outer, Inner, and Perspective. You can get a live preview of these effects when you hover over them. So try each effect and make them your own.
9] Loop a PowerPoint Presentation
Slideshows are commonly used for displaying digital photos at weddings or trade shows. On such an occasion, you might want to loop your selected images continuously so that your guests would not be bored. So, let’s find out how to do it.
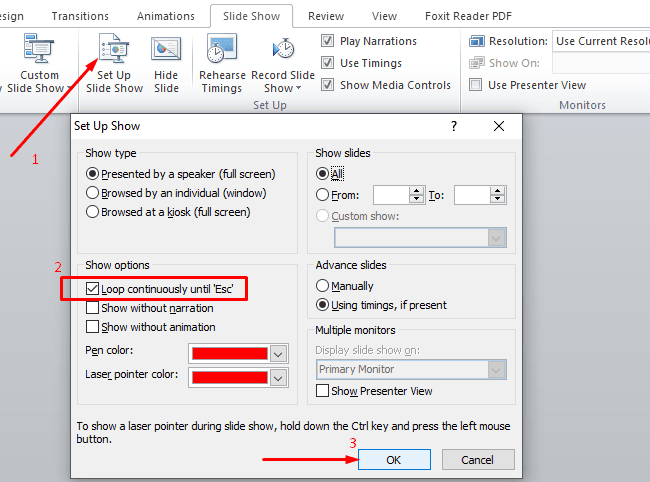
Open your PowerPoint presentation and go to the Slide Show tab.
Click on the Set Up Slide Show button to open the Set up Show page.
Under Show options, mark the checkbox next to the Loop continuously until ‘Esc’.
If you want to loop only specific slides, you can list them in the Show Slides section. Otherwise, simply click on the OK button.
10] Save PowerPoint Presentations as PDF Files
And the last point is about saving the PowerPoint presentation as a PDF file. It becomes quite useful if you urgently need to open your presentation on any other device and, unfortunately, the presentation is not compatible with the included program there.
In such a case, you can save your file as a PDF, which can then be easily opened on any computer. So, let’s see how to do it:
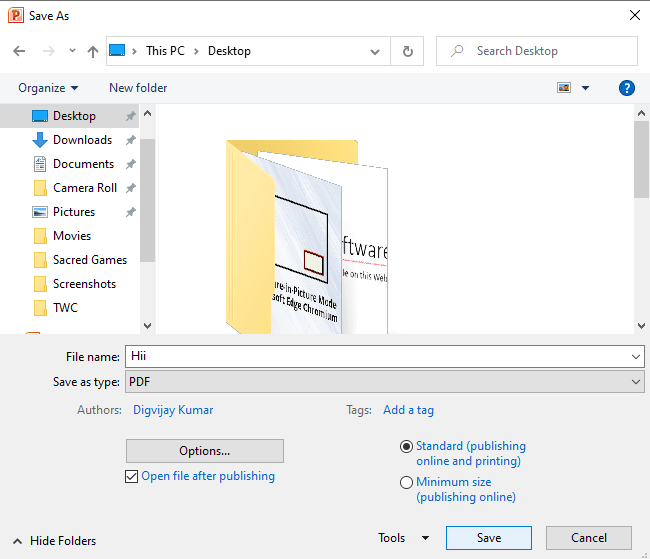
Once you create your PowerPoint presentation then go to the File menu and select Save As option.
In the next window, enter your file name, then select a location to place it.
Thereafter, click the drop-down menu next to the Save as type and then select the PDF option from the list.
If you want to open the PDF file immediately after creating it, you can select the checkbox next to “Open file after publishing”. And then click on the Save button.
Read: PowerPoint Online Tips and Tricks.
