
In this post, we will show you how to limit how much bandwidth is used for downloading updates in the background or foreground by Windows 11/10 using Settings or Group Policy Editor. Windows allows you to limit the bandwidth that your computer can consume for Windows Updates. You can set absolute limits in Mbps or set the limits in percentage using Windows Settings or Group Policy. This can be rather useful if you are on a limited data connection and want to control your data usage. If you are on an unlimited data pack, you may not find this feature very useful.
Every Windows Update that is rolled out includes programs and applications that contain packages with exceptionally large files. As such, downloading and distributing these Windows Updates can consume a sizeable amount of network resources on the devices receiving them. It is for this reason that Microsoft has introduced the Delivery Optimization feature to moderate bandwidth consumption. Delivery Optimization enables Windows 11/10 users to distribute the work of downloading large-file packages among multiple devices in a deployment.
There are two types of downloads in Windows OS: Foreground downloads and Background downloads. Before limiting the bandwidth of foreground downloads, we must understand their properties, after which we will talk about how to limit their bandwidth.
What are Foreground downloads and Background downloads?
Background downloads are downloads that are involuntarily conducted by your operating system. These are usually the updates done on Windows and are automatically downloaded without asking for permission or any user interaction. Whenever there are any update requirements, you see them getting updated right away.
Foreground downloads are the kinds of downloads that one has to start by oneself. A very good example of a manual or foreground download is when we click on Get or a Download button to download an update or an application.
Both foreground and background downloads affect the system’s bandwidth, and if they go beyond a certain limit, they could saturate disk utilization. A good way to find out is by opening Task Manager and checking the disk utilization percentage. If it is in red, we have to limit the downloads to reduce the load on the system; otherwise, it could start hanging and might become totally unresponsive.
How to limit Windows Update bandwidth in Windows 11 in Percentage
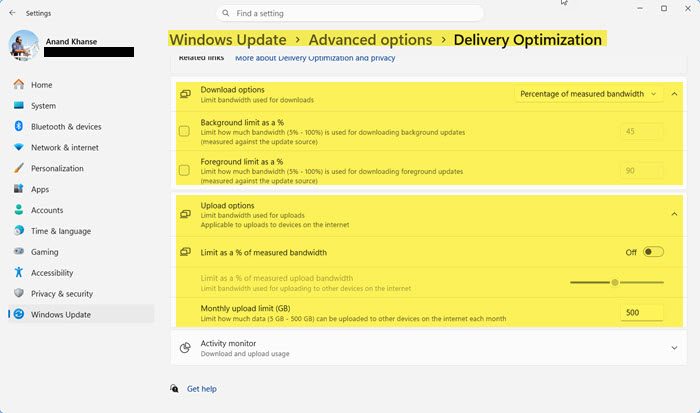
Since Windows 11 has added a lot of settings, the approach and options have changed in the Windows 11 Settings menu. One such case is with the Delivery Optimization options. If you are using a limited data network and don’t want to exhaust all of your data downloading Windows updates, you can set a specific percentage of data that can be used for updating your system. The procedure to limit Windows Update bandwidth in Windows 11 is as follows:
- Right-click on the Start button and select Settings.
- Go to the Windows Update tab on the list on the left-hand side.
- In the right-pane. select Advanced options.
- Scroll down to the menu under Additional options and click on Delivery Optimization.
- Against Download options, you will see a drop-down – select Percentage of bandwidth limit
- Set the Background and Foreground download percentage limits.
- Restart your computer.
Note that you can set network bandwidth limits for foreground as well as background downloads.
Limit Absolute bandwidth that can be used to download Windows 11 Updates in Mbps
Says Microsoft:
By default, we’re dynamically optimizing the amount of bandwidth your device uses to both download and upload Windows and app updates, and other Microsoft products. But you can set a specific limit if you’re worried about data usage.
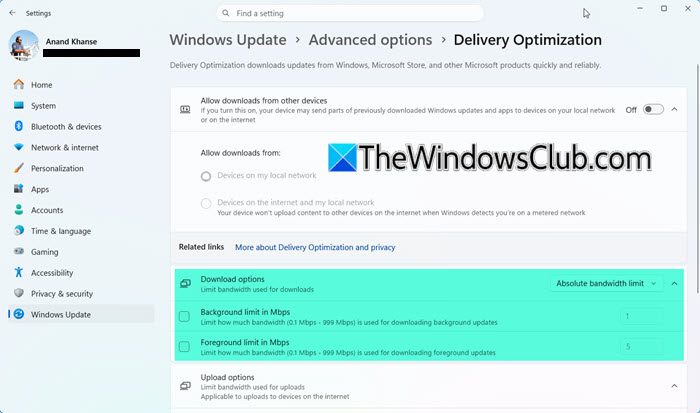
While there are options to mention the percentage of data that can be used to download Windows updates, many users would prefer to specify an exact number of MBs to be permitted for the updates. The procedure to specify absolute bandwidth that can be used to download Windows Updates in Windows 11 is as follows:
- Right-click on the Start button and select Settings.
- In the Settings window, go to the Windows Update tab on the left pane.
- In the right pane, select Advanced options.
- Under Additional options, select Delivery Optimization.
- Against Download options, you will see a drop-down – select Absolute bandwidth limit
- Set the Background and Foreground download limits in Mbps.
Restart your computer.
Limit bandwidth of Foreground or Background downloads in Windows 10 in %
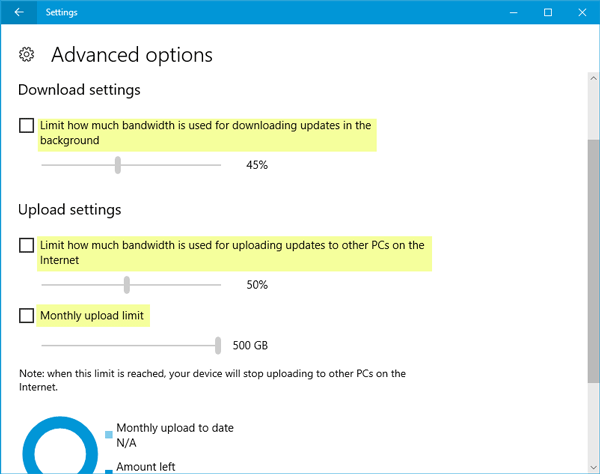
To limit data consumption for Windows Updates in Windows 10:
- Open Windows Settings panel by pressing Win+I button
- Select Update & Security >
- Click Windows Update >
- Navigate to Advanced options (under Update Settings)
- Click Delivery Optimization
- Go to Advanced options.
- You will find Download settings and Upload settings.
Select the checkbox that says, “Limit how much bandwidth is used for downloading updates in the background.” After that, you can select a percentage of the bandwidth. By default, it is set to 45%. But, you can change it using the slider.
Do note that you can set the network bandwidth limits for foreground as well as background downloads.
The same thing can be done with the Upload settings. You would be able to set the Monthly upload limit if you want to limit the uploading bandwidth by either percentage or data (5 GB to 500 GB).
The uploading bandwidth limitation feature works only when you have enabled Allow download from other PCs option that comes under Delivery Optimization. If you haven’t activated this feature, the “Upload Settings” options are not mandatory.
Once the predefined limit is reached, all update activity will stop automatically.
You can also check how much data is used or available on the same page.
Specify Absolute bandwidth that can be used to download Windows Updates in Windows 10
Windows 10 has options configured to dynamically optimize the amount of bandwidth your device uses to both download and upload Windows and app updates and other Microsoft products. However, you can change and define the limit if you’re worried about your data usage.
Click the Start button, choose ‘Settings’, and select ‘Update & Security’ option.
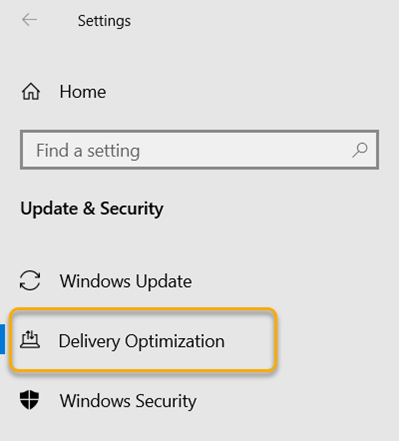
Next, choose the ‘Delivery optimization’ option and switch to the right-panel.
There, click the ‘Advanced options’ link present at the bottom of the screen.
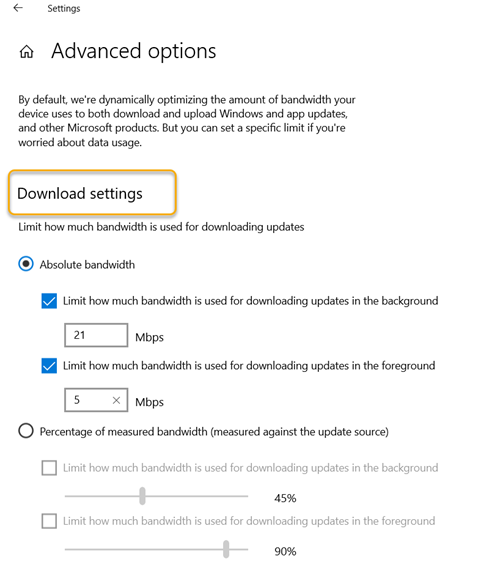
Now, check the ‘Absolute bandwidth’ circle to configure how much bandwidth is used for
- Downloading updates in the background.
- Downloading updates in the foreground.
The values are expressed in megabits per second (Mbps). You can also specify the same in terms of a percentage value by checking the Percentage circle.
Once done, your settings will be saved instantly and applied. Simply close the Settings app and return to your work.
Thus, with the new Absolute Bandwidth options, Windows 11/10 users can have more granular control over their data limits and their usage.
Limit how much bandwidth is used for downloading Windows Updates using Group Policy
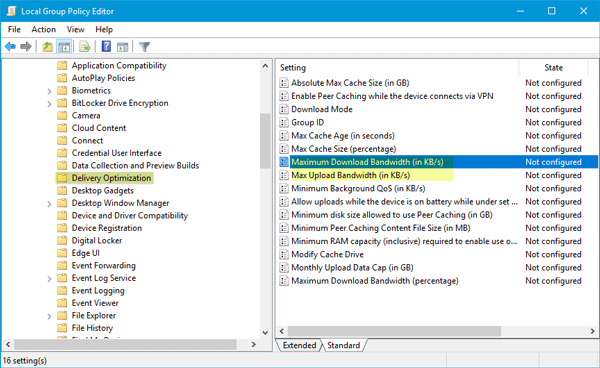
In Windows 11/10, the same feature can be enabled with the help of the Group Policy Editor as well. To open it, press Win+R, type gpedit.msc and hit the Enter button. Next, navigate to the following path-
Computer Configuration > Administrative Templates > Windows Components > Deliver Optimization
On your right-hand side, you will find two different options-
- Maximum Download Bandwidth (in KB/s)
- Max Upload Bandwidth (in KB/s)
Double-click on an option > select Enabled > enter a value in the corresponding box (in KB/s) > click on Apply & OK.
Hope this functionality will be helpful for you to limit Windows Update bandwidth usage in Windows 11/10.
How to limit Foreground downloads using Group Policy in Windows 11
In case we are handling a network of systems managed by a common group policy, we could make changes as follows:
1] Press Win + R to open the Run window and type the command gpedit.msc. Press Enter, and it would open the Local Group Policy Editor.
2] Scroll to the path Computer Configuration > Administrative Templates > Windows Components > Delivery Optimization.
3] On the Settings pane on the right-hand side, double-click on the Maximum Foreground Download Bandwidth (percentage) policy.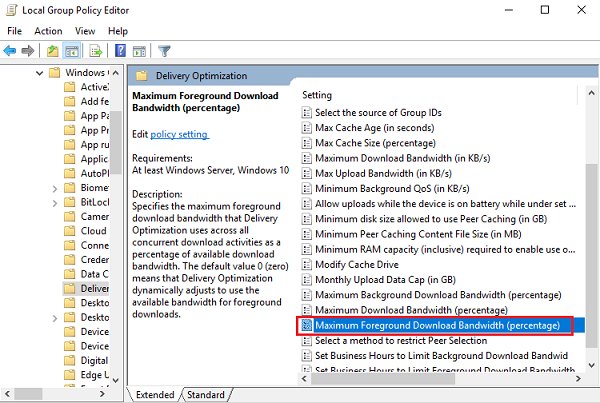
4] Select the radio button at Enabled. Under Options, change the Maximum Foreground Download Bandwidth (percentage) to whatever bandwidth you prefer.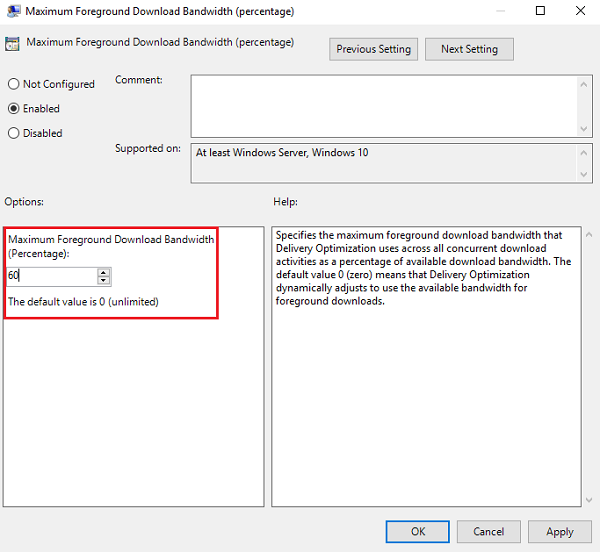
5] Click on Apply and then Ok to save the settings.
And that’s it! You have successfully set the bandwidth of your manual/foreground downloads.
How much data would Windows Updates need?
Just in case you are wondering whether or not to use the mentioned option, a general Windows Update needs hundreds of MBs of data and a featured update would need a few GBs of data. Thus, if you are using a network with limited data, then the mentioned option is the best.
Why should you use this option instead of the percentage of bandwidth one?
In case you have a slower connection, you should use the option that specifies the exact bandwidth allocated to downloading Windows Updates. However, if your computer uses a fast internet connection, then you would want to keep the limit somewhat higher. This is based on the knowledge that a few MBPS of data would be sufficient for the rest of your work.
Does using less bandwidth slow down the Windows Update process?
It depends. Windows updates need a certain amount of bandwidth to download smoothly. Anything higher than that makes no difference. Anything slower would slow down the Windows update process.
Read next: How to manage the Data Usage Limit on Windows.
