If you encounter the error Your current hardware doesn’t support any graphics features when opening Intel Graphics Command Centre or other Intel software on Windows, don’t fret; there’s nothing wrong with the hardware, and it is likely fine. This message usually appears due to a driver conflict or a disabled integrated GPU in the BIOS or Windows, which interferes with the graphics settings. However, this can be easily fixed, and that is what we are going to explore in this guide.

Your current hardware doesn’t support any graphics features Intel error
If you encounter the “Your current hardware doesn’t support any graphics features” error message in Intel software, follow the solutions below.
- Enable the Intel iGPU in BIOS and allocate fixed memory
- Disable Windows automatic driver updates
- Use DDU in Safe Mode to completely wipe remnants and install the OEM graphics driver
- Reinstall Intel Graphics Software
- Verify hybrid graphics settings
Let’s get started with the troubleshooting guide.
1] Enable the Intel iGPU in BIOS and allocate fixed memory
Windows and Intel Graphics Software need the integrated GPU to be physically active and visible at the hardware level. Some gaming laptops or PCs with discrete GPUs set the iGPU to Auto or Disabled in BIOS. This makes the Intel software report that no hardware is supported. To ensure the graphics software detects it properly, we need to manually enable it. For that, follow the steps mentioned below.
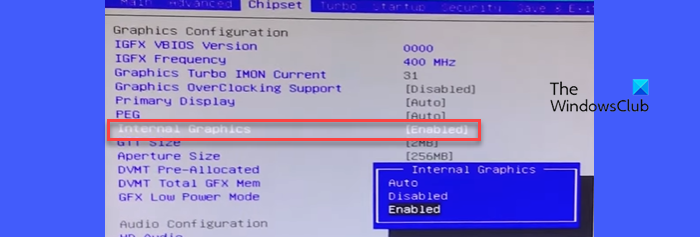
- Reboot the device and enter BIOS/UEFI during boot, and then navigate to Advanced, Chipset or System Configuration based on the different names given by the manufacturer.
- Look for Internal Graphics / Integrated Graphics / iGPU or Multi-Monitor support, and change the setting from Auto to Enabled.
- Find DVMT Pre-Allocated or IGPU Memory and set it to at least 64MB or 128MB, and save the changes.
Exit the BIOS, boot into Windows, and check if the error is gone. If not, see the next solution.
2] Disable Windows automatic driver updates
Windows Update often downloads a newer generic Intel driver or reverts to a Microsoft Basic Display Adapter driver without asking and therefore breaks the Intel Graphics Software again. This error can be resolved by disabling automatic driver updates to prevent Windows from overwriting the carefully installed driver.
- Click Win + R to open the Run dialogue box, type gpedit.msc, and press Enter to open Local Group Policy Editor.
- Navigate to Computer Configuration, click on Administrative Templates, and select Windows Components.
- Next, go to Windows Update, click Manager updates offered from Windows Update, and double-click on Do not include drivers with Windows Updates.
- Set it to Enabled, click Apply, and OK.
Alternatively, if you are using Windows Home Edition, download the wushowhide.diagcab tool from Microsoft, run it, and then click on Hide updates options and select the Intel graphics driver.
Once done, reboot the device and verify the condition. Proceed to the next solution if it remains the same.
3] Use DDU in Safe Mode to completely wipe remnants and install the OEM graphics driver
Uninstalling the Intel graphics driver through Device Manager or the Intel installer leaves behind registry entries, cached shader binaries, and configuration files that often remain hidden on the system. These can conflict with a fresh driver installation, so to eliminate this, we are going to run DDU from Safe Mode to remove them and prevent the software from being tricked.

Follow the steps mentioned below.
- Download Display Driver Uninstaller from the official Wagnardsoft.com website.
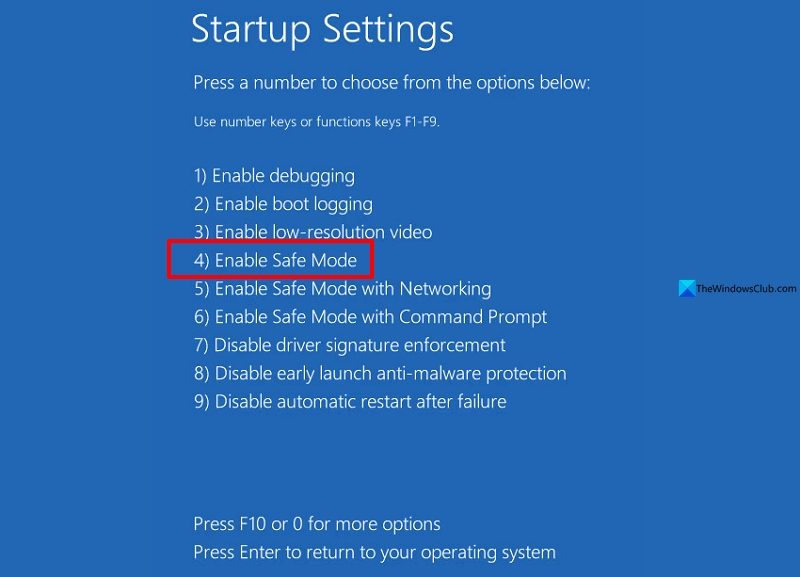
- Restart Windows into Safe Mode by holding Shift while clicking Restart, and then click on Troubleshoot > Advanced Options > Startup Settings.
- Click on Restart and press the 4 or F4 button, and once in Safe Mode, open the DDU folder and run it as administrator.
- Select GPU from the device type dropdown, then choose Intel and click Clean and restart. DDU will remove everything and reboot automatically.
After reboot, we are going to download and install the exact drivers from OEM to restore manufacturer-validated components. This resolves the error by matching the driver to the exact hardware IDs and firmware quirks of the machine and allows Intel software to recognize the GPU as fully supported.
- Identify the device’s model number, and go to the manufacturer’s support website.
- Enter the model, navigate to the Drivers page > Graphics section, and download the listed Intel Graphics driver.
- Disconnect from the Internet to prevent Windows Update from interfering, and then run the OEM installer. Check for the Clean install option if available; otherwise, proceed with the default option.
Once done, restart the PC and connect to the Internet and see if the issue is resolved. If not, go to the next solution.
4] Reinstall Intel Graphics Software

Intel Graphics Software can become corrupted after updates, failed installations, or Store synchronization, even when the graphics driver is functioning correctly. In such a situation, reinstalling the app refreshes its components and rebuilds its configuration files. This also forces a new hardware detection process.
- Press Win + I to open Settings, click on the Apps tab, and then select Installed apps options.
- Search for Intel Graphics Command Centre or Intel Graphics Control Panel, and click on the three dots.
- Select Uninstall, and also uninstall any other Intel Graphics Control Panel.
Note: Do not uninstall anything labeled Intel Graphics Driver under Display adapters in Device Manager. - Restart the device, and reinstall Intel Graphics Command Centre from the Microsoft Store.
Launch the app, and it should now detect the hardware. If it still doesn’t detect it, go to the next solution.
5] Verify hybrid graphics settings
Many modern laptops use hybrid graphics technology, in which both the Intel iGPU and a dedicated NVIDIA or AMD GPU work together. If the system is configured to operate exclusively on the dedicated GPU, the Intel Graphics adapter may remain inaccessible, causing Intel Graphics software to display the unsupported hardware message. It is necessary to confirm the correct graphics mode to ensure that the Intel GPU remains active and detectable.
- Right-click Start, click on Device Manager, and then expand Display adapters.
- Verify you see an Intel entry, and if you see a yellow triangle or a down arrow, right-click on it and select the Enable device option.
- If the Intel adapter is missing entirely, click Action, and select the Scan for hardware changes option. If it’s still missing, users may need to reinstall chipset drivers from the OEM.
- Next, go to Settings > System > Display > Graphics. On the Graphics page, under Custom options for apps, add Intel Graphics Command Centre.
- Once added, click Options and select Power Saving to force Windows to use the integrated Intel GPU instead of any discrete GPU.
Restart the device, then launch Intel Graphics Software; hopefully, there will be no more issues.
That’s it!
Read: Fix Intel Graphics Drivers problems on Windows 11
Should I disable Intel DTT?
No, Intel does not recommend disabling Intel DTT, as it can cause performance fluctuations, unexpected behavior, or overheating. It may also void users’ warranties. Instead, it is recommended to check the BIOS settings to ensure that DTT is enabled and to install the latest drivers from the PC manufacturer.
What is error code 0x8000846B?
Error code 0x8000846B (-2147449749) is a generic error often encountered with the Intel Driver and Support Assistant. It points to a specific installation conflict, typically caused by a corrupted driver environment or leftover files from a previous installation. A common recommended fix is to fully clean the system with a tool like DDU before retrying the driver installation.
Read: Your GPU driver version does not meet the minimum requirements.