If you are interested in programming, you might know Ruby. It is a relatively simple programming language that allows you to write clean and reliable code. However, just like any other programming language, it’s not preinstalled. Therefore, in this post, we will learn how you can install Ruby, Ruby Blunder, and RubyMine on Windows computers.
Install Ruby and Ruby Blunder on Windows 11
As mentioned earlier, Ruby is a simple programming language that you can use on your computer. On the other hand, Ruby Blunder is a dependency management tool for Ruby. It is not a must-have, although, if you are trying to create a project, you might want to install Ruby Blunder and RubyMine along with Ruby.
Install Ruby on Windows
Ruby is a powerful high-level, interpreted programming language that excels in simplicity and productivity. It was introduced to enable developers to create clean and readable code efficiently. Ruby is a top choice for web development, particularly with the Ruby on Rails framework, and it proves to be highly versatile for various applications, including scripting and data processing.
If you want to install Ruby on your computer, follow the steps mentioned below.
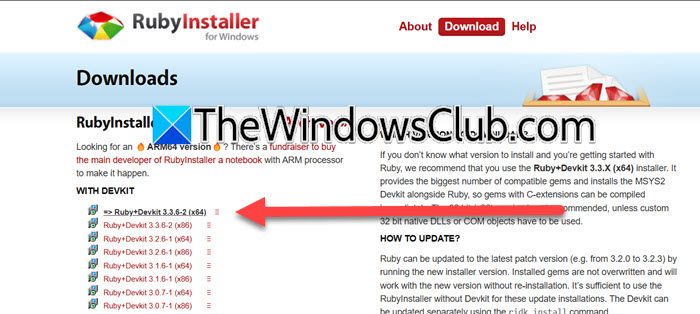
- First of all, you need to navigate to rubyinstaller.org and click on the hyperlink associated with the Ruby version you want to install, we recommend you download the devkit version.
- If you get a warning marking the download as untrusted, click on the three dots, and click on Keep. And then More details > Keep anyway on the Microsoft Defender prompt.
- Now, double-click on the downloaded installation media, and click Yes when the UAC prompt appears.
- Tick I accept the License and click on Next.
- Set the installation destination, tick Add Ruby executables to your PATH, and Associate .rb and .rbw files with this Ruby installation. Click on Install.
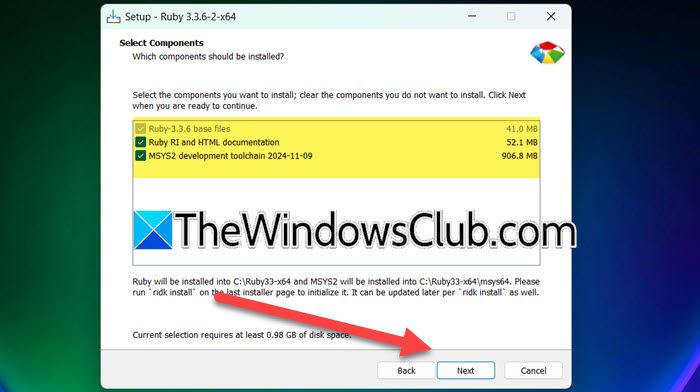
- Select the components you need to install, it’s recommended to select all of them and click on Next to trigger installation.
Wait for a few minutes until the installation process is completed. Once Ruby is installed, click on Finish, and we will go ahead and install MYSYS2 components. Once you click on the Finish button, you will get a cmd prompt, asking you to install MYS2. You can select one of the installers, however, if you are unsure what to install, just type 1, 2, 3, and hit Enter. This is an automated process and it will take some time to update the database, install files, and download and install packages.

Once everything is completed, and you want to check if Ruby is installed, run the following command in CMD to check its version.
ruby -v
If you get the version information, Ruby is installed.
To get started, you can use the following simple command.
puts "Hello World"
Now, let’s go ahead and install other components.
Install Ruby Bundler on Windows
Bundler is a dependency management tool for Ruby applications that ensures your project runs as expected by managing and installing the necessary gems and their specific versions. To get started, you list your required gems and their versions in a Gemfile. When you run `bundle install`, Bundler reads this file, resolves any conflicts, and installs the gems. It also creates a Gemfile.lock file, which locks the exact gem versions used, ensuring consistency across development, testing, and production environments.
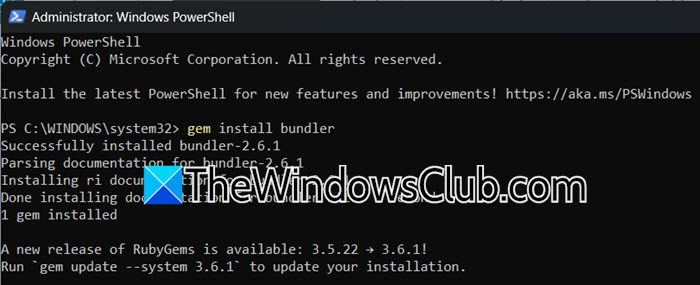
To install Ruby Bundler, open PowerShell as an administrator and then run the following command.
gem install bundler
The process is going to take some time, and once that is done, you will get the following message.
Successfully installed bundler-2.6.1
Parsing documentation for bundler-2.6.1
Installing ri documentation for bundler-2.6.1
Done installing documentation for bundler after 3 seconds
1 gem installed
You can also run the bundler command to know the mode and last write time.
Install RubyMine on Windows
Finally, let us go ahead and install RubyMine. It is a cross-platform integrated development environment (IDE) for Ruby web applications that is maintained by JetBrains. The IDE is written in Java, and it offers features such as Ruby gem management, rake support, code completion, an integrated terminal, syntax highlighting, debugging, and various plugins, that make it a popular choice for Ruby development. To install it, follow the steps mentioned below.
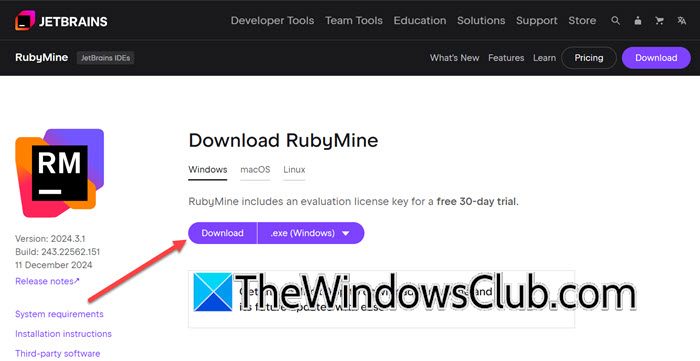
- Navigate to jetbrains.com and download the IDE.
- Once the IDE is downloaded, double-click on the installation media and follow the on-screen instructions to complete the process.
- To create a new project, open RubyMine IDE, go to Projects > New Project, and select the location and framework.
Hopefully, this tutorial will help you set up Ruby and the required tools on your Windows computer.
Read: How to install and run Makefile on Windows 11
How do I install RubyGems on Windows?
On Windows, RubyGems comes included with the actual Ruby installer. When you install Ruby by following the steps mentioned earlier, RubyGems comes installed with it. To access it, all you have to do is open Start Command Prompt with Ruby by searching it out of the Start Menu.
Read: How to install Python in VS Code?
How to start Ruby in CMD?
To start Ruby in CMD, you can run the irb command. This will open an interactive Ruby session where you can run Ruby codes. To run a Ruby script file, navigate to the directory where your script is located using the cd command, and then type ruby your_script.rb.
Also Read: Install NumPy using PIP on Windows 11.