Subnet Mask divides the IP address into two segments and informs the computer which part is the network bit and which one is the host bit. For example, if there is an IP address: 192.168.0.1, it will have 24 host bits and 8 network bits, therefore, its Subnet Masks would 255.255.255.0. Windows allows you to change the Subnet Mask of your IP. In this post, we are going to see how to change the Subnet Mask in Windows 11/10.

What are Subnet Mask and Prefix Length?
Before configuring the Subnet Mask, we first need to understand what it is and what are Prefix Length. Subnet Mask, as discussed earlier, is used to define how many hosts and network bits are there and your IP address.
However, Microsoft computers use a different notation for Subnet Mask called CIDR or Classless Inter-Domain Routing notation, which instead of using the regular format, four groups of numbers, uses Subnet Prefix Length that tells us the number of network bits in an IP making.
For example, if there is a class C IP, its Subnet Mask would be 255.255.255.0 and the Subnet Prefix Lenght would be 24 as there are 24 network bits. Now that we know what are Subnet Mask and Prefix Lenght, let us learn how to change them.
How to change the Subnet Mask in Windows 11/10
To change the Subnet Mask on your computer, the first thing you need to know is if your IP is static. In case, your IP is not static, follow the instruction mentioned in this post to set a static IP address.
Follow any of the prescribed methods to alter the Subnet Mask in Windows 11.
- Change Subnet Mask using Windows Settings
- Change Subnet Mask using Control Panel
- Change Subnet Mask using PowerShell
- Change Subnet Mask using Browser
Let us talk about them in detail.
1] Change Subnet Mask using Windows Settings
Windows Settings is a great way to control your computer and alter it the way you want. It also allows you to change the network settings including the Subnet Masks. To do the same, follow the prescribed steps.
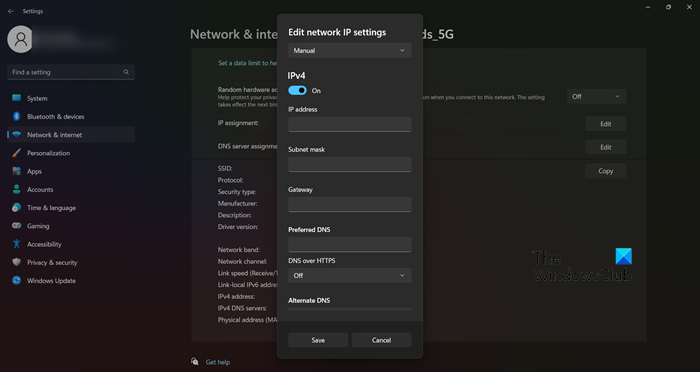
- Open Settings by Win + I.
- Go to Network & Internet and select WiFi or Ethernet (the one you are using).
- Click on the network that you are connected to.
- Select the Edit button placed next to the IP assignment.
- Select Manual from the drop-down menu.
- Turn on the toggle for the IP version you are using.
- Finally, you can edit the IP address, Subnet mask, Gateway, and the (Preferred) DNS.
Enter the correct information in their corresponding field and you will be good to go.
2] Change Subnet Mask using Control Panel
Just like Settings, Control Panel on your Windows device allows you to configure your computer the way you want. We can also configure the network settings, including IP and Subnet masks using the Control Panel. So, if you are really a fan of Settings or just want an alternative option, follow the prescribed steps to configure the network settings and change the Subnet mask via Control Panel.
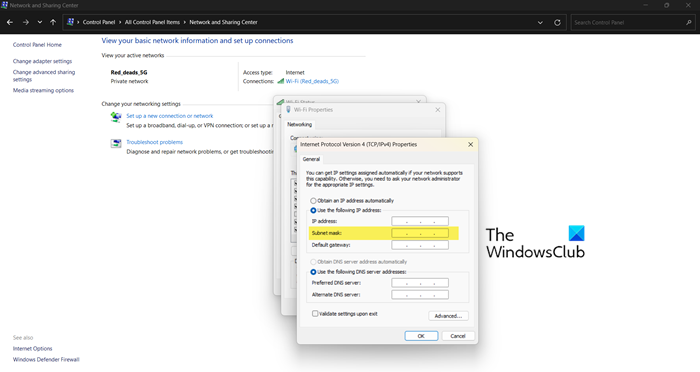
- Hit Win + R, type Control, and hit Enter.
- Set the View by to Large icons.
- Click on Network and Sharing Center.
- Select the network you are connected to from Connections.
- Click on the Properties button.
- Double-click on Internet Protocol Version 4 (TCP/IPv4) or Internet Protocol Version 6 (TCP/IPv6).
- Check the box associated with Use the following IP address.
- Now, enter all the required values including the Subnet mask.
Hopefully, this will do the job for you.
3] Change Subnet Mask using PowerShell

If you are someone familiar with Windows command-line interpreter PowerShell then we have a way that you can use to change the Subnet Mask. To do the first, open PowerShell as an administrator. You can do the same by searching out PowerShell from Start and selecting Run as administrator. Once you have launched PowerShell in elevated mode, run the following command.
Get-NetAdapter -physical
This command will all the network adapters installed on your system. You then need to copy the Interface Index value of the network you want to change the Subnet Mask of. Finally, enter it into the following command and you will be good to go.
Set-NetIPAddress -InterfaceIndex <ifIndex value that we copied> -PrefixLength <prefix length of subnet mask>
For example, in my case, the ifIndex value of the network is 19, so the command I have to enter to make the Prefix Length of Subnet mask 24 would be Set-NetIPAddress -InterfaceIndex 19 -PrefixLength 24. You can adjust the command the way you want and you will be good to go.
4] Change Subnet Mask using Browser
If you are using a home network, you can use the browser and go to the ISP portal and change the network settings. This might not be possible if your ISP has blocked users from accessing the portal, but if not, then it could be one of the easiest methods. So, first, find out the IP address of your router, then open a browser, paste the Default Gateway or IP address, log in using the credentials given to you and then change the Subnet Mask.
Hopefully, now you know how to change the Subnet Mask or Subnet Prefix Length on a Windows computer.
Read: Failed to obtain an IP address from DHCP Server
How do I find my subnet mask on Windows 11?
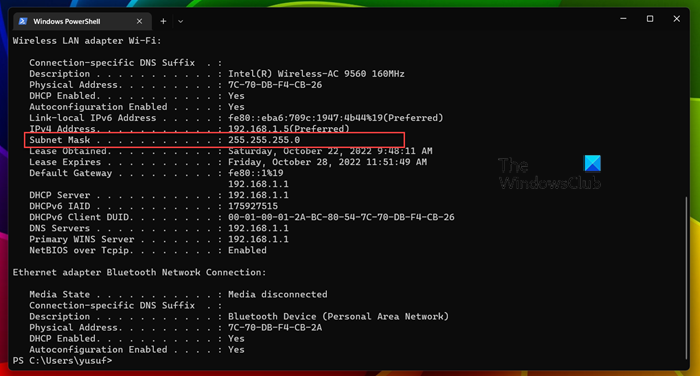
One of the easiest ways to find out your Subnet Mask is by using the Command Prompt or PowerShell on your Windows computer. All you have to do is open PowerShell or Command Prompt as an administrator and then run the ipconfig /all command. This command will tell you every single detail about all the network adapters connected to your computer including their Subnet Mask.
How do I change my subnet mask?
There are various ways to change your computer’s subnet mask, we have mentioned most of them in this post. So, you can just pick the one you like and change the Subnet Mask of your computer or Subnet Prefix Length as Microsoft likes to call it. Hopefully, you will be able to do the task pretty easily.
Read: How to configure & set up Router Firewall settings.