
Chkdsk is a built-in command-line utility in Windows 11 that helps you check your disk for logical errors and bad sectors. If a hard drive has logical errors and bad sectors, it may result in file corruption, slow performance, and potential data loss. This is because the hard drive struggles to read and write data properly. Some users have found some of their folders and files missing after running a ChkDsk scan. This is a common issue when using the Chkdsk utility. That’s why it is always recommended to back up your data before repairing your hard drive with Chkdsk. If some of your data goes missing after running the chkdsk scan, this article will help you get those files back.
Why are my files and folders missing after running ChkDsk?
If CHKDSK finds cross-linked file names, lost clusters, or corrupted directory entries, it detaches them from your folder structure to keep the file system consistent. Additionally, recovered fragments or detached files are often stripped of their original names and extensions and dumped into a hidden root folder named FOUND.000 (or FOUND.001, etc.) as .chk files. Also, if your hard drive or SSD has physical wear or unreadable bad sectors, CHKDSK may mark those areas as unusable and consequently cut off access to any data.
Folders and files missing after running a ChkDsk scan in Windows 11
If you find some of your folders and files missing after running a Chkdsk scan, don’t panic, as your data is not permanently deleted. You can still recover your missing files. However, there is no guarantee that you can recover all missing files after a Chkdsk scan. This totally depends on the severity of the data corruption. Use the following fixes and see if you can recover your missing files:
- Look for hidden files and folders
- Use a third-party data recovery software
Let’s start.
1] Look for hidden files and folders
When Chkdsk finds corrupted files during the scan, it saves them in hidden folders named FOUND.000, FOUND.001, and so on. Some of the corrupted files may also have a .chk extension. Chkdsk marks these FOUND folders as system folders. That’s why they remain hidden by default. To make these folders visible, enable the Hidden files and folders option in File Explorer. If this does not make the FOUND folders visible, you need to unhide the protected operating system files. Follow these steps:

- In File Explorer, click on the three dots on the ribbon and select Options.
- Go to the View tab.
- Uncheck the Hide protected operating system files checkbox.
The FOUND folder(s) should now be visible on your hard drive. If Chkdsk has created multiple FOUND folders, you need to open them one by one to recover your files.
If you get a permission error while opening the FOUND folders, take complete ownership of the folders. Now, back up all your data from these folders to another storage device. These FOUND folders may contain multiple subfolders. If so, open each subfolder and look for your missing files.
2] Use a third-party data recovery software

You can also use third-party data recovery software to recover your missing files. Many free Data Recovery tools are available that can help you recover your lost or deleted files. You can use any of them. The time the software takes to recover your lost data depends on its size. If your missing data includes videos or large files, recovery will take longer. Therefore, do not interrupt the process.
Mistakes to avoid after running the Chkdsk scan
If you find some of your files missing after running the Chkdsk scan, avoid the following mistakes, as they can lead to permanent data loss.
- Copying or downloading new files on the affected hard drive: This is another big mistake that can result in permanent data loss. When you delete a file on a hard drive, it is not permanently deleted. The data remains in the hard drive clusters. Data Recovery software reads these clusters to recover your missing or deleted files. Copying or downloading new files may overwrite these clusters, making data recovery impossible.
- Running the Chkdsk scan again: Finding missing data may put you in a panic state, which can lead to mistakes. Some users think running Chkdsk again on the same hard drive may recover the missing files. Do not make this mistake, as it may result in permanent data loss.
- Formatting the hard drive: People often panic and format the hard drive partition, thinking it will fix the error. Formatting completely wipes out any remaining data.
- Editing the raw data: Another mistake users often make is editing the raw data directly. Editing the raw files created after the Chkdsk scan may corrupt the data further or permanently damage the file headers, making successful recovery impossible. Always create a backup copy of the raw .chk files on a separate hard drive before attempting to rename or edit them.
How to recover files from .chk extension
The files created by the Chkdsk utility have the .chk extension. Hence, you can recover those files in the following two ways. Before doing any of these, make a copy of your files and keep the originals untouched.
1] Changing their extensions manually
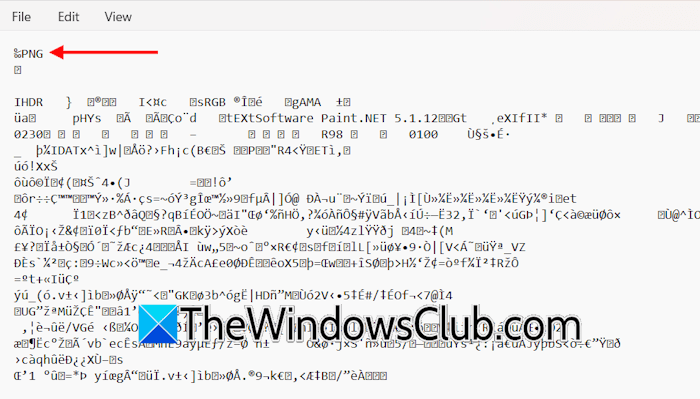
You can try changing the .chk file extensions to their original extensions and see if this restores them in their original state. But without knowing their original extension, you cannot perform this action. For example, the .chk file you have selected may be an image file, a video file, or a PDF file. Changing the extension to another incorrect format may further corrupt the file. To find the file’s original extension, open it in Notepad. You will see the original extension at the top (see the screenshot above). Once you know the right file extension, follow these steps:
- Click View > Show > File name extensions.
- Right-click on the file and select Rename.
- Replace the .chk extension with the original file extension.
- Press Enter.
- Click Yes in the warning prompt.
2] Using a third-party software
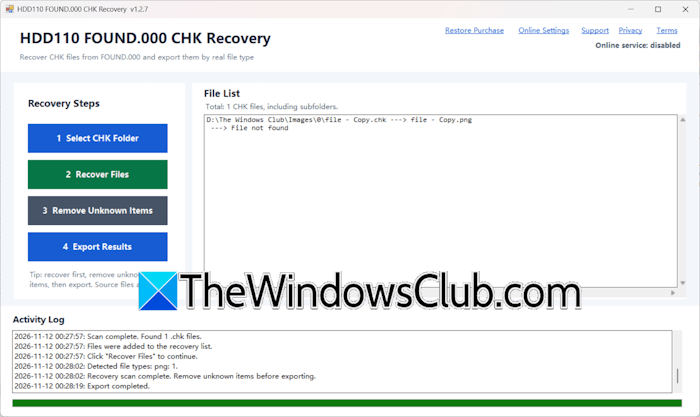
FOUND.000&chkRecovery is a Microsoft Store app that helps you restore the .chk files to their original state. Open the app and select the folder containing all the .chk files. It will automatically scan the selected folder and upload all the .chk files. After that, click the Recover files button. When the recovery is completed, export the recovered files to any storage device.
I hope this helps.
After ChkDsk drive not accessible
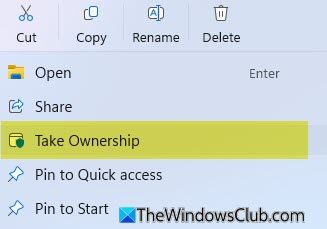
If a Drive is not accessible after using ChkDsk, if could happen if the file system has become RAW or you see Access is denied permission. First, add a Take Ownership option to your right-click context menu using our Ultimate Windows Tweaker, and then take ownership of that drive and see if that helps. Additionally, you may need to use specialized data recovery software to scan the drive and extract your files
Chkdsk deleted my files
If Chkdsk finds corrupted files while scanning your hard drive, it repairs and moves them to a protected folder named FOUND.000. Chkdsk may also create multiple FOUND folders. These folders are protected and hidden by default. So, when you open your hard drive and can’t find some files, you may think Chkdsk deleted them. You can recover your missing files from the FOUND folders. However, if you don’t find your files there, you can use data recovery software to recover them.
What if files disappeared after Chkdsk?
If your files disappear after the Chkdsk scan, do not run the scan again. Unhide the protected operating files. Now, open the FOUND folder. You will find all the disappeared files there. Copy them to an external storage device. You can also use data recovery software to recover your missing files.
Read next: Unable to determine volume version and state, CHKDSK aborted.
