Your GPU has complex work to do, so many processes related to it are running in the background. Some NVIDIA users are complaining that nvcontainer.exe aka NVIDIA Container is consuming a lot of resources. In this article, we will address this issue. If NVIDIA Container is showing high Disk usage on your Windows 11 or Windows 10 computer, this post is for you.

Why is my NVIDIA Container using so much Disk?
Users reporting this issue are split into two groups. One sect is complaining about NVIDIA Container high Disk usage while gaming. On the other hand, the other section is experiencing the issue in question with no apparent pattern.
The major cause of this issue is the corrupted driver file. The reason they became corrupted is puzzling, but the solution is not. We will provide the solution later in this article. On this point, we also note that outdated drivers can cause this issue. Before reinstalling, you should update the drivers and see if that resolves the issue.
Fix NVIDIA Container high Disk, GPU, Memory usage in Windows 11/10
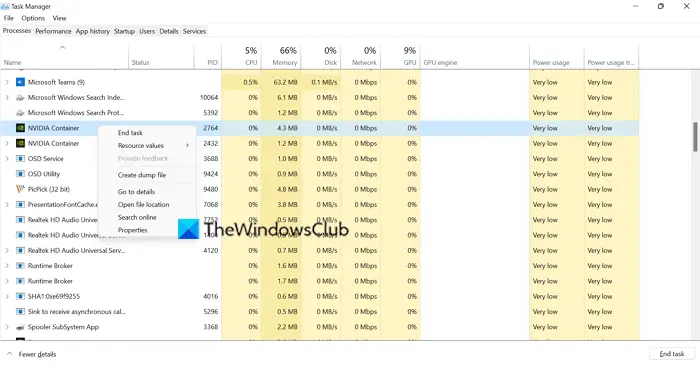
Before proceeding with a potential solution, suspend NVIDIA Container, restart your computer, and confirm whether the issue persists. Open Task Manager by Ctrl + Shift + Esc, right-click on the process and click End task. Finally, restart your computer. After completing these steps, check whether NVIDIA Container is still consuming your resources. If the issue persists, proceed to the solutions.
If NVIDIA Container shows high Disk, GPU, or Memory usage, use the following solutions in any order to resolve the issue.
- Update your Graphics Driver
- Reinstall the driver
- Scan for Viruses and Malware
- Disable GeForce Overlay
- Delete GeForce Experience
- Restart Service
- Rename NVIDIA Container
Let us talk about them in detail.
1] Update your Graphics Driver
As mentioned earlier, let us start with the most basic solution of them all, we are going to update your Graphics Driver to the latest version and see if that works. This way, if the issue is because of a bug, then it will be resolved. Following are two ways to update the Graphics Drivers on a Windows computer.
- Check for Windows update and install it if available. This will automatically update all the drivers.
- Download the latest version of the NVIDIA driver from the manufacturer’s website.
After updating the driver, restart your computer and see if the issue persists.
2] Reinstall the driver
If the update is unsuccessful, the driver on your computer may be corrupted rather than outdated. Please reinstall the driver and see if that resolves the issue. So, go to Device Manager, uninstall the Display Driver and then reinstall it. Hopefully, it will resolve the issue for you.
3] Scan for Viruses and Malware
Another reason that can trigger the issue is the presence of viruses or malware. The legit nvcontainer.exe process is located in the following folder:
C:\Program Files\NVIDIA Corporation\NvContainer\
If located elsewhere, it could be a virus. You can scan your computer with your antivirus or use Windows Security to do the same. Follow the steps below to scan for viruses and malware using Windows Security.
- Open Windows Security by searching it out of the Start Menu.
- Go to Virus & threat protection.
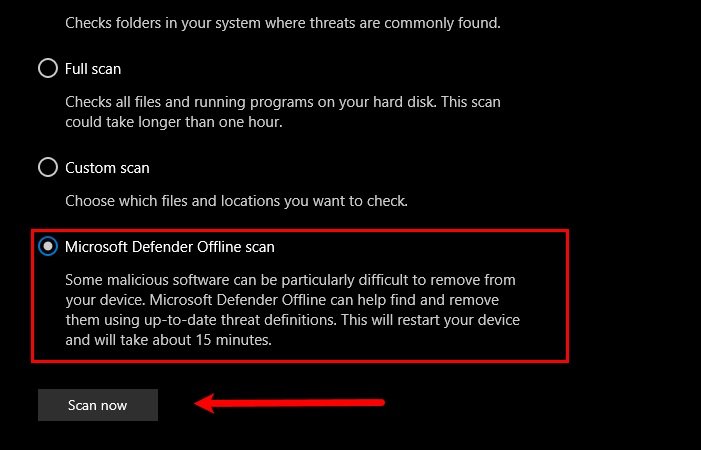
- Click Scan options.
- Select Microsoft Defender Offline scan > Scan now.
Wait for the process to complete and check if the issue persists.
4] Disable GeForce Overlay
The In-Game Overlay is useful for gamers as it allows them to access some GeForce exclusive features. However, it adds weight to your computer and forces it to allocate some resources to the process. If you are complaining about high Disk usage, then try the following steps to disable In-Game Overlay.
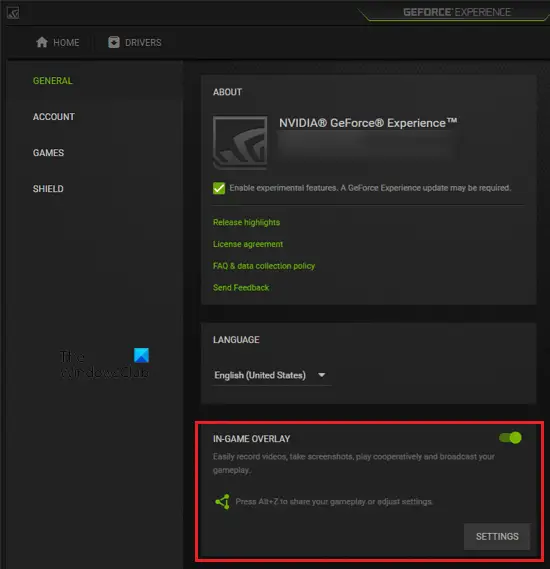
- Open GeForce Experience
- Click on the cog button to enter the Settings.
- Go to GENERAL and disable IN-GAME OVERLAY.
Finally, restart your computer and check if the issue persists.
5] Delete GeForce Experience
If disabling the Overlay is ineffective, we will try deleting GeForce Experience. Even though it comes with the driver, it is there to automatically update it. However, there are other methods by which you can update the driver (we have mentioned earlier). So, we would recommend you uninstall GeForce Experience and see if it works.
6] Restart Service
The issue can be because of a glitch and to resolve it, we need to restart NVIDIA Display Container Local System Service. Open Services, look for Nvidia Display Container Local System, right-click on it and select Stop. Restart your computer, right-click on the same service and click Start. Hopefully, your issue will be resolved.
7] Rename NVIDIA Container
Many people recommend deleting NVIDIA Container. You can do that, but to get it back, you need to hustle. There are many things you need to hustle for. Please rename the NVIDIA Container. Open Task Manager, right-click on NVIDIA Container and select Open File Location.
Then, right-click on the nvcontainer.exe or nvdisplay.container.exe file and select Rename. Name it “nvcontainer_.exe” and hit Enter.
Hopefully, this will resolve the issue for you.
Should I disable NVIDIA Container?
NVIDIA Container is an important feature that allows other GPU-related programs to run properly. So, you should not disable it, unless it is causing an issue. Such as the one we are discussing. Still, we recommend reviewing the solutions mentioned earlier before taking this step.
Also check: