If you’re a system administrator or someone who relies on batch files to automate tasks, you’ve probably encountered situations where things go wrong because a script gets changed while it’s running. Well! Not anymore. In this post, we are going to see how to enable or disable Enhanced Security and Performance for Batch and CMD files using Registry Editor, Reg script, and CMD..
Enable or disable Enhanced Security and Performance for Batch and CMD files
The Enhanced Security and Performance feature is available in recent Windows 11 versions, allowing admins to prevent batch and CMD files from being modified while they’re executing. When enabled, Windows locks the file for the duration of its execution, preventing any external process from altering it mid-execution.
This feature not only improves security but also enhances performance. When Code Integrity is enabled, like in systems using Application Control policies, Windows checks the digital signature of each command in a batch file. This creates a lot of extra work. With the new improvement, Windows verifies the signature only once at the start of the file’s execution, reducing overhead.
To enable or disable Enhanced Security and Performance for Batch and CMD files, follow the steps below.
- Using Registry Editor
- Using Notepad
- Using CMD.
Let us talk about them in detail.
1] Configure Enhanced Security and Performance using Registry Editor
Our first option is to make registry changes to edit Enhanced Security and Performance. However, before making such changes, it is crucial to create a registry backup. To do so, open Registry Editor, click on File > Import > Save the file somewhere accessible.
Then, go to the following location.
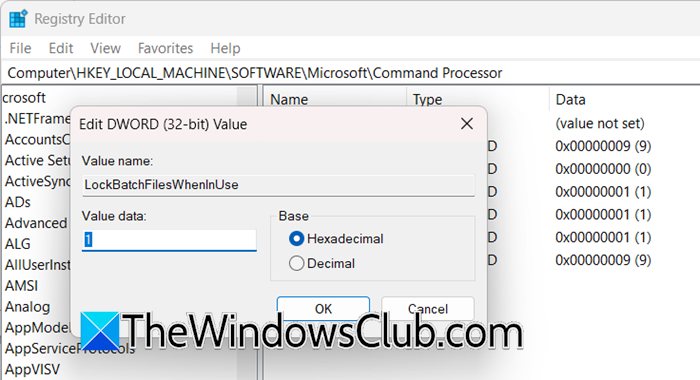
HKEY_LOCAL_MACHINE\SOFTWARE\Microsoft\Command Processor
In the right pane, you’ll need to create or modify a DWORD value named LockBatchFilesWhenInUse.
- To enable the feature: Set its value to 1.
- To disable the feature: Set its value to 0, or simply delete the value if it exists.
Click OK and close Registry Editor. The change takes effect immediately.

Note: Before editing the registry, consider exporting the Command Processor key as a backup. This lets you restore the original setting quickly if the new feature causes unexpected issues with your existing batch scripts.
2] Configure Enhanced Security and Performance from Notepad

If you don’t want to fiddle with the Registry Editor and want a script to do it for you, we have a method.
Open Notepad and paste the following lines of code (separate files need to be created).
Enable_LockBatchFilesWhenInUse
Windows Registry Editor Version 5.00

[HKEY_LOCAL_MACHINE\SOFTWARE\Microsoft\Command Processor]
"LockBatchFilesWhenInUse"=dword:00000001
Disable_LockBatchFilesWhenInUse
Windows Registry Editor Version 5.00

[HKEY_LOCAL_MACHINE\SOFTWARE\Microsoft\Command Processor]
"LockBatchFilesWhenInUse"=dword:00000000
To use the .reg file, first, save it to your desktop. If your Smart App Control is enabled, make sure to unblock the file after downloading. Next, double-click the .reg file to merge it. When prompted, click Run, then Yes for User Account Control, and choose Yes and OK to confirm the merge. Once done, you can delete the .reg file if you want.
If you plan to deploy this setting across multiple computers, using a .reg file is efficient. However, test the .reg file on a single machine first to confirm that no scripts break when file locking is enabled.
3] Configure Enhanced Security and Performance using CMD
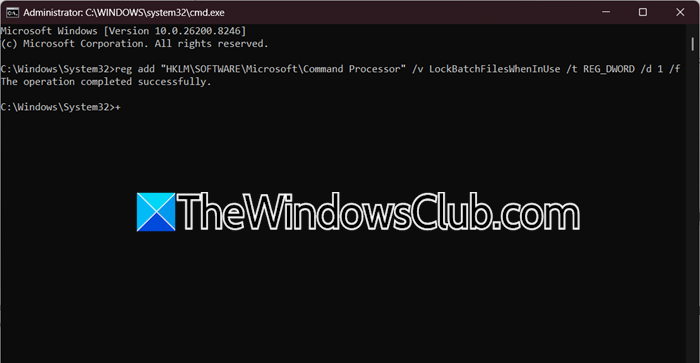
If you prefer the command line, you can do it via an elevated Command Prompt or PowerShell.
Open Windows Terminal (Admin) or Command Prompt (Admin).
To enable the feature, copy and paste the following command and press Enter:
reg add "HKLM\SOFTWARE\Microsoft\Command Processor" /v LockBatchFilesWhenInUse /t REG_DWORD /d 1 /f
To disable the feature, use this command instead:
reg add "HKLM\SOFTWARE\Microsoft\Command Processor" /v LockBatchFilesWhenInUse /t REG_DWORD /d 0 /f
Alternatively, to remove the setting entirely:
reg delete "HKLM\SOFTWARE\Microsoft\Command Processor" /v LockBatchFilesWhenInUse /f
That’s all there is to it. Once enabled, your batch and CMD files will run in the new secure, locked-down mode. Keep in mind this feature is still relatively new, so if you’re running a production environment, test it first to ensure it doesn’t conflict with any existing workflows that might rely on modifying scripts on the fly.
Read: Enable Enhanced Sign-in Security (ESS) in Windows 11
How to enable high performance in CMD?
To enable the High Performance Power Plan via the Command Line, open Command Prompt as an administrator and run the command powercfg -duplicatescheme 8c5e7fda-e8bf-4a96-9a85-a6e23a8c635c, which will reveal the plan so you can then select it from the Power Options control panel.
Read: How to schedule Batch File to run automatically on Windows 11
How to enable 4688?
To enable Windows security event 4688 (process creation auditing), you must configure two Group Policy settings: first, enable Audit Process Creation under Computer Configuration > Windows Settings > Security Settings > Advanced Audit Policy > Detailed Tracking, and second, enable Include command line in process creation events under Computer Configuration > Administrative Templates > System > Audit Process Creation to also log command-line details.
Also Read: Run Batch Files silently in background on Windows.