Microsoft along with many other tech giants is trying to make Artificial Intelligence and Machine Learning adjust according to the user. Be its speech recognition, Automatic Learning, etc. Microsoft is trying to embed as many features in their Windows OS as they can.
What is Automatic Learning in Windows?
Automatic Learning allows the computer to keep an eye on your handwriting and vocabulary in order to alter your message accordingly. This feature is good for the most part as it can save you a lot of time. In this article, we are going to see how to enable or disable Automatic Learning in Windows 11/10.
Enable or Disable Automatic Learning in Windows 11/10
These are the ways by which you can enable or disable Automatic Learning in Windows 11/10.
- Using Group Policy Editor
- Using Registry Editor
Let us talk about them in detail.
1] Using Group Policy Editor
The Local Group Policy Editor in Windows allows the users to alter many different policies and one can easily enable or disable Automatic Learning in Windows 10 with it. So, without further ado, let us check, how to enable or disable Automatic Learning in Windows 10 with Local Group Policy Editor.
Launch Local Group Policy Editor by searching it out of the Start Menu and navigate to the following location.
User Configuration > Administrative Templates > Control Panel > Regional and Language Options > Handwriting personalization
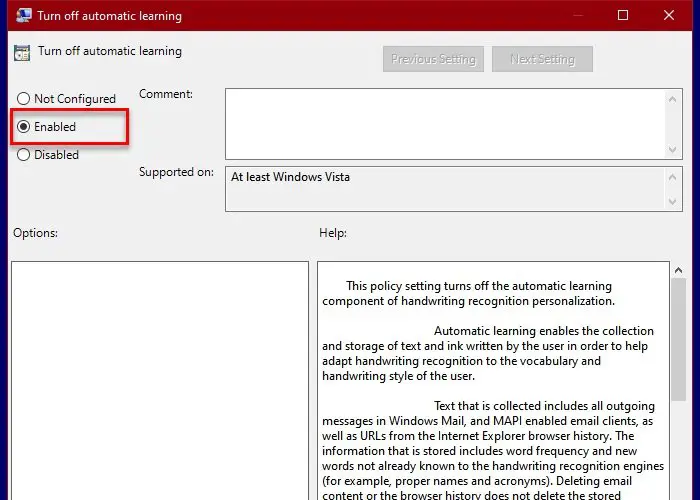
Now, double-click on “Turn off automatic learning”, select Enabled, and click Apply > Ok. This way you can disable the Automatic Learning feature.
To enable go to the same location, just select Disabled after double-clicking “Turn off automatic learning”.
2] Using Registry Editor

If you have a Windows 10 Home, you won’t have Group Policy Editor. In that case, you can use Registry Editor for the same. Let us see, how to enable or disable Automatic Learning with Registry Editor.
Launch Registry Editor by searching it out of the Start Menu and navigate to the following location.
Computer\HKEY_LOCAL_MACHINE\SOFTWARE\Policies\Microsoft
If you can find “InputPersonalization”, click on it.
If not, right-click on Microsoft and select New > Key. And then name the newly created Key, InputPersonalization.
Right-click on InputPersonalization , select New > Dword (32-bit), and name it “RestrickImplicitTextCollection”.
Similarly, create another value and name it “RestrictImplicitInkCollection”.
Now, double-click on both values simultaneously and set the Value data to 1, and click Ok.
This way you have disabled Automatic Learning in Windows 11/10.
To enable it, set the Value data of both of these values to 0.
Restart your computer.
That’s it.
Read Next: How to stop Microsoft from tracking you on Windows.