In our guide on how to set up Windows Print Server, we talked about sharing Printer resources across the organization. However, with the help of the Internet Printing Protocol (IPP), we can print documents over the Internet or Intranet using our browsers. In this post, we will see how you can enable and configure Internet Printing on Windows Server.
Enable and configure Internet Printing on Windows Server
The Internet Printing Service on Windows Server allows users to manage and print documents over the internet or an intranet using a web browser. This service leverages the Internet Printing Protocol (IPP) encapsulated in HTTP, enabling remote printing capabilities. It allows the administrator to manage printers and print jobs through a web interface and it works with any IPP-compatible printer.
To enable and configure Internet Printing on Windows Server, follow the steps mentioned below.
- Install Internet Printing along with the required roles and features
- Share your printer
- Connect to shared Printer
Let us discuss them in detail.
1] Install Internet Printing along with the required roles and features

Internet Printing is a Role Service which is a part of the Print and Document services which is a Server Role. We also need to install a Web Server (ISS) Role. To do so, follow the steps mentioned below.
- Open the Server Manager.
- Click on Add roles and features.
- Click on Next once the Add Roles and Features wizard pops up.
- Now, select Roles-based or feature-based installation and click on Next.
- Select the server and click on Next.
- Once you are on the Server Roles tab, tick Print and Document Services.
- You will get a pop-up, click on Add Features.
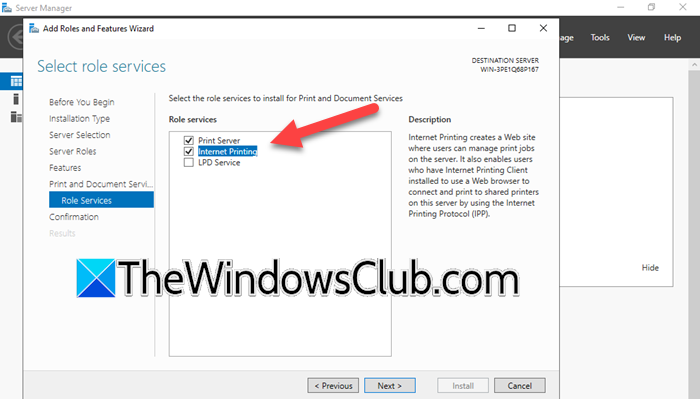
- Keep clicking on Next until you reach Role Services, tick Internet Printing, and then click on Add Features; click on Next.
- If you get a prompt to select features for the Web Server Role (ISS), keep the default settings.
- Once you are on the Confirmation tab, click on Install.
Wait for the installation to complete and then close the Server Manager if required.

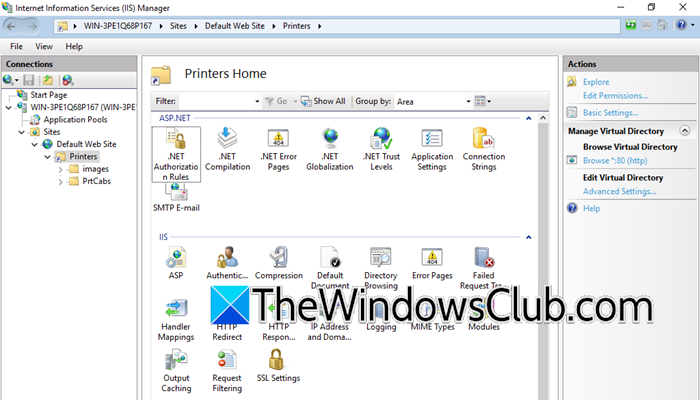
When you open the Internet Information Services (IIS) Manager, you will notice that the Default Web Site includes a Printers virtual directory configured by default.
2] Share your printer

You can go ahead and share your printer. Sharing the printer resource is actually pretty simple, if you have ever shared your printer even on a local network, we are going to do the same thing.
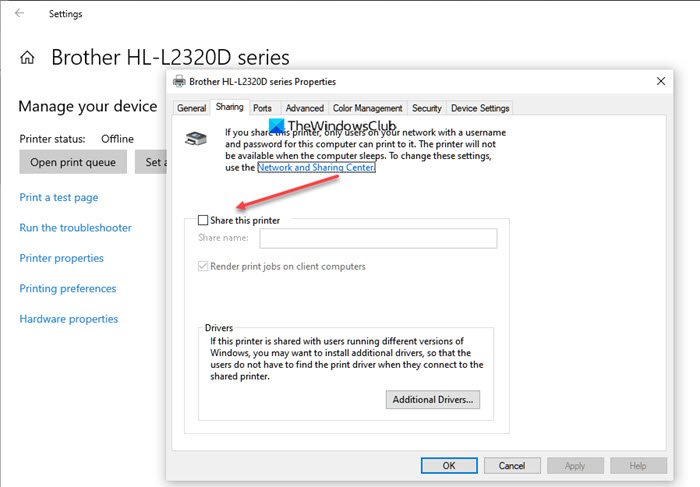
You just have to right-click on the printer in the Print Management console and select Properties. Then, go to the Sharing tab and tick the box associated with Share this printer.
When you share a printer using the standard print-sharing features in Windows Server, it becomes accessible on the Internet Printing site for users to connect. Access permissions will be governed by the settings in the Security tab of the shared printer, which determines which users are allowed to connect.
3] Connect to shared Printer
After you have enabled the Share this printer option, the printer will be listed on the Internet Printing ISS site. In order to access it, you can either navigate to the IP address or FQDN of the IPP Windows Server with /printers, so, it would be http://<server-name>/printers or http://<server-ip>/printers/. Any user, who’s a part of the domain, can access the printer from any browser, and then download the necessary drivers and add the printer to their local system.
After navigating to the server with the /printers virtual directory, we can see the shared printer listed there. Under the printer’s properties link, you will find the Network Name used to connect to the printer. Additionally, you will see the standard printer actions available to IT administrators and others with the appropriate permissions.
To view the printer properties, access the Internet Printing website. To connect a Windows client to the printer using the Internet Printing Protocol (IPP), open the client computer and use the network name displayed in the printer’s properties on the Internet Printing IIS site. You can connect by selecting the option to share a printer by name and entering the network name.
Hopefully, you can configure Internet Printing with the help of the tutorial mentioned here.
Read: Switch Network printing between TCP and RPC in Windows 11
How do I enable print logging in Windows Server?
To enable Print logging, we need to use the Event Viewer. To do this, open Event Viewer, go to Applications and Services Logs > Microsoft > Windows > PrintService, then, right-click on Operational, tick the box next to Enable Log and then increase the Maximum log size (KB), and then click on Ok. In order to do this, enable it, open Local Group Policy Editor, go to Computer Configuration > Administrative Templates > Printers, and then enable Allow job name in event logs.
Read: How to share and add Network Printer in Windows
How to enable Microsoft internet printing?
To enable Internet Printing on Windows Server, you need to install Print and Document Service which is a Server Role. When you do that, you get an option to install Role Services, and there you need to enable Internet Printing. Once you do that, configure it, and you will be good to go, consider checking out the aforementioned post to know more.
Leave a Reply