
OneDrive is regarded as one of the leading cloud storage services. It is most commonly used by the enterprise, bundled with the Microsoft 365 subscription, although many users also use it for their personal accounts. One issue some users are reporting is seeing duplicate OneDrive folder icons in File Explorer. This turns out to be a nasty bug that can often confuse users about its existence.
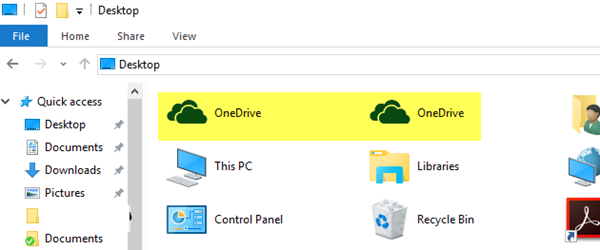
Duplicate OneDrive folder icons in File Explorer
The following reliable workarounds and fixes might help you get your computer in the way that you intend to:
- Reset OneDrive.
- Relink the OneDrive account.
- Use the Registry Editor.
- Switch to a local account and switch back.
Before you begin, back up your local unsynced OneDrive data to a separate location.
1] Reset OneDrive
In order to Reset OneDrive on Windows 11/10 you can follow this:
Open the Run box and type the following and hit Enter:
%localappdata%\Microsoft\OneDrive\onedrive.exe /reset
Check if that fixes your issues.
2] Relink the OneDrive account
Right-click on the OneDrive icon in your system tray and select Settings from the context menu that you get.
It will open a new mini-window where you need to navigate to a tab called Account.
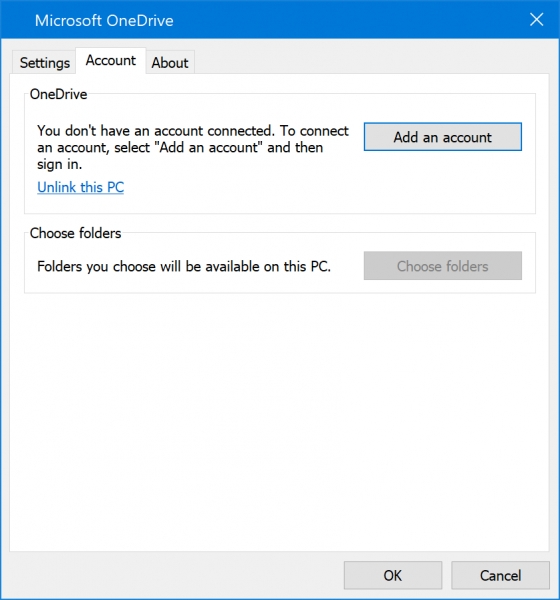
Select the option that says Unlink this PC.
It will open a pop-up window that will confirm if you really want to Unlink your OneDrive account on the computer. Select Unlink account.
You can now run OneDrive again and relink your account to check if that makes any difference.
3] Use the Registry Editor
In the Start Menu, search for “Registry Editor.”
Select Registry Editor Desktop App and open by selecting “Open as Administrator.”
Once Registry Editor opens, navigate to the following key-
Computer\HKEY_CURRENT_USER\SOFTWARE\Microsoft\Windows\CurrentVersion\Explorer\Desktop\NameSpace
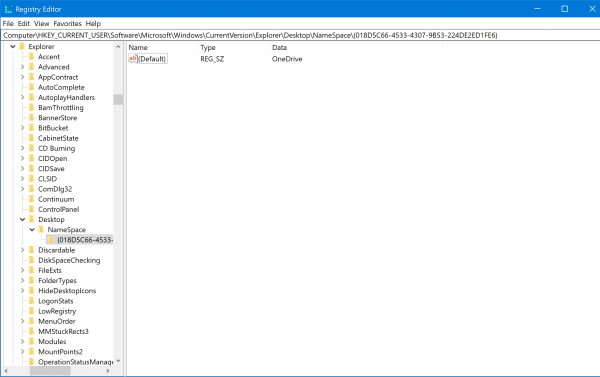
Look out for the folders having folders named OneDrive and delete those OneDrive data DWORDs or folders.
Alternatively, you can check this modification inside the Registry Editor.
Once Registry Editor opens, navigate to the following key-
Computer\HKEY_CURRENT_USER\SOFTWARE\Microsoft\Windows\CurrentVersion\Explorer\Desktop\NameSpace
Look out for the folders having folders named OneDrive and copy the names of folders that contain the OneDrive folder.
Now navigate to the following location inside of the Registry Editor-
Computer\HKEY_CLASSES_ROOT\CLSID
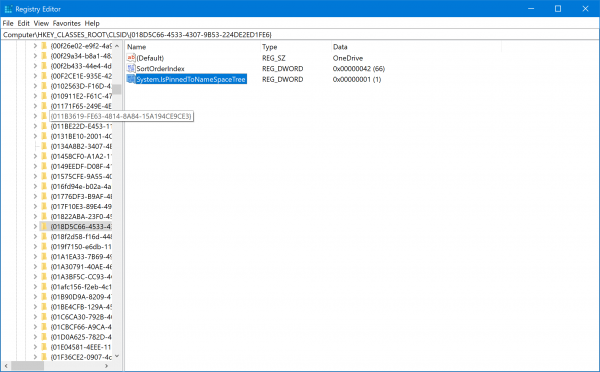
Look for the folder name that you just copied.
Inside that folder, there will be a DWORD named System.IsPinnedToNameSpaceTree and set its value data to be 0.
Reboot your computer for the changes to take effect.
Related: OneDrive always opens two instances
4] Switch to a local account and switch back
Press the WINKEY + I button combination to open the Windows 10 Settings App.
Navigate to the following path: Accounts > Your info.
Scroll down to select the option of Sign in with a local account instead.
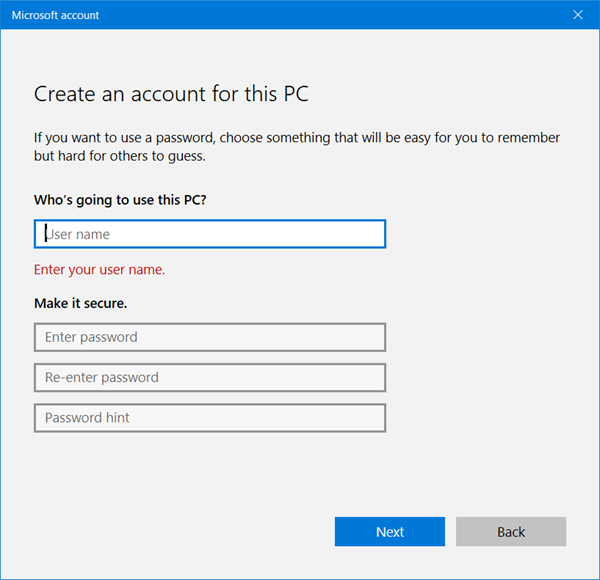
Follow the on-screen instructions to create a local account, then enter the desired username and password.
Once that is done, navigate to the same location inside of the Settings app and this time select the option that says- Sign in with a Microsoft Account instead.
Follow the on-screen instructions again to sign in to your Microsoft Account with your Email address and Password.
Reboot your computer and check whether your issues persist.
So is only one OneDrive icon appearing now?
Read: OneDrive creating duplicate copy of file or folder with computer name added.
