We saw a very peculiar issue where the drive letter keeps disappearing abruptly or after a reboot in Windows 11/10. This problem commonly affects secondary drives (e.g., D:), external USB drives, or mapped network drives, often stemming from system misconfigurations, hardware conflicts, or software interference. In this post, we will explore why this is happening and what you can do to resolve the issue.

Why did my hard drive disappear in Windows 11?
Drive letters can disappear or reset after a reboot due to conflicts. This happens when multiple drives, like USB devices or DVD drives, compete for the same letter. Sometimes, letters get stuck in the registry from hardware that is no longer connected, stopping their reuse.
Issues with the system partition can make this problem worse. For instance, backup tools like Acronis might temporarily assign a letter to the EFI system partition, which is important for booting. This partition is usually hidden, which can be confusing when it suddenly disappears.
Outdated or corrupt disk drivers can also cause drives to lose their letters after system updates or reboots. Additionally, Group Policy or UAC settings may disconnect mapped network drives by turning off the “Reconnect at logon” feature or restricting persistent drive mappings. Hidden partitions lose their letters by design.
Finally, errors in the registry’s MountedDevices key can reserve letters for drives that no longer exist, preventing valid assignments.
Drive letter keeps disappearing after reboot in Windows 11/10
If the drive letter keeps disappearing abruptly or disappears after reboot in Windows 11/10, you can follow the solutions mentioned below to resolve the issue.
- Reassign Drive Letter
- Clear Stale Drive Letters
- Unhide partition
- Adjust Group Policy & Registry for Mapped Network Drives
- Prevent EFI Partition Letter Assignment
Let us talk about them in detail.
1] Reassign Drive Letter

Windows assigns drive letters dynamically at boot. If a conflict occurs (e.g., another device temporarily claims the letter), the affected drive may boot without its identifier. Manually reassigning the letter in Disk Management overrides this glitch, forcing Windows to recognize the drive with a persistent identifier. To reassign a drive letter, using Disk Management, follow the steps mentioned below.
- Open the Disk Management utility from the Search Menu.
- Right-click on the affected drive (listed as “Healthy” but without a letter), and select Change Drive Letters and Path.
- Click on Add > Assign a drive letter.
- Click Ok.
Finally, check if the issue is resolved.

2] Clear Stale Drive Letters
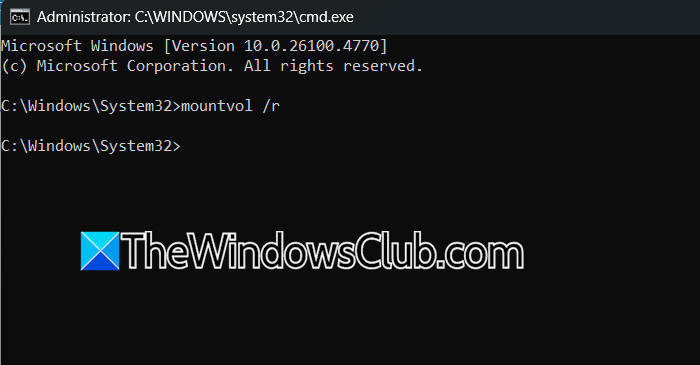
Windows stores drive letter assignments in the registry (HKEY_LOCAL_MACHINE\SYSTEM\MountedDevices). When drives are disconnected (e.g., USB drives removed abruptly), their letters can become “orphaned” and reserved in the registry. This blocks other drives from using those letters. The mountvol /r command forcibly purges these stale entries, freeing up locked letters. To clear slate drive letters, open Command Prompt as an administrator and run the following command.
mountvol /r
Finally, reboot and reassign the drive letter using the steps mentioned earlier.
3] Unhide partition
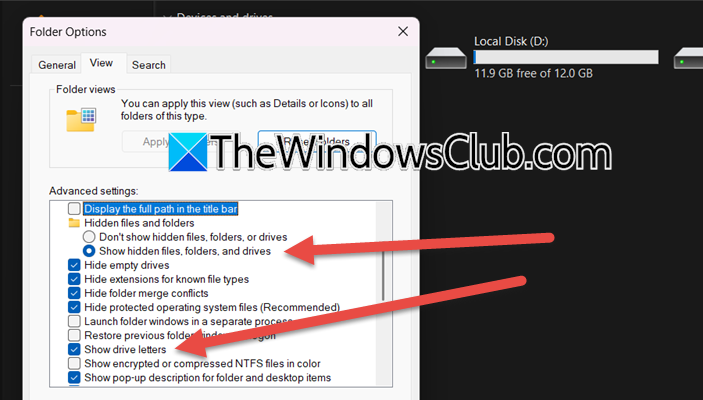
It’s possible that your drive letter didn’t disappear, but is hidden. In that case, we can just unhide them in the File Explorer. To unhide the partition, you need to follow the steps mentioned below.
- In File Explorer, click on the three dots, and select Options.
- Now, go to the Views tab.
- Tick Show drive letters and Show hidden files, folders, and drives.
Finally, click on Ok. Check if the issue is resolved.
4] Adjust Group Policy & Registry for Mapped Network Drives
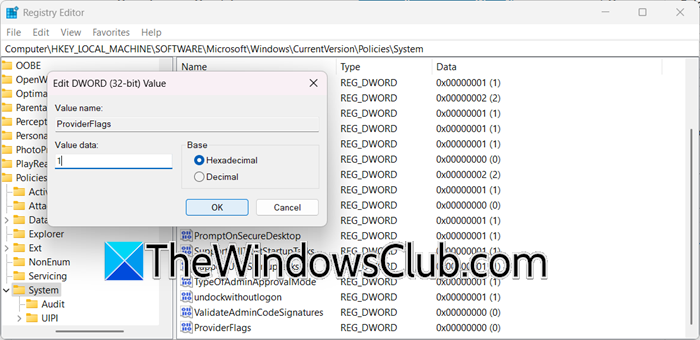
Mapped network drives often disconnect after reboots because Windows doesn’t wait for network services to initialize before loading the user profile. Enabling “Always wait for the network at startup” forces Windows to delay the login process until network resources (like NAS or domain servers) are fully available. The ProviderFlags registry tweak ensures network providers (e.g., Microsoft Network) load before user logon, allowing drive letters to persist.
Group Policy Editor
In the Group Policy Editor, go to Computer Configuration > Administrative Templates > System > Logon, look for Always wait for the network at startup, and enable it.
Registry Editor
Before making any changes, you need to take a backup of the registry. Once done, go to the following location.
HKEY_LOCAL_MACHINE\SOFTWARE\Microsoft\Windows\CurrentVersion\Policies\System
Right-click the right pane, and select New > DWORD (32-bit) Value. Name it ProviderFlags and set it to 1.
Finally, check if the issue is resolved.
5] Prevent EFI Partition Letter Assignment
The EFI system partition contains critical boot files and must remain hidden for system stability. Backup tools like Acronis sometimes temporarily assign it a drive letter during operations, causing confusion when it vanishes after reboot. Removing the letter prevents accidental user access (which could corrupt boot files) and stops false alarms about missing drives. Follow the steps mentioned below to do the same.
- Open Disk Management.
- Identify the EFI partition (labeled “System Reserved,” “EFI,” or “Recovery”).
- Right-click the partition, select Change Drive Letter and Paths, and click Remove.
- In Acronis, disable options like “Assign drive letters to all partitions” or “Make system partitions visible” and enable “Exclude system-reserved partitions.”
Hopefully, with the help of these solutions, your issue will be resolved.
Read: C or D Drive letter missing in Windows
How to permanently set a drive letter?
To permanently assign a drive letter in Windows, use Disk Management. Press Win + R, type diskmgmt.msc, right-click the target drive (e.g., a secondary HDD or SSD), select Change Drive Letter and Paths > Add, assign an unused letter (e.g., E:), and confirm; this manually locks the letter to the partition, overriding dynamic assignment conflicts that occur during reboots.
Also Read: Windows not assigning Drive letters automatically.