The Steam connection error is one of the frustrating things experienced by Steam users that has jostled them to the verge of abandoning the service. This fault pops up on the screen with a note reading, ‘Could not connect to the Steam network’ in Windows 11/10 PC. In this article, we will explore fixes that can address this error and enable Steam users to access the platform smoothly.

Why am I seeing ‘Could not connect to the Steam Network’?
The program is not accessible as users cannot connect and this error usually does not allow users to log in to their Steam account. So, a possible reason could be a slow Internet connection. However, there are other network-related errors that we will discuss and how you can resolve them to fix the Steam network error. For your information, this error can also be found on Windows 11, as well as Windows 10.
Connection Error: Could not connect to the Steam network
You can try these fixes to ensure that you won’t face this problem again.
- Change the Internet protocol that Steam uses
- Troubleshoot your network
- Reinstall your Steam client
- Update, rollback, reinstall drivers
1] Change the Internet protocol that Steam uses
The first step to resolve this Steam network error is to change its UDP to TCP.
To do so follow the steps.
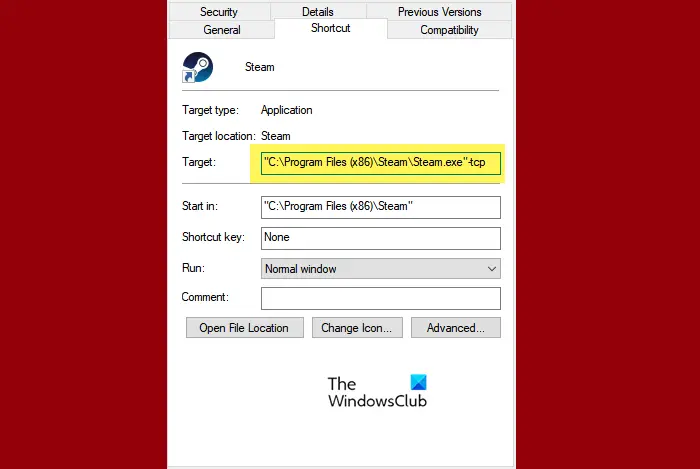
- Select Properties after right-clicking on the Steam Shortcut. Note: If you can’t find the Steam shortcut on your desktop then go to its location.
- Now append ‘-tcp’ in the Target text box. And then press the OK button.
- Launch Steam by double-clicking the shortcut.
It will surely resolve the error, but if it persists, the next solution is available.
2] Troubleshoot your network
Often, the internet connection status can be down, which can cause this error. You should also check the Internet connection and inspect the Internet hardware, specifically the Adapter, Router, and Modem.
You can call your ISP if your network is now working, or fix the slow Internet connection if yours is the only device facing the issue.
Before proceeding, it is advisable to restart both your router and computer. Sometimes, that can fix the issue.
3] Reinstall Steam
Corrupted files are one of the main reasons that prevent Steam from connecting and cause network errors. Uninstalling the program and then reinstalling always do the work.
Backing up the game file is a must if you have downloaded games and applications via Steam clients. Go to the Steam app, copy all the content, and then keep it at a different location.
Now, follow the given steps to uninstall the program
- Click Win + R simultaneously to open the Run box. Type ‘Control’ in the open text box and then click OK.
- Press Programs and Features.
- Right-click on Steams from the programs list, and then select the Uninstall option.
Now, go to their official website and download the latest Steam App. Now you can move the backup Steamapps folder to the Steam directory and launch Steam again to remove this error.
4] Update, rollback, or reinstall drivers
The network drivers can cause this issue. Therefore, open Device Manager and expand the Network Adapters section. Then right-click on your Network driver to update or uninstall the driver. If the issue still persists, rollback your Network driver to resolve the issue
Finally, check if the issue persists.
How to check if Steam is down or not?
Sometimes, the issue is temporary and you can do nothing about it other than wait for the engineers to get the service back on track. So, check the Steam Server’s status and see if it’s down. If that’s the case, keep checking and once the Server status is up, start gaming. That said, there are some online tools that you can use to verify the online status of the Steam server.
Read Next: Steam is having trouble connecting to Steam servers.