Whenever a Windows computer runs into an error, it shows a BSOD or a Blue Screen of Death. This screen usually comes up for a fraction of a second, creates some logs or Dump Files as many other people refer and then suddenly reboots the computer. Now, this process happens so quickly that the user often does not get a chance to capture the error code, and then probably does not get a chance to see what went wrong. These crash dump files are stored internally in the computer and can only be accessed by an administrator.
The crash dump files are of 4 main types. On Windows 11/10, they are either:
- Complete Memory Dump,
- Kernal Memory Dump,
- Small Memory Dump (256KB) or
- Active Memory Dumps.
How to configure Windows to create Crash Dump Files on Blue Screen
First of all, we would recommend you make a System Restore point. Because we will be playing with system files and modifying some critical Windows settings. Now, we will continue on our quest to make Windows 11/10 create Dump Files after a Stop Error.
Create Dump files by modifying settings in Startup and Recovery
First, open the Control Panel. To do this, just search for Control Panel in the Cortana Search box and click on the appropriate results.
Make sure that you are viewing the contents by their Category. Click on the header link labeled as System and Security – or, just right-click on the This PC icon and click on Properties.
Now, on the left panel, select Advanced system settings. A new small window will open up.
Inside that, under the region called Startup and Recovery, select the Settings button.

Under the region called as System Failure, you can select any option from the drop-down for Write debugging information:
- None (No dump file created by Windows)
- Small Memory Dump (Windows will create a Minidump file on BSOD)
- Kernel Memory Dump (Windows will create a Kernel Memory Dump file on BSOD)
- Complete Memory Dump (Windows will create a Complete Memory Dump file on BSOD)
- Automatic Memory Dump (Windows will create Automatic Memory Dump file on BSOD
- Active Memory Dump (Windows will create an Active Memory Dump file on BSOD)
It is worth noting that the complete dump needs a page file allowed to be a size of the physical memory installed on the computer with a dedicated 1MB space for just the page header.
Now after selecting the most suitable option for you, select OK/Apply and exit.
Reboot your computer for the changes to take effect.
Create Dump files WMIC command line
Start by pressing WINKEY + X button combo or right-click on the Start button and click on Command Prompt (Admin) or just search for cmd in the Cortana search box, right click on the Command Prompt icon and click on Run as Administrator.
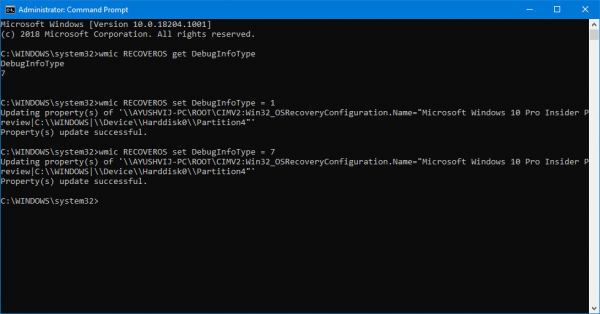
Now, type in any one of the following commands as per your preferences in order to make Windows 10 create Dump Files.
No dump file: wmic RECOVEROS set DebugInfoType = 0
Small Memory Dump: wmic RECOVEROS set DebugInfoType = 3
Kernel Memory Dump: wmic RECOVEROS set DebugInfoType = 2
Complete Memory Dump: wmic RECOVEROS set DebugInfoType = 1
Automatic Memory Dump: wmic RECOVEROS set DebugInfoType = 7
Active Memory Dump: wmic RECOVEROS set DebugInfoType = 1
For your information, a complete dump needs a Page file allowed to be a size of the physical memory installed on the computer with a dedicated 1MB space for just the page header.
Now, type in exit to exit the Command Prompt.
Reboot your computer for the changes to take effect.
Read: How to manually create a Crash Dump file in Windows 11/10.
In case you wish to check what current Memory Dump Settings are on your computer, simply type in the following command to check,
wmic RECOVEROS get DebugInfoType
Now check if your modified settings work or not.
TIP: You can use Crash Dump Analyzer software to analyze crash dump reports.
How to fix Dump file creation failed due to error during dump creation?
To fix the Dump file creation failed due to error during dump creation, ensure there is enough disk space, update system drivers, run SFC and DISM scans, and disable the automatic restart function. Additionally, uninstall any third-party cleanup software. These steps often resolve issues with dump file creation errors.
Read: No Minidump folder in Windows 11
How to make Windows create minidumps?
To create a minidump file on Windows, open the Task Manager by pressing Ctrl+Alt+Delete, then go to the Processes tab. Right-click on the application you want to analyze and choose “Create dump file.” This action saves the minidump file in the system’s temporary folder for troubleshooting purposes.