Struggling to connect to L2TP VPN on Windows 11? You are not alone. This often occurs because Windows 11 has stricter security settings that can clash with the older L2TP/IPsec protocol. The good news is that this is usually fixable by tweaking some specific settings on the device. In this article, we will walk through them and see what you can do if you cannot connect to the L2TP VPN on Windows 11.
Why can’t I connect to VPN on Windows 11?
Users may be unable to connect to VPN on Windows 11 due to incorrect VPN settings, missing presare keys, or blocked firewall ports. Moreover, NAT traversal and IPsec issues are other common causes. In the next section, we are going to delve deeper into the causes and see how to resolve them.
Cannot connect to L2TP VPN on Windows 11
If you cannot connect to the L2TP VPN on your Windows 11 PC, execute the solutions mentioned below.
- Modify Registry for IPsec and NAT-T connectivity
- Add the Pre-shared key (PSK) to the VPN connection
- Allow IPsec and NAT-T through the firewall
- Disable third-party VPN software and Antivirus
- Reset the TCP/IP stack and network components
Let’s get started with the troubleshooting guide.
1] Modify Registry for IPsec and NAT-T connectivity
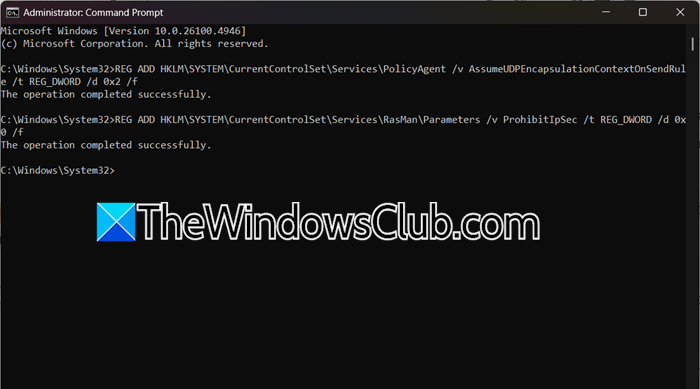
If the L2TP VPN connection is failing, it may be because Windows is not properly handling NAT-T or is blocking IPsec. NAT-T ensures VPN traffic passes through the router and firewalls, whereas IPsec establishes a secure, encrypted tunnel. To enable them, follow the steps given below.
- Click Win + x to open the Quick menu link, and select Windows Terminal (Admin), or Command Prompt (Admin).
- Now, run the following command to force Windows to use NAT-T for the VPN connection.
REG ADD HKLM\SYSTEM\CurrentControlSet\Services\PolicyAgent /v

AssumeUDPEncapsulationContextOnSendRule /t REG_DWORD /d 0x2 /f

A message will flash stating "The operation completed successfully."
- Next, execute the following command to ensure Windows is allowed to use the IPsec security protocol for this VPN connection, to override any settings that might be blocking it.
REG ADD HKLM\SYSTEM\CurrentControlSet\Services\RasMan\Parameters /v ProhibitIpSec /t REG_DWORD /d 0x0 /f

The same message as before should be displayed across the screen.
- Close the command prompt window, and restart the device to ensure the changes are applied.
After rebooting, try to connect to the L2TP VPN. If the issue continues, see the next solution.
2] Add the Pre-shared key (PSK) to the VPN connection
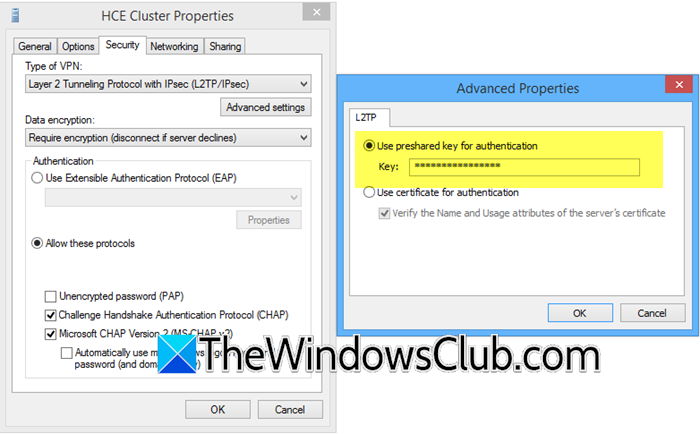
The PSK is essential because it acts as a shared password between the device and the VPN server. If it is missing, the connection won’t be able to authenticate securely; therefore, it must be added. Here’s how to do the same.
- Click Win + I to open Settings, go to the Network and Internet tab, and select VPN.
- Click on the VPN connection, select Advanced options, and then click on the Edit button.
- Go to the Security tab, and select Layer 2 Tunnelling Protocol with IPsec (L2TP/IPsec) option in the Type of VPN section.
- Next, click on the Advanced settings button, select Use pre-shared key for authentication, enter the key, and hit the OK button.
Check if you can bypass the error message or not. If it is the latter situation, execute the next solution.
Read: Internet gets disconnected when VPN connects

3] Disable third-party VPN software and Antivirus
Conflicts with third-party software are a common cause of VPN issues. Other VPN clients can install virtual adapters that can interfere with Windows’ built-in networking stack. To troubleshoot, it’s necessary to fully uninstall unused VPN clients and temporarily disable firewalls, as they can unintentionally block VPN connections. Suppose the connection works after disabling the firewall. In that case, it’s necessary to create a specific allowance for VPN’s traffic to restore functionality, and that’s what we are going to do in the next solution.
4] Allow the IPsec and NAT-T through the firewall

The connection can also fail if Windows Firewall is blocking key ports required for IPsec and NAT-T. These protocols use UDP 500 and 4500 to establish and maintain the VPN tunnel, and if they are restricted, the connection will not succeed.
- Click Win + R, type wf.msc, and hit Enter to open Windows Defender firewall with advanced security.
- Click on Inbound rules > New Rule, and then go to Port > Next.
- Select UDP, specify ‘500’ and ‘4500’ ports, and click Next.
- Next, ensure Allow the connection is selected, hit Next, and then apply the rule to all profiles.
- Once done, press Next, provide a name for the rule, and click Finish. Repeat the same process for Outbound rules.
In case the problem continues, proceed with the next solution.
5] Reset the TCP/IP stack and network components

Last but not least, corrupted or misconfigured network settings on the PC can play a hand in the VPN issue. To fix it, we are going to reset Winsock, TCP/IP, and flush DNS to rebuild the network and ensure Windows starts afresh.
- Click Win + X, and then select Open Command Prompt or Windows Terminal with administrator rights.
- Run the following commands one by one, and press Enter after each one.
netsh winsock reset

netsh int ip reset

ipconfig /flushdns
- Once done, reboot the PC to let Windows rebuild its network catalog.
Now, try to connect, and hopefully, there won’t be any issues anymore.
Hopefully, with the help of these solutions, you will be able to resolve the issue.
Read: VPN connection failed due to unsuccessful domain name resolution
How to allow VPN connections on Windows 11?
To allow VPN connections on Windows 11, go to Settings, click on Network and Internet, and select VPN. Click on Add VPN option, and then enter all the information: the provider, server address, VPN type, and login details. The next task is to save the profile and then connect from the VPN.
Also Read: Common VPN error codes and solutions for Windows.