Shuttering and tearing are two problems that many people experience while playing games. This not only kills the interest in the game but also makes the game’s frame rate look ugly. Windows 11/10 promises to reduce this by offering an option to enable variable refresh rate under Graphics Settings. See how to customize the Variable Refresh Rate for games in Windows 11/10.
The main purpose of any graphics card is to provide a buttery-smooth gaming experience. To do this, a graphics card pushes images to your PC screen as fast as it can. However, most devices monitor refresh their image at a set rate. So, when the graphics card delivers frames outside the set schedule, the display screen shows a portion of one frame and the next frame onscreen simultaneously. This makes the image look distorted as it splits in two (Screen Tearing). This phenomenon only worsens with increasing dynamic frame rate of the game.
Variable Refresh Rate feature is offered to optimize games for displays and graphics cards that support variable refresh rate.
Enable Variable Refresh Rate for games in Windows 11
Right-click the Windows button on the Taskbar and select Settings from the list of options. Alternatively, you can press Win+I in combination to go to the settings directly.

Select System from the side panel on the left and choose the Display heading.

When directed to a new screen, scroll down to the Related Settings section and under it, expand the Advanced Display entry.

Hit the drop-down button adjacent to Choose a refresh rate description and select the desired value.
Enable Variable Refresh Rate for games in Windows 10

Variable refresh rate feature is disabled by default. So, to enable it, you’ll need to go to Settings > System Settings > Graphics Settings.
Under the ‘Graphics Settings’ section, you’ll find these 2 options

- Variable refresh rate
- Graphics Performance Preference
Locate the slider below the first option and turn it to ‘On’ position.
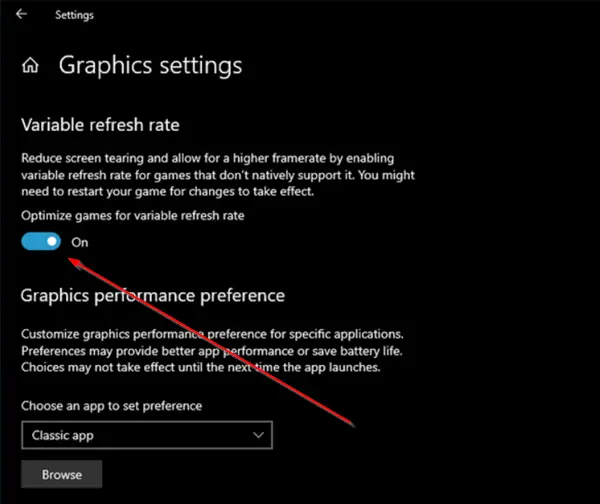
When enabled, the option will reduce screen tearing and allow a higher frame rate by enabling the option for games that don’t support it natively.
Simply restart your computer and allow the changes to take effect. Please note that this option will not be visible for PCs equipped with NVIDIA GeForce graphics.
Windows 11 user? Learn how to enable or disable Dynamic Refresh Rate (DRR).
What exactly is the Refresh rate?
In simplest terms, the Refresh rate refers to the number of times your display draws a new image or refreshes it per second. It is measured in Hertz (Hz). So, a value of 60Hz means the display will update the screen 60 times per second. A higher rate gives smoother motion but also uses more power.
What is a good Refresh rate for a PC?
For native digital users, the Refresh rate is not of much use; however, it’s important for gamers, who want a monitor with the lowest response time. For them, a PC with at least 75 Hz is desirable. If you’re someone who is not much into gaming, then a monitor with a 60 Hz refresh rate would suffice.