If you plan to leave the world of Windows and move to Apple Mac, you may need to move your data. The million-dollar question right now is, how does one migrate their important files from Windows to a Mac? It is very much possible to do so. We have seen how to send files from Mac to Windows PC. Now, this post shows you how to transfer or move your important documents, data & files from Windows PC to Mac using Windows Migration Assistant Tool.
Use Windows Migration Assistant Tool to transfer Files and Data from PC to Mac
It is not a simple two clicks of the mouse step, but that shouldn’t matter because your files are more important than the perceived difficulty. In all seriousness, it is not hard, but it is not super easy, either.
Step 1: Before Migrating from macOS Big Sur to Windows 10
- Ensure that Windows is up to date.
- Ensure that you know the administrator account credentials on your PC.
- Connect your Mac and PC to the Wi-Fi network or connect your Mac and PC ethernet port.
Step 2: Use the check disk (chkdsk) utility
- Run Command Prompt.
- Type chkdsk and press Enter.
- At the prompt, type Y, then restart your PC.
Step 3: Move data from a Windows PC to your Mac
- Download Windows Migration Assistant for macOS Big Sur on Windows.
- Quit any open Windows apps.
- Open Windows Migration Assistant > Click ‘Continue.’
- Start up your Mac.
- Open Windows Migration Assistant.
- On your Mac, follow the onscreen prompts.
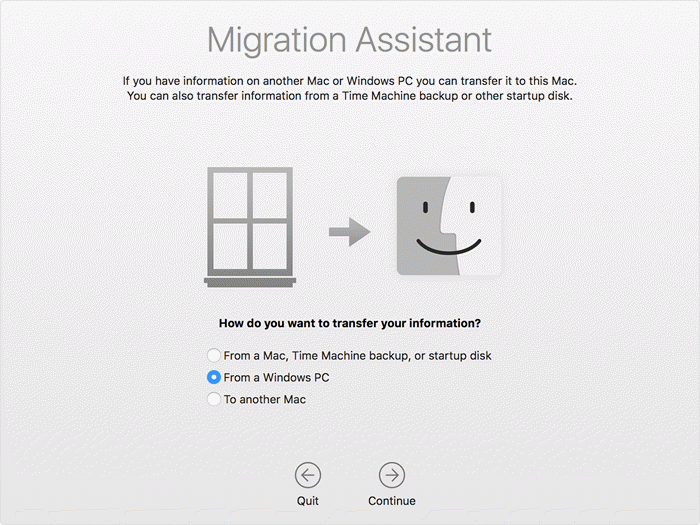
- Select the option to migrate data “From a Windows PC.”
- Click ‘Continue.’
- Enter an administrator name and password.
- Click Continue to close any other open apps.
- Select your PC from the list of available computers.
- Click Continue on your PC and Mac when both computers display the same passcode.
- Your Mac scans the drives on your PC to build a list of information to migrate.
When migration completes, log in to the new user account on your Mac.
We have given additional details where required.
First, you’ll need to download the Windows Migration Assistant tool from Apple. It works on macOS Big Sur too. The application should be able to migrate files from Windows.
After installation, the migration application should launch automatically. Keep in mind that the tool will only transfer your contacts, calendars, email accounts, and more. Furthermore, we should point out that the Windows mail apps are not supported.
Also, your Mac and Windows PC must be connected to the same network via “Ethernet.”
Transfer files and data from Windows PC to Mac
After installing the tool on your Windows PC, turn on your new Mac for the first time. When it boots you should see “Transfer Information to This Mac” window. If when the Mac is turned on the relevant windows have not appeared, follow these simple instructions.
Go > Utilities, or press Shift–Command–U. Double-click Migration Assistant.

From here, you will need to select the “From a Windows PC” transfer option and click Continue.
The Mac should highlight a passcode, which should also appear on your Windows computer. Click continue to proceed with the process.
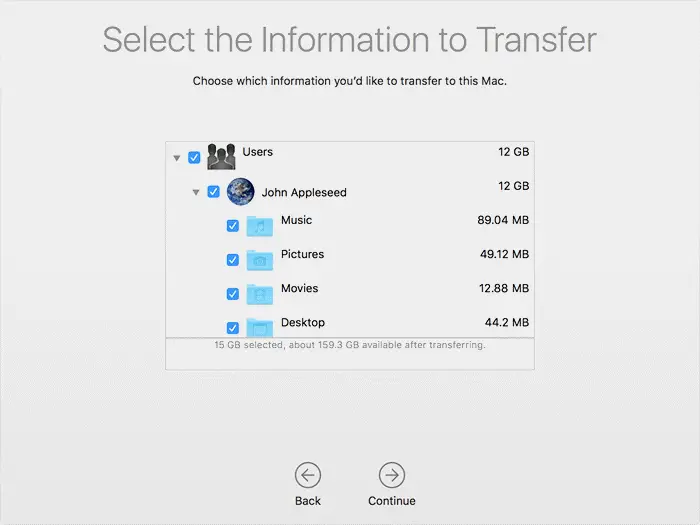
On your Mac, you should now see a window that gives the option of where to transfer files from. Click the correct boxes then click on Transfer at the bottom and watch the transfer bar as files slowly migrate.
TIP: This post will help you if Windows Migration Assistant is not working.
We’re not sure why you would want to leave the world of Windows to a Mac since Windows 11/10 is arguably the best desktop operating system available today. But hey, each person is free to make their own choices, so if you want to switch to a Mac, then go for it.
PS: Planning to switch from Mac to Windows? These tips on switching from Mac to Windows PC will help you get started.