You may have faced an issue where you find that Skype is not sending messages. This issue is common with Skype for home users, and the most probable cause has been having low or no internet connectivity. But if you think the problem could be something else, then this post will help you resolve the issue.
Skype messages not sending
Try restarting the system and running the Skype application as an administrator. It is also important to update Skype to the latest version. There other causes for this issue could be proxy servers, group policies, problems with Skype servers, etc. In case the internet is working fine (you can browse websites), but Skype isn’t sending or receiving messages, this post could be useful to you.
- Use special Skype commands
- Contact your system administrator for permissions in case of a managed system
- Check for proxy servers
- Verify whether the Skype servers are online
- Remove one version of Skype
- Reset Skype.
If it doesn’t work, you could proceed with the following solutions to troubleshoot the issue in discussion.
1] Use special Skype commands
A few special commands could be used in Skype to resolve the problem. This method is especially effective when you are unable to send messages to one specific user.
Open the chat window with the intended contact in Skype. Type the following commands one by one and hit Enter after each command:
/dumpmsnp
/MSNP24
Now sign out of Skype and sign back in.
Then type the following command as a message to the intended contact and press Enter:
/remotelogout
Restart the system.
All of the commands mentioned in this solution are special commands, and the end user does not receive them.

2] Contact your system administrator for permissions in case of a managed system
One of the most common reasons for being unable to send messages through Skype for home is when your organization puts restrictions on your system through group policies. In such a case, you could contact your system administrator for permission to send messages through Skype.
2] Check for proxy servers
At times proxy servers prevent certain functionalities of a few apps (including Skype). To isolate this cause, remove proxy servers temporarily.
Windows 11
Right-click the Windows button on the Taskbar and select Settings from the list of options. Alternatively, you can press Win+I in combination to go to the settings directly.
Select Network & internet from the side panel on the left.
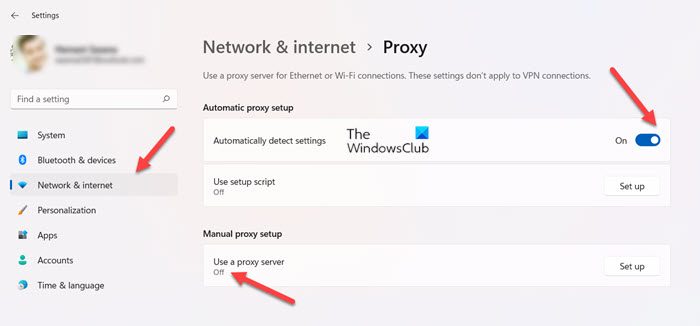
Scroll down to the Proxy tile in the right-pane and click to expand it. When directed to a new screen, set the toggle next to Automatically detect settings under the Automatic proxy setup heading to the On position.
Similarly, under the Manual proxy setup heading, make sure the Use a proxy server option is set to the off position.
When done, restart your computer to allow the changes to take effect.
Windows 10
Click on the Start button and go to Settings > Network and Internet > Proxy.
Keep the switch ON for Automatically detect settings and switch it OFF for Manual proxy setup.

Restart the system.
3] Verify whether the Skype servers are online
The Skype servers are pretty stable. However, nothing is perfect. If they are subjected to DDoS attacks or down for maintenance, you could face problems while sending messages.
The status of Skype’s servers could be checked from its official website here.
Server issues with Skype are common. The logs for the same could be checked on the server status page itself.
4] Remove one version of Skype
In case multiple versions of Skype are installed on your system, they might interfere with each other causing problems with either or both of them. It is advised to uninstall one of the versions of Skype.
Windows 11
Press Win+I keys together to go to the settings directly. Choose Apps entry from the side panel.
Then, expand the Apps & features entry on the right.
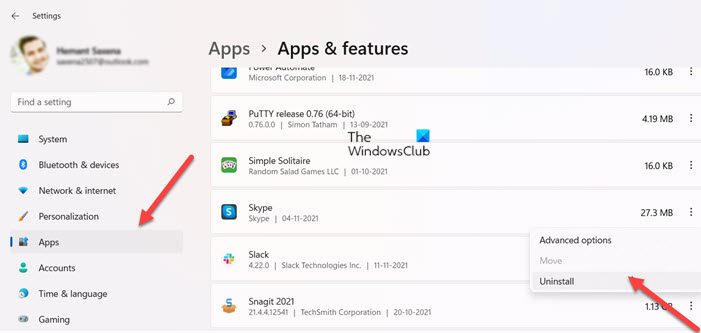
Scroll down to the Apps list heading. Under it, locate Skype app. Click the Menu (visible as 3 vertical dots) and from the list of options displayed, choose the Uninstall option.
Open the Skype Classic version and check if the problem is solved.
Windows 10
Click on the Start button and go to Apps > Apps and features.
In the list of applications, click and expand one of the versions of Skype and select Uninstall.

It should be noted that many users reported that their issue got resolved after shifting to Skype Classic.
Read: Skype can’t send or receive images or files.
5] Reset Skype
You could reset the Skype app to default, just in case any setting was messed up.
Windows 11

Head to the Settings again. Select Apps > Apps & features to go to the Skype app. Click the Menu (visible as 3 vertical dots) and from the list of options displayed, choose the Advance options.
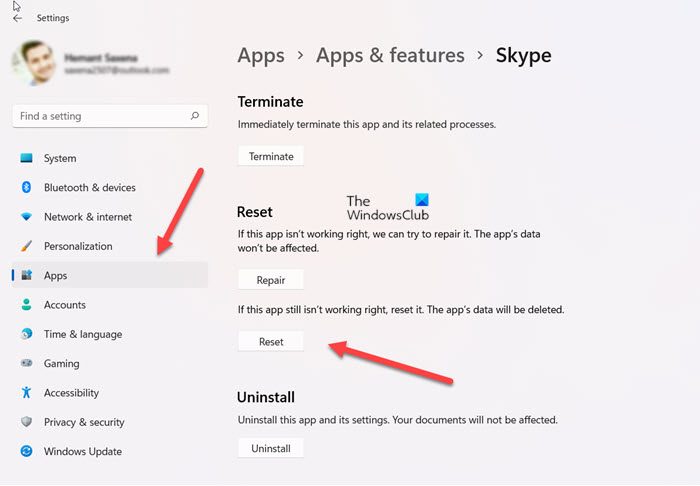
When directed to a new screen, scroll down to locate the Reset button and click it to Reset the app.
Windows 10
Go to the Apps and Features window as explained in solution 4 and expand the details for Skype. Select Advanced options.

In the next window, scroll down and select the option Reset to reset the settings of the Skype application.

If all of the above-mentioned solutions fail, you could consider re-installing the Skype application.
How do I access my Skype messages?
Log in to Skype and choose a contact under the Recent or Contacts category heading. Then, click the Show Earlier Messages entry visible at the bottom of the Recent category to view older messages. This is how you can access your Skype messages via contacts.
Is Skype message free?
Yes! Skype instant messages between two users is a free service. It’s especially a great value for texting abroad. You don’t need to use a phone to send online texts with Skype!
Let us know if anything here helped you.