This guide explains how to set up automated email alerts whenever a Windows 11/10, or Server system is unlocked. We will see how you can receive Email notification when your Windows computer is unlocked using Windows Task Scheduler and PowerShell.

Receive Email Notification when your Windows computer is Unlocked
To implement this solution, you will need access to an SMTP server for sending the email notifications. To receive an email notification when your Windows computer is unlocked, follow the steps mentioned below.
- Configure the PowerShell Notification Script
- Schedule your script
- Test your task
Let us talk about them in detail.
1] Configure the PowerShell Notification Script
Begin by creating a dedicated folder for your scripts, such as C:\Windows\System32\Scripts. Open Notepad and paste the following PowerShell code:
# PowerShell Script: Send-LoginAlert.ps1
# Purpose: Emails details when a user unlocks the workstation.

# --- CONFIGURATION SECTION ---
# SMTP Account Credentials
$EmailUser = "[email protected]" # Sender address
$EmailPassword = "your_password" # Sender password
$SMTPServer = "smtp.yourdomain.com" # SMTP server address
$SMTPPort = 587 # SMTP port (587 is common for TLS)

# Email Recipient & Details
$Recipient = "[email protected]" # Who receives the alert
$MachineName = $env:COMPUTERNAME # Auto-fetches computer name

# --- SCRIPT LOGIC ---
# Prepare secure credentials for SMTP
$SecurePass = ConvertTo-SecureString $EmailPassword -AsPlainText -Force
$EmailCreds = New-Object System.Management.Automation.PSCredential ($EmailUser, $SecurePass)

# Capture login data
$LoggedInUser = $env:USERNAME
$LoginTime = Get-Date -Format "yyyy-MM-dd HH:mm:ss"

# Compose email
$EmailSubject = "Security Alert: $MachineName unlocked by $LoggedInUser"
$EmailBody = @"
Login Event Detected:
- User: $LoggedInUser
- Computer: $MachineName
- Local Time: $LoginTime
"@

# Send the email
Send-MailMessage -From $EmailUser -To $Recipient -Subject $EmailSubject `
-Body $EmailBody -SmtpServer $SMTPServer -Port $SMTPPort -UseSsl -Credential $EmailCreds

# Optional: Log event locally to a text file
$LogEntry = "$LoginTime - User '$LoggedInUser' unlocked $MachineName"
Add-Content -Path "C:\Scripts\LoginLog.txt" -Value $LogEntry
Before saving, update these values in the CONFIGURATION SECTION:
- [email protected] & your_password: Your SMTP sender credentials.
- smtp.yourdomain.com & 587: Your SMTP server and port.
- [email protected]: The email address for receiving alerts.
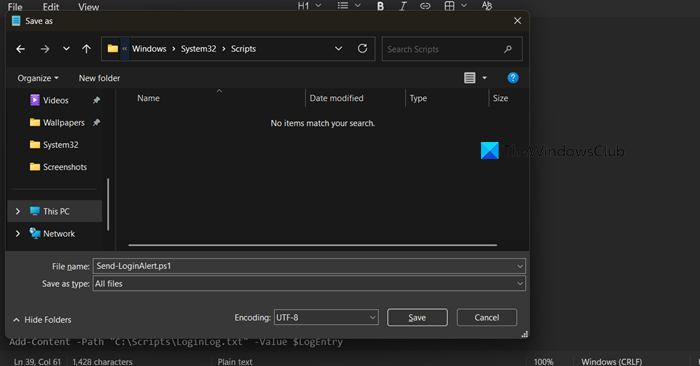
To save correctly:
- In Notepad, go to File > Save As.
- Navigate to your script folder (e.g., C:\Scripts).
- Set Save as type to All Files (.).
- For Encoding, select UTF-8 (this is the modern equivalent of the “Unicode” mentioned in older guides and ensures compatibility).
- Name the file Send-LoginAlert.ps1 and click Save.
2] Schedule your script
To schedule your alert script, you need to follow the steps mentioned below.
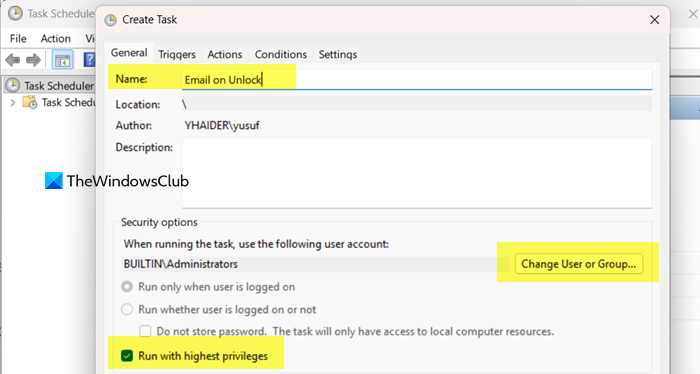
- Open the Task Scheduler.
- From the Action menu, click on Create Task.
- In the General tab, give it a clear name (e.g., Email on Unlock).
- Check the option Run with highest privileges.
- Click Change User or Group, type Administrators, and click OK.
- Navigate to the Triggers tab and click New.
- Set the trigger to begin the task On workstation unlock for Any user. Click OK.
- Go to the Actions tab and click New.
- Action: Start a program
- Program/script: powershell.exe
- Add arguments: -ExecutionPolicy Bypass -WindowStyle Hidden -File “C:\Scripts\Send-LoginAlert.ps1”.
- Adjust Conditions and Settings
- Conditions Tab: Uncheck Start the task only if the computer is on AC power to ensure it runs on laptops.
- Settings Tab: It is helpful to enable: Run task as soon as possible after a scheduled start is missed and If the task fails, restart every: (set to 1 minute).
- Click OK to create the task. Enter administrator credentials if prompted.
Now, let us go ahead and check if it works.
3] Test your task
To test the configuration, manually lock your PC using Windows Key + L, then unlock and log back in; within a minute, you should check the recipient’s email inbox for the alert and also verify that the local log file (LoginLog.txt) has been created in your designated script folder.
Hopefully, with the help of this guide you will be able to create and schedule a script that notifies you when your system unlocks.
Read: Your account has been locked – Microsoft
Why do I get a message saying your computer has been locked up?
The message stating “your computer has been locked” is a standard security feature of the Windows operating system. It appears when the system activates the lock screen, which can happen automatically after a period of inactivity due to power settings or manually when you press the Windows Key + L. This lock is intentional, designed to protect your privacy and data by requiring your login credentials to resume access, and it is often mandated by organizational security policies on workplace or domain-joined machines.
Read: Windows locked due to unusual activity [Suspicious Message]
How do I make my computer ding when I get an email?
To make your computer produce a sound when you receive an email, you need to configure notification settings within your specific email application and ensure your system sounds are enabled. In clients like Microsoft Outlook or Thunderbird, you can typically find this option in the settings or preferences menu under Notifications or Sounds, where you can select an alert tone. For webmail like Gmail in a browser, you must enable desktop notifications in both the site’s settings and your browser’s permission center, and ensure your Windows sound scheme is not set to Silent or volume is not muted.
Also Read: Change Lock Screen Timeout Period in Windows 11.