When a Windows system crashes, it stores information like what went wrong in small memory dump files. These files are usually stored in the Minidump folder; however, there are reports of it missing entirely. In this article, we will explore what to do if there is no Minidump folder on your Windows 11/10 computer.

Where is the Minidump folder located in Windows 11?
In Windows 11, the Minidump folder is located at C:\Windows\minidump and has file names such as “Mini031125-01.dmp”. In this example, 03 is the month, 11 is the day, 25 is the year, and 01 is the number of the dump file. Larger crash dumps are typically saved as Memory.dmp in the C:\Windows directory.
No Minidump folder in Windows 11
If there is no minidump folder in Windows 11/10, execute the solutions mentioned below.
- Enable Minidump creation in startup and recovery
- Check Virtual Memory (Page File) configuration
- Disable Automatic cleanup of crash dumps
- Turn off Fast Startup
- Verify hardware and permission issues
Let’s get started with the troubleshooting guide.
1] Enable Minidump creation in startup and recovery
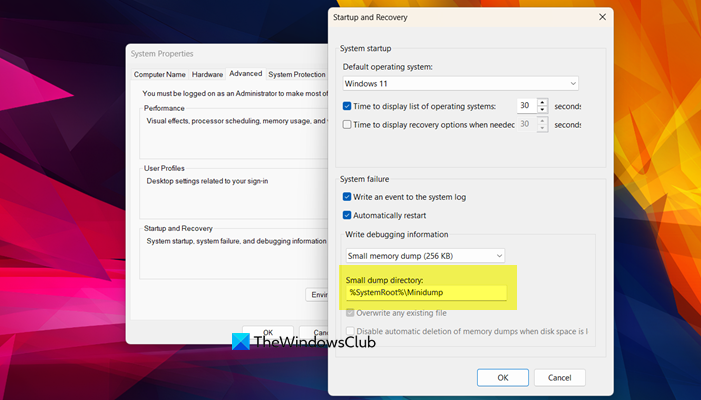
Windows might not be configured to save any debug information after a crash. To record crash data, we are going to enable the small memory dump option, as without this, Windows might crash and never write a minidump file. This is the reason why the folder stays empty or never appears.
- Click Win + R to open the Run dialogue box, type sysdm.cpl, and hit Enter to open System Properties.
- Navigate to the Advanced tab, go to the Startup and Recovery section, and click on the Settings button.
- From the Write debugging information section, click on the drop-down menu and select Small memory dump (265KB), and then check if the Small dump directory field is set to %SystemRoot%\Minidump.
- Click OK twice, then reboot the device for the changes to take effect.
2] Check Virtual Memory (Page File) configuration
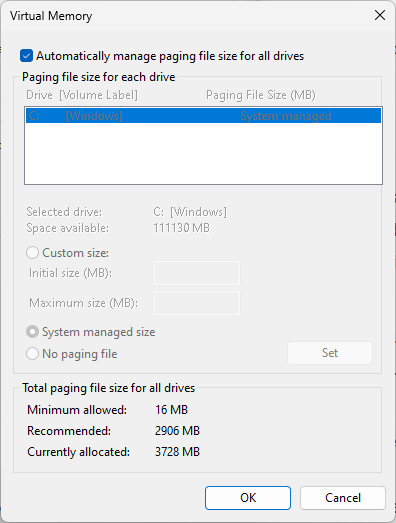
Windows relies on the page file to temporarily store memory content during a system crash. If the page file is missing or disabled, Windows lacks a place to stage crash data; therefore, to allow Windows to complete the dump-writing process, it is necessary to ensure a properly sized page file.
- Open the Run dialogue box, type sysdm.cpl, and hit Enter to open System Properties.
- Go to the Advanced tab, and click Settings under Performance.
- In the Performance Settings window, click on the Advanced tab, and go to the Virtual Memory section.
- Click on the Change button, and check if the Automatically manage paging file size for all drivers box is checked.
- If it is configured, click cancel; otherwise, select the system driver and choose the System managed size option.
- Click the Set button, then hit OK.
Once done, reboot the PC, and check if the issue is resolved. If not, see the next solution.
3] Disable Automatic cleanup of crash dumps
The storage cleanup feature can automatically remove dump files. Disabling automatic cleanup is necessary to ensure that crash files are restored instead of being deleted.
- Press Win + I to open Settings, go to System, and click on Storage.
- Under the Storage Management section, click on the Cleanup Recommendation option, and select the See advanced options link.
- In the list of temporary files, make sure that the System error memory dump files option is unchecked.
After the process is complete, open any third-party disk-cleaning software you have and add the C:\Windows\Minidump folder or .dmp files to its exclusion or ignore list. See the next solution if the issue persists.
Read: Configure User Mode Dumps creation and collection in Windows 11
4] Turn off Fast Startup
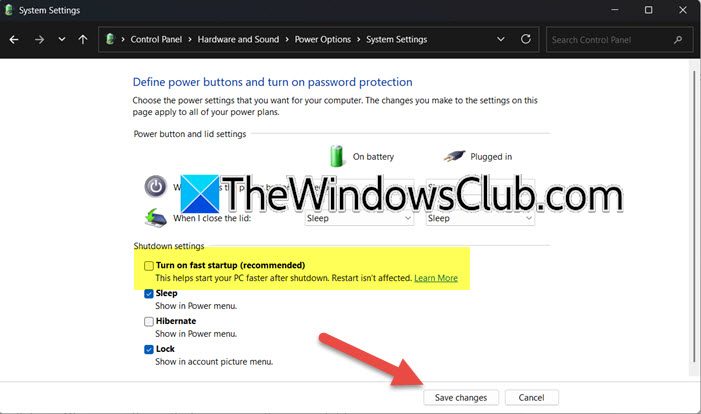
Fast startup dictates how Windows shuts down and restarts. This can interfere with how crash data is written to disk. We will disable it to force Windows to ensure a full system shutdown and restart cycle, so that the crashed information is saved properly.
- Open Control Panel, go to Hardware and Sound tab, and select Power Options.
- From the left sidebar, click on Choose what the power buttons does, and then select the Change settings that are currently unavailable link.
- Navigate to the Shutdown settings section, and uncheck the Turn on fast startup (recommended) box.
Click the Save changes button, and slide to the next solution if the issue persists.
5] Verify hardware and permission issues
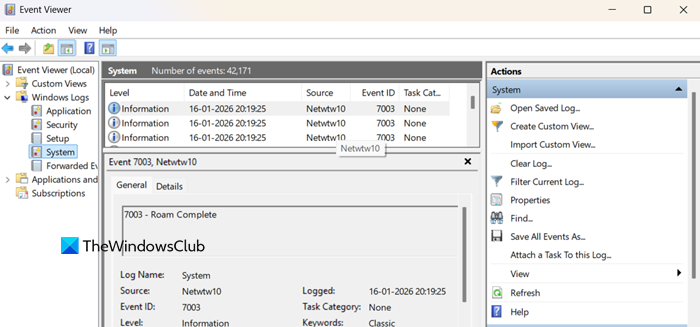
Last but not least, if none of the above solutions could resolve the issue, the failure to write a file during a crash can stem from hardware instability, disk failure, or restrictive file permissions. To verify this, start by checking the Event Viewer for a sudden shutdown. To do the same, click Win + R, type eventvwr.msc, navigate to Windows Logs > System, and look for a critical Event ID 41 with a source of Kernel-Power. This indicates that the crash was caused by a sudden power interruption or critical hardware failure. In such a case, the next step is to run the Windows Memory Diagnostic tool to test RAM. If both RAM and drive checks pass, then ensure that C:\Windows\Minidump has correct permissions.
That’s it!
Read: How to read Small Memory Dump (dmp) files in Windows 11
Windows minidump not saving into designated folder
The Windows minidump may not be saving to the designated folder due to insufficient permissions or insufficient disk space. To fix this, ensure the target directory exists and that the system has full write access to it. Moreover, verify that the page file and system crash settings are configured correctly to generate the dump file. For that, check out the article given above.
Read: Configure Windows to create Crash Dump Files on Blue Screen
Where are Minidump files stored in Windows 11?
Minidump folders (.dmp), automatically created during a system crash to help determine the cause of the Blue Screen of Death, are by default stored in the C:\Windows\Minidump folder. This is the standard location; however, it can be customized in the system’s advanced settings.
Also Read: Windows computer creates only Minidump file.