Hearing audio from nowhere is one of the most annoying things to face. It usually happens when a website starts playing a video, and users don’t have a clue where it is coming from. In Google Chrome, to stop the audio, you need to right-click on the browser tab and click Mute Site or Unmute Site. It is cumbersome, and that’s where the Tab Audio Muting feature comes in handy. This post will guide you on how you can enable Tab Audio Muting in Google Chrome.

What Is Tab Audio Muting?
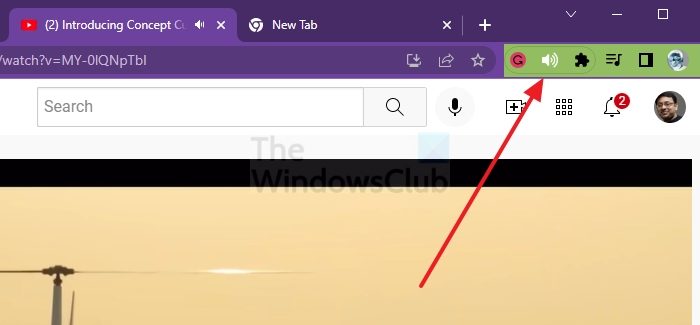
Tab audio muting, or the Tab audio muting UI control, allows users to instantly mute a tab when audio can be heard. Every time a website plays audio, a speaker icon appears on that tab. This feature helps to quickly mute or unmute a tab by clicking on the speaker icon (audio indication) directly on the tab rather than right-clicking on the tab and selecting to mute or unmute a site.
How to enable Tab Audio Muting in Google Chrome
While enabling the functionality on chrome:/flags is still required, doing so restores the capability to toggle audio on individual tabs with a press or click on the audio icon.
- Open Google Chrome.
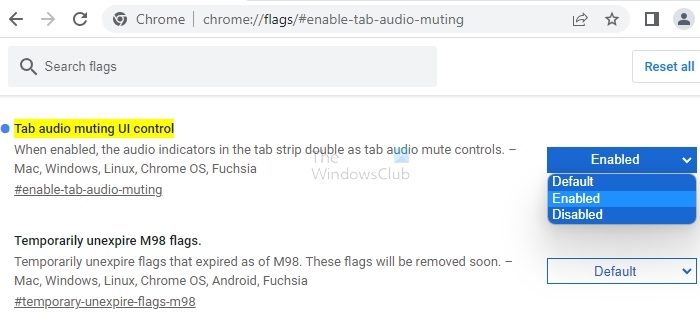
- Type or copy and paste chrome://flags/#enable-tab-audio-muting in Chrome’s address bar, and press Enter.
- From Tab audio muting UI control setting, you can select Disabled (default) or Enabled.
- Close and relaunch Chrome
To test, open any music or video website and play. Notice a speaker icon will be available. Click on it to mute. If it works, then you have enabled the tab audio muting feature.
Extensions That Help To Achieve Audio Tab Muting
Chrome browser add-ons boost productivity and find content with ease from the browser. It helps you be safer, smarter, and more productive. The nice aspect is that you have many options to choose from. With one click, the Google Chrome online shop offers several solutions. We’ve compiled a list of the best.
Tab Muter Extension
If you want to mute individual tabs rather than entire websites, try Tab Muter. This extension helps to mute one specific tab, and no need to pause if you switch to another tab. The Chrome browser cannot automatically determine which tabs should play audio, but this extension lets the user make that decision.
- Go to the Tab Muter page and select Add to Chrome, then Add Extension in the top-right corner.
- In your Extensions list, you’ll see an icon that appears like a black speaker.
- If you don’t notice it straight away in Chrome’s upper corner, click the puzzle piece symbol and look for it there.
- Press the thumbtack icon next to ensure the Tab Muter icon is always visible.
- To silence a tab, open it and click the black speaker symbol. The tab will get muted instantly.
Smart Mute Extension
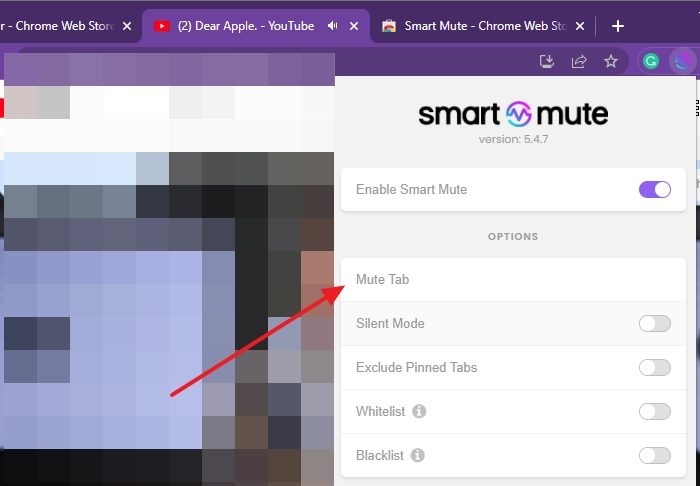
SmartMute has a feature that mutes all tabs except the active one, which means you can finally watch videos without getting annoyed by those random pop-up ads. However, the last active tab will keep playing audio even if you switch to a tab with no audio content. It is also possible to mute all the tabs if you want a moment of silence. It also offers features such as allowed websites, a denylist, silent mode, and the option to exclude pinned tabs.
How To Control Audio Playback For Individual Sites?
First, open Google Chrome at the top right corner, click on the three dots icon, and find Settings. Click on it. Next, click Privacy and security in the left pane, then Sound and select the option you want as your default setting for individual sites.
How Do I Lower The Tab Volume In Chrome?
You can achieve this by using the Volume Master Extension. You can lower the tab volume in Chrome Volume Master via the blue icon next to the address bar. Once installed, hold and slide the volume knob to adjust the tab’s volume now. You can easily download it from Chrome Web Store.

There are several options for controlling the sounds that play in your browser. You can use any of these extensions or enable tab audio muting for a simple on-off feature to prevent the browser’s background audio from bothering you.