This post will show you how to disable Proxy or Prevent changing Proxy settings in Windows 11/10. As Google Chrome or Microsoft Edge uses your system’s proxy settings, you just need to access those settings and turn off or disable proxy. This post covers all the steps to do that.
A proxy server acts as an intermediary between the client and the server. It helps in bypassing content filtering (to access blocked sites), caching websites to load them faster, enhancing security, and more. All browsers provide the feature to use a proxy server. If you don’t want you or someone else to use it, then you can simply disable or turn off proxy. Let’s see how to do it.
How to Turn off proxy in Windows 11/10
To Turn off proxy in Windows 11, open Settings > Network and internet > Proxy.
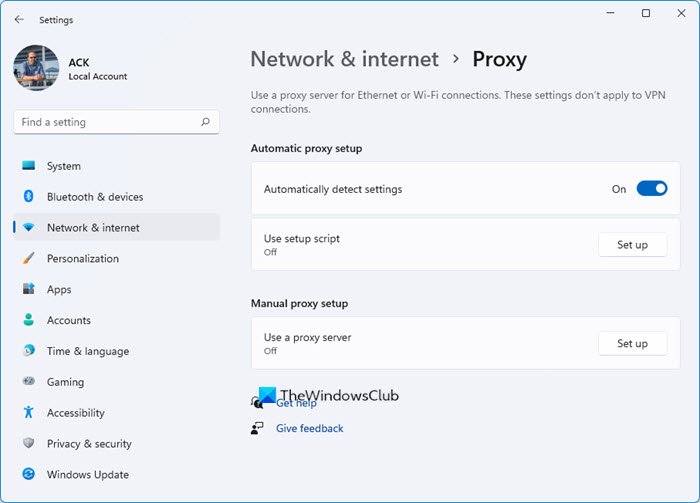
You can configure the settings there. Turn off Automatically detect settings button
click on the Setup button against Use setup script present under Automatic proxy setup section, or configure Proxy manually by clicking on the Setup button against Use a proxy server button.
To Turn off proxy in Windows 10, take these steps:

- Open Windows 10 Settings app using Win+I hotkey or Search box
- Click on Network & Internet category
- Under that category, click on the Proxy page
- On the right-hand side, turn off Automatically detect settings button
- Now Use setup script button present under Automatic proxy setup section.
- Turn off Use a proxy server button available under Manual proxy setup.
Now proxy settings are disabled. You can turn on all the buttons again and add a proxy server of your choice to enable or use proxy in Google Chrome.
Bonus Tip: If you use a proxy server in Firefox or Chrome and the proxy server is refusing connections, then read this post.
Disable Proxy using REGEDIT
You can also use the Registry Editor to disable this setting as follows:
- Open Registry Editor and visit the following location:
Computer\HKEY_Local_Machine\Software\Policies\Microsoft\Windows\CurrentVersion\Internet Settings
- Right-click Internet Settings and then select New > DWORD (32-bit) Value from the context menu.
- Assign the newly formed DWORD as ProxySettingsPerUser and set the new DWORD’s Value data by double-clicking it as 1.
- Click OK and restart your computer.
Proxy settings greyed out in Windows 11/10

You might have also faced this issue, where, after accessing the Proxy page of the Settings app of Windows 10, all Proxy settings are greyed out.

This means proxy settings are disabled permanently, and you can’t use the available buttons to enable or disable proxy in Chrome. This could be the reason because a setting is applied or enabled in the Local Group Policy Editor window. So, you can turn off that setting to get rid of this problem.
The steps are as follows:
Open Local Group Policy by typing gpedit in the Search box. Alternatively, you can use Run Command (Win+R) and type gpedit.msc to open that window.
In Local Group Policy, access the following path:
User Configuration > Administrative Templates > Windows Components > Internet Explorer

On the right-hand side, double-click to Prevent changing proxy settings, as highlighted in the image above.
A new window will open. In that window, select Not Configured or Disabled, and save it.

Now you might need to restart File Explorer or PC to see the changes. After that, you can access the Proxy page in the Settings app, and you will be able to turn on buttons related to proxy settings.
Prevent changing Proxy settings in Windows 11/10
If you wish to prevent users from changing Proxy settings in Windows 11/10 you need to ensure that the Prevent changing proxy settings GPO mentioned above in GPEDIT is set to enabled.
That’s all!
Hope you will be able to enable or disable proxy settings in Windows 11/10 using this post.
Related: How to disable Proxy settings in Firefox.