Having a blog these days is one of the most common things among Internet users. Different people use different types of blogs to represent different things. For instance, a tech geek develops a blog to write various tech-related tutorials, some people may want to write blog posts on fashion, beauty, cooking, etc.

Now every website has a Contact Us page to let the visitors contact the site owner. If so, you can find an email ID or contact form on the contact us page of all websites. It is far better to use a custom email ID like [email protected] or [email protected] etc. instead of [email protected] or [email protected] or something similar. In other words, to make the blog more professional and to gain the readers’ trust, you should use your domain to create your very own and unforgettable email ID.
Google Apps and Outlook helped users create custom email IDs with a domain at no cost. However, the free version is no longer available now. You can create an @mydomain.com email ID if you have cPanel hosting. But if you use Blogger or Tumblr or other platforms and want to make a custom email ID with a domain, you can certainly opt for Zoho Mail.
Zoho Mail
Zoho Mail helps users to create a custom email ID with their own domain name. In other words, Zoho Mail is free and lets you create email addresses like [email protected] or [email protected].
Create custom Email ID with domain name
It is very easy to create an email ID with your own domain name using Zoho Mail. As mentioned before, Zoho Mail is free; you will not have to spend a single dollar to get things done.
To get started, just head over to the Zoho Mail website and click on the Pricing link. Here you will find different pricing plans, such as Mail Lite, Mail Premium, and Workplace. You need not click on any of these links to get started for free. Scroll down and you will see the Forever Free Plan. Click on the SIGN UP NOW button under this box.
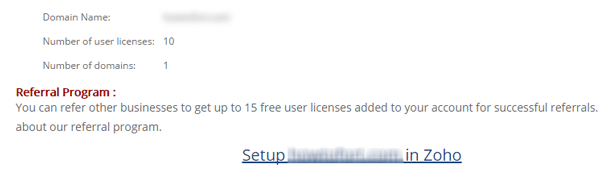
For your information, you can host only one domain per account.
To use Zoho Mail to create an email ID with a custom domain, you will have to create an account with a @gmail.com or @outlook.com, or any other email ID. That means, if you want to host two different domains, you will have to create two different accounts to get the free option.
Moreover, the Free version provides 5GB/user and a 25 MB attachment limit. You will also get web access and free mobile apps. Zoho Mail’s free plan supports only up to 5 users in an organization. If you want to add more than 5 persons, you have to move to the paid plan.
Anyway, after clicking on the SIGN UP button, you will get a screen like this:

Just enter your domain name and hit the Add Domain button. On the next screen, enter your name, email ID, password, and contact email.
Here, you will have to enter two different email IDs. The first one is the one you want to create with your domain ([email protected] or [email protected]). The second one is Contact Email. Enter your running email ID here. Zoho will create an account with that email ID. This will be used as the administrator’s email ID for your domain.
You will now receive an email from Zoho to your Contact Email ID. Your account needs to be verified. Thereafter, click on the link given in the email to verify and create your Zoho Mail account.
On the next screen, you will get a link to set up your Zoho Mail account for your domain. Just click on it.
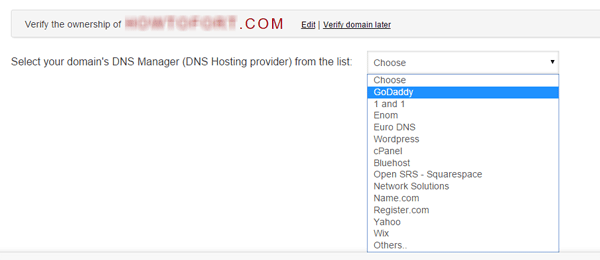
After that, you will have to verify your domain name. There are several methods to verify your domain name. You can get CNAME, TXT, and HTML methods to verify the domain that you have added to create a custom email ID using Zoho Mail. The most popular methods are CNAME and HTML. But there is no risk in using the TXT method as well.
CNAME and TXT Method: This is applicable for all domain registrars. No matter whether you have bought a domain from GoDaddy, BigRock, 1&1, NameCheap, Bluehost, or anywhere, you can certainly get the option to add CNAME records in your domain control panel. The same applies to the TXT method as well. Therefore, choose a domain registrar from the drop-down menu. If your domain registrar is not on the list, select Others.
Thereafter, you will get a Host/CNAME and Destination like this,

Now, just log in to your domain registrar and add them as a CNAME record. If you choose TXT method, you will have to add the respective value as TXT Record. This is very important to add them properly. Otherwise, Zoho Mail cannot verify your domain, and hence, you won’t be able to create your custom email ID with Zoho Mail.
HTML Method: This is the easiest method to verify the domain. Just click on the HTML Method button. Here you will have to download a file named verifyforzoho.html and upload it to your root directory. If you have to host cPanel and you are using WordPress, then the root directory would public_html directory. Here, you will need to create a folder named zohoverify and upload the HTML file to it.
After using any of the methods, click on Verify by CNAME/TXT/HTML button. After that, you will have to enter the username again. After entering a username, click on Create Account button. It takes a moment to create the email ID. After that, you can add more users (up to 10), create groups and do many more things.
To send/receive an email, you will have to enter two MX Entries with the proper priority. Here, you can either use your domain registrar’s control panel or your hosting cPanel to add them. The MX Entry should be like this:
| Host Name | Address | Priority |
| @ | mx.zoho.com | 10 |
| @ | mx2.zoho.com | 20 |
Don’t forget to add them. Otherwise, you cannot send or receive emails.
Now, if you have entered them correctly, your email account should be ready immediately. You may need to wait while the CNAME records propagate.
Click here to visit the Zoho Mail website.
Similar: How to set up Zoho Mail with domain
How do I create a custom email domain for free?
Some domain registrars offer free custom email domains in their plans. You can contact your domain registrar for more information. In addition, most hosting companies offer free email domains with their hosting plans. If you have a website, you can log in to your cPanel and create a custom email domain for free. Alternatively, you can use other service providers, like Zoho Mail.
Read: Top Free Email Service Providers List.
Are custom email domains free?
Custom email domains are usually based on a business or website name. If you have a website, you can create a custom email domain for free by logging in to your cPanel, provided your hosting provider offers the option to create free custom email domain(s) in your hosting plan.
Also read: ManageEngine OpManager Plus from Zoho demonstrates how modern monitoring software can help address common challenges in Windows service monitoring.