This post will show you how to physically replace a hard drive in Windows 11. We will also discuss how to replace hard drives in Windows natively or using a free tool called Hot Swap.

How to physically replace a hard drive in Windows 11
If you want to install a new HDD/SSD on your Windows 11/10 computer:
- Shut down your PC and unplug it.
- Open the case (for desktops) or access the drive bay (for laptops).
- Disconnect the old drive’s power and data cables.
- Remove the drive from its mounting bracket.
- Insert the new drive, secure it, and reconnect cables.
- Boot into BIOS/UEFI and ensure the new drive is detected.
- Install Windows or clone your old drive to the new one using tools like Clonezilla or Macrium Reflect.
Note:
- If it’s a secondary drive, boot into Windows, open Disk Management, right-click the new unallocated disk, select New Simple Volume, and follow the on-screen wizard to format it.
- If you replaced your Windows drive, you will need to install a fresh copy of Windows 11. Plug in a bootable Windows 11 USB installation drive, turn on your PC boot from the USB and follow the on-screen Windows setup instructions
How to change hard disk drives in Windows with Hot Swap
Removing a hard disk drive from a personal computer is quite easy. Pull down the system and remove the drive. However, it’s a bit more complex when performing a hot swap. For those unaware, hot swapping is the practice of replacing a hard drive without shutting down the system. If not done correctly, this can be dangerous for the drive. One doesn’t just pull a SATA or eSATA drive out of the hardware without anticipating problems. This is why we recommend using software known as Hot Swap. With Hot Swap tool, computer users can transform a regular SATA drive into a removable drive similar to USB/IEEE1394 drives. Well, now that that is out of the way, let’s talk about how it works for the most part.

Hot Swap is very small, so downloading it should take seconds. It comes in a .zip file, which means the user must first extract the files inside to get to the real deal. There are two versions of Hot Swap when extracted: one for x86 hardware and another for x64.
Note that there’s nothing to install. Just locate the version best for your computer, and launch it. Now, bear in mind that once the tool launches, nothing will appear on the screen. That’s because it’s hidden, so simply fire up the “Show hidden icons” option in the taskbar, and it should be there.
Interestingly enough, it looks similar to the “Safely Remove Hardware” icon, which is not a bad move. Red is the big differentiator, so there is no confusion between the two icons.
To remove a drive, left-click on the icon to view all swappable drives. The user must then select the drive from the pop-up menu. Watch for a balloon saying the drive has been successfully hot-swapped. From here, the user can power down the disk and safely remove it from the computer.
If a drive is in use by Windows or is colored gray, it cannot be removed.

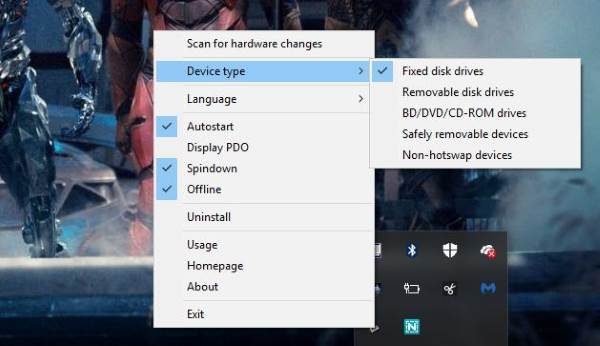
Right-clicking on the icon allows users to scan for hardware changes. They can also change the device type and language and even uninstall the Hot Swap tool if necessary.
If the user doesn’t want the program to auto-start, they can change this by right-clicking the icon. Hot Swap doesn’t come with a window or anything of the sort; it’s all about the icon and what can be done from it.
Overall, we like what Hot-Swap offers in terms of features and capabilities. We recommend it for anyone interested in hot-swapping their hard drive.
Download the Hot Swap tool right now, free from the official website at http://mt-naka.com/hotswap/index_enu.htm or any good download site.
Hot Swap a Drive in Windows 11 without using any tool
This is only possible if your hardware supports hot-swap bays or external enclosures designed for SATA or NVMe drives. You should have a hot-swap capable drive bay or external enclosure and Drives connected via SATA or NVMe with hot-swap enabled in BIOS/UEFI.
Steps to take:
- Restart your PC and enter BIOS/UEFI
- Locate SATA Configuration or NVMe settings.
- Set the port to Hot Plug / Hot Swap enabled.
- This will enable Hot-Swap in BIOS/UEFI
- Next, in Windows, click the Safely Remove Hardware icon in the taskbar.
- Select the drive you want to remove, then wait for the confirmation that it’s safe to remove.
- Once you see the message, physically pull the drive out of the hot-swap bay.
- Finally, insert the new drive into the hot-swap bay. Windows will automatically detect it.
- Open Disk Management to Initialize, partition, or format the new drive.
All the best.
Hot-swap disks are not recognized in Windows
This issue arises due to communication errors between Windows Server and the inserted SATA drives. When this issue occurs, drives don’t appear in This PC or Disk Management after insertion. Try removing and reinserting the affected drives to see if it helps. If not, open Disk Management and rescan for disks.