You will fail to connect to your database if the SQL Server service is not running. If you try running the SQL Server service from the Services.msc app, you will encounter an error that says Windows could not start the SQL Server on Local Computer. Let us see how to fix the issue.

Windows could not start the SQL Server (<DB-NAME>) on Local Computer. For more information, review the System Event Log. If this is a non-Microsoft service, contact the service vendor, and refer to service-specific error code 3417.
AND
Windows could not start the SQL Server Reporting Services service on Local Computer. Error 1053: The service did not respond to the start or control request in a timely fashion.
Fix Windows could not start the SQL Server on Local Computer
If Windows could not start the SQL server on the local computer, you can follow the solutions mentioned below.
- Change the Log on type
- Check Server Dependencies
- Create SevicesPipeTimeout registry entry
- Configure the computer to not retrieve trusted and untrusted CTLs
1] Change the Log on type
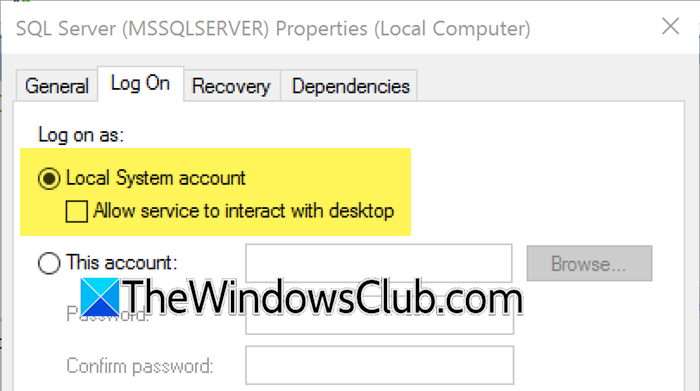
First, change the log-on type to make sure that you are logging in using the Local System Account. Many users have been able to resolve the issue by switching to a local system account, hopefully, that will do the job for you. Follow the steps mentioned below.
- Open Run by Win + R, type “Services.msc”, and click Ok.
- Now, look for SQL Server, right-click on it, and select Properties.
- Go to the Log on tab, and set Log on as Local System Account.
- Click on Apply > OK.
Finally, check if the server starts. If the services start, try connecting to your database. Hopefully, you will be able to connect without any issues, but if that doesn’t work, you need to restart the service (right-click on the service and select Restart) and then connect to the database.
2] Check Service Dependencies
Checking Service Dependencies is an important step because SQL Server might rely on other services to function correctly. SQL Server won’t start if these dependent services aren’t running. Follow the steps given below.
- Open Run by Win + R, type Services.msc, and click on Ok.
- Now, look for the SQL Server (instance name or db name) service, right-click on it, and click on Properties from the context menu.
- Go to the Dependencies tab to see all the services upon which your SQL Server service depends. These could include services like:
- Windows Management Instrumentation (WMI)
- Remote Procedure Call (RPC)
- SQL Server Browser (if using named instances)
- Now, return to the Services screen, and ensure all the services are running. If not, manually start them by right-clicking on the service and selecting Start.
Once you have started all the services, start the SQL Service again and see if it starts. If it has already started, restart the service and try connecting to the database.
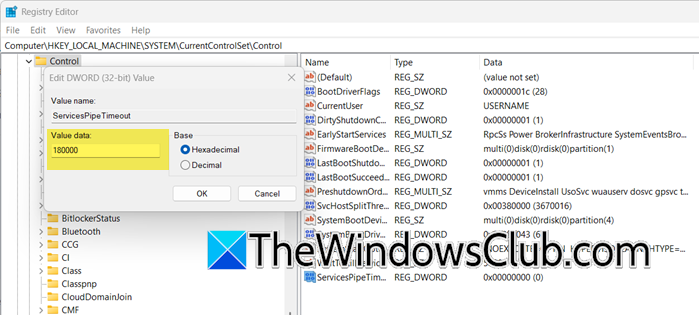
3] Create SevicesPipeTimeout registry entry
The ServicesPipeTimeout Registry entry in Windows is used to specify the amount of time (in milliseconds) that the Service Control Manager (SCM) will wait for a service to start before it times out. This is particularly useful for services that require more time to start due to various reasons, such as heavy load or dependencies on other services. You may encounter error 1053 related to SQL Server Reporting Service due to the fact that service timeout is not set, we can set it, and resolve the issue.
- First of all, create a backup of registry.
- Now, open the Registry Editor and navigate to the following location.
HKEY_LOCAL_MACHINE\SYSTEM\CurrentControlSet\Control
- Right-click on the Control folder, and select New > DWORD (32-bit) Value.
- Name it ServicesPipeTimeout.
- Double-click on ServicesPipeTimeout, 180000, and click on.
Finally, reboot your computer, and start the service and see.

4] Configure the computer to not retrieve trusted and untrusted CTLs
SQL Server Reporting Services might not start if it can’t access certificate lists from Windows Update. This can happen if the system isn’t connected to the Internet or if a firewall blocks Windows Update. The service takes too long to get the certificate lists, so it times out. If it takes more than 30 seconds to start, Windows stops the service. In the previous solution, we increased the time for service timeout, in this, we will configure the network. Try the following workaround.
If you have Group Policy Editor, open it, go to the following setting:
Computer Configuration > Policies > Windows Settings > Security Settings > Public Key Policies > Certificate Path Validation Settings
Select the Network Retrievaltab, tick Define these policy settings check box, and clear the Automatically update certificates in the Microsoft Root Certificate Program (recommended) checkbox. Finally, click on OK.
As for Windows Home users, open the Registry Editor, go to HKLM\Software\Policies\Microsoft\SystemCertificates, right-click on AuthRoot, select New, and then click on DWORD.
Type DisableRootAutoUpdate and press Enter. Right-click on DisableRootAutoUpdate, select Modify, and in the Value data box, type ‘1‘, then click OK. Finally, click Exit from the File menu.
Hopefully, you will be able to resolve the issue using the solutions mentioned in this post.
Read: How to install MongoDB on Windows 11?
How do I start Local SQL Server on Windows?
To start the Local SQL Server on your computer, open the Services app by searching it out of the Start Menu. Now, search for SQL Server, right-click on it, select Properties, set the Startup type to Automatic, and click on Start. The service might take a little time to start.
Read: How to install SQL Developer in Windows 11
Can I run a SQL Server on a Local computer?
Yes, you can install SQL Server on your computer and then access it using the SQL Server Management Sudio. We recommend you check our post on how to install and configure SQL Server Management Studio to know more.
Read: Install Oracle Database on Windows 11.