Want to paste a screenshot in your Microsoft document, slide, or notebook without using a third-party screenshot app? Microsoft Office offers a Screenshot tool in Word, Excel, PowerPoint, Outlook and OneNote, providing screen clipping features.
Microsoft continually improves the features of its products, particularly Microsoft Office. Recently, it has added an option to take a screenshot in Office programs. This screenshot can be added directly to the document, sheet, or presentation.
Images added to Word, Excel, or PowerPoint files are often screenshots. One way to add these screenshots is to take them separately and then use the Insert option to add them as regular images.
How to use the built-in Screenshot tool in Office programs
Microsoft noticed that many users create documents by adding screenshots of a project they work on while creating the document, sheet, or presentation. In this case, the former method would be cumbersome. Thus, adding an option to take screenshots through Word, Excel, or PowerPoint directly can be very helpful.
You can use the built-in Screenshot tool in Word, Excel, PowerPoint, Outlook and the Screen Clipping tool in OneNote. We explain below how to use screenshots or Screen clipping in Microsoft Office programs.
How to take a screenshot in Word using Office Screenshot tool

The procedure to add a screenshot in Microsoft Word is as follows:
- Open your Microsoft Word document.
- Place the cursor at the exact location where you wish to insert the screenshot.
- Now, go to the Insert tab.
- In the Illustrations tab, click on the downward-pointing arrow associated with Screenshot.
- Now, if you wish to attach the complete window, select the option in Available Windows.
- If you need a clip of a screen, then select Screen Clipping.
- Now, select the portion of the screen you wish to add as screenshot.
- The second you drop the click, the screenshot will be added to the document at the position where you placed the cursor.
How to add screenshot to Excel using Office Screenshot tool
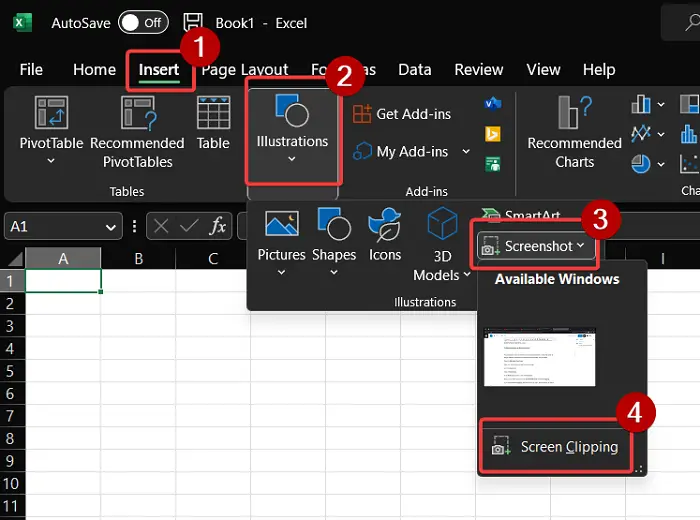
The procedure to add a screenshot to a Microsoft Excel sheet is somewhat similar to that for adding a screenshot to a Microsoft Word document. It is as follows:
- Open the Microsoft Excel sheet.
- Place your cursor where you wish to add the image.
- Go to the Insert tab.
- Click on Illustrations.
- In the Illustrations section, click on Screenshot.
- Now, you can either choose from the Available Windows or Screen Clipping.
- If you choose Screen Clipping, then the second you clip it, the screenshot clip will be added to the Excel sheet where you placed the cursor.
How to take a screenshot to PowerPoint using Office Screenshot tool
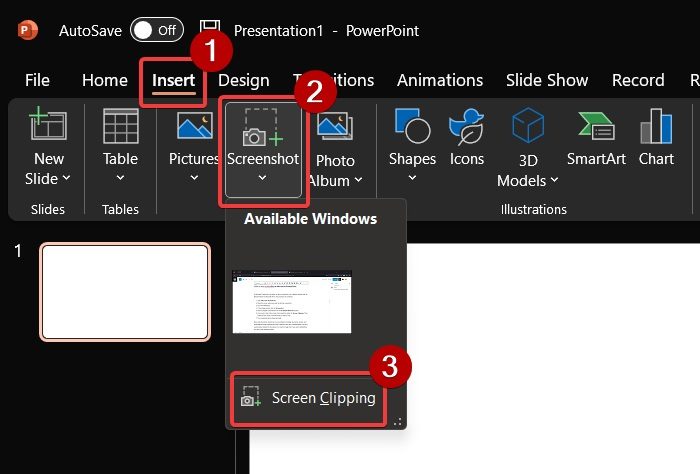
In Microsoft PowerPoint, the option to add a screenshot is in a different section than for Microsoft Excel or Microsoft Word. The procedure is as follows:
- Open Microsoft PowerPoint.
- Place the cursor where you wish to add the screenshot.
- Go to the Insert tab.
- In the Image section, click on Screenshot.
- Select complete screenshots from the Available Windows section.
- If you need a clip of the screen, then select the option for Screen Clipping. Then, select the part of the screenshot that you wish to crop.
- The screenshot will be added promptly.
Now, while the above method can be very helpful in creating documents, sheets, and presentations using screenshots quickly. However, they have a disadvantage. The only customization allowed by the option is to crop the image. But if you want modifications, you can try the following options.
How to use Screenshot Tool in Outlook
Follow the steps below to use the Screenshot feature in Outlook.
- Go to the location where you want to screenshot.
- Click the location on the document where you want to add the screenshot.
- On the Insert tab, in the Illustration group, click the Screenshot button and select Screen clipping from the drop-down menu.
- The Screen will become white with a cross pointer on the location you want to screenshot.
- Drag and select the part of the screen you want to capture.
The captured screen will appear on your document.
How to use Screen Clipping Tool in OneNote

Follow the steps below to use the screenshots in OneNote.
- Go to the location where you want to screenshot.
- Click the location on the document where you want to add the screenshot.
- On the Insert tab, click the Screen clipping button, in the Images group.
- The Screen will become white with a cross pointer on the location you want to screenshot.
- Drag and select the part of the screen you want to capture.
- The captured screen will appear in your notebook.
How do I take a screenshot in Office 365?
Just like the desktop version of Microsoft Office (say Microsoft Office 2016), there is a Screen Clipping tool in Word for Microsoft 365, Outlook for Microsoft 365, Excel for Microsoft 365, etc. Open any of these Microsoft 365 apps, jump to the Insert menu, and click on the Screenshot drop-down menu. Now you can add the screenshot of an entire opened window or use the Screen Clipping option to capture a part of the screen and add it to your document.
How do you take a screenshot of a Table in Excel?
You can screenshot the range of cells in Excel. To do this procedure:
- Copy the range of cells.
- Then go to the Home tab.
- Click the drop-down arrow of the copy button in the Clipboard group and select Copy as Picture option.
- A Copy Picture dialog box will open. There, select the Appearance type to As shown on screen or As shown when printed option.
- Select the Picture option as Format
- Then click the OK button.
- Click a different location on your spreadsheet, then select Paste in the clipboard group.
Take screenshots in Office using Windows in-built tools
Microsoft provides two options for taking screenshots. The first one is the Snipping Tool. Microsoft has continually updated this tool. It includes options to share the screenshot directly, add delays before taking it, etc. Other than this, you can use the CTRL+PrtScn or PrtScn. After that, paste the screenshot from the clipboard to MS Paint. You will be able to use all the functions of MS Paint to edit the screenshot.
Take screenshots in Office using third-party screenshot tools
Unlike the Snipping Tool and MS Paint, third-party snipping tools offer many additional features designed to enhance screenshot editing. You can try free screen capture tools for the same. My favorite is ShareX since you can easily add steps and edits to it. To add screenshots to your document, sheet, or presentation later, simply use the Insert option associated with the application and insert them as generic images.
How do I take a screenshot of Excel in PowerPoint?
You can take a screenshot of Excel on PowerPoint in two ways. The first option is to use the screenshot feature in PowerPoint, as explained above. The second method is using a separate tool like the snipping tool or a third-party tool and adding it as an image.
How do I take a screenshot of a PowerPoint presentation into Word?
To take a screenshot of a PowerPoint presentation into a Word document, you can use the screenshot option in Word as explained above. Alternatively, you can use a third-party screen-sharing tool or the Snipping tool provided by Windows.
We hope this tutorial helps you understand how to use Screenshot or Screen Clipping in Microsoft Office. If you have questions about the tutorial, please let us know in the comments.