Virtual Machines (VMs) have made it possible to run multiple Operating Systems on a single device. However, sharing VMs between Windows and Mac/Linux can be a bit bothersome. Fortunately, in this article, we present a simplified guide to effectively share VirtualBox (VMs) between Windows and Mac/Linux.

How to share VirtualBox VM between Windows and Mac/Linux
To share VirtualBox VM between Windows and Mac/Linux, follow the steps mentioned below:
- Create the storage device for the VM
- Share the VDI file between operating systems
Let’s get started.
1] Create the storage device for the VM

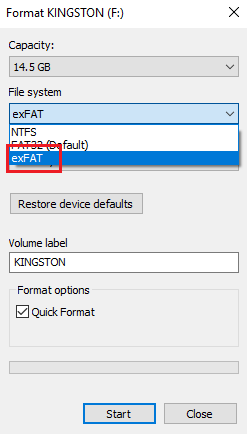
First of all, we need to form an external storage unit featuring an ExFAT filesystem. We prefer an ExFAT filesystem as it allows Virtual Machine hard disk files to function normally on any Operating System irrespective of the original one.
For Windows:
- Open the File Manager and plug in the external hard disk, find and right-click on the desk.
- Click on the Format option, and select the File System dropdown list.
- Select the ExFAT option, keep the default settings, and then click on the Start button.
For macOS:
- Click Command + Space to open the Machine Spotlight Search, and type in Disk Utility.
- Press on the physical disk from the left sidebar, and if you are unable to find it, go to the View menu, select Show All Devices, and then do so.
- Now, hit the Erase button, followed by selecting the ExFAT option from the Format Dropdown menu.
- Lastly, select the Erase button to format the drive to ExFAT.
For Linux:
- Launch a new terminal session, and type the following to install the ExFAT filesystem:
sudo apt install exfatprogs exfat-fuse
- Now, press Win and type disks to open the system disk utility program.
- Click on the physical disk, select the dotted menu, and then hit the Format Disk option.
- Click on the Format option, and then the + button, available under the storage device’s volume diagram.
- Lastly, select the Next button, followed by the Other radio button, and the Next button. Finish off by clicking the ExFAT and Create button to install it to the device.
Now, that we have created the required storage device, let us go ahead and share VDIs.
2] Share the VDI file between operating systems

Between Windows and MAC/Linux
Once the file is created, let’s not waste any more time and find out how to share the VDI file between Windows and MAC/Linux. To do so, follow the steps mentioned below:
- Log into your Windows system, launch VirtualBox, and select the New button.
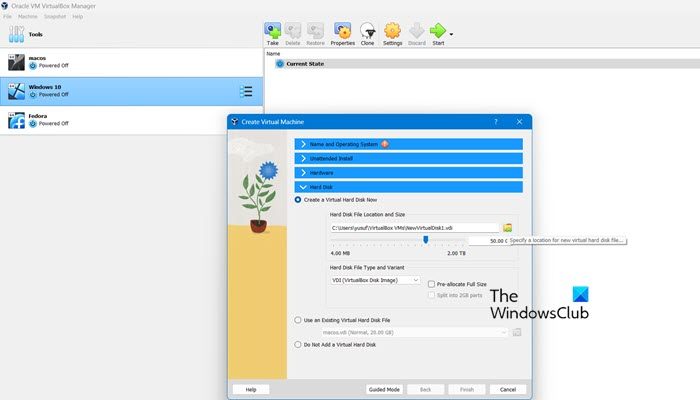
- Enter the VM name, select the ISO file, and then press on the Hard Disk dropdown tab.
- Go to the Hard Disk File Location and Size section, and then select the Browse button.
- Search up the External disk, select the location of the VDI disk, follow the on-screen instructions of the installation wizard to install the OS, and then switch off the VM.
- Now, boot into either MacOS or Linux, open the copy of the VirtualBox in the system, and select the New option to create a new VM.
- Appoint a name to that VM, hit the Next option, and make sure that the VM on the second OS is configured with the same amount of memory, and processors allocated to it as the first one.
- Select the Use an Existing Virtual Hard Disk File option, click the Browse button from the right side, and then hit the Add button.
- Search the VM’s VDI file on the external disk, highlight it, and then select the Choose button.
- Follow it by clicking on the Next button and then the Finish button. Once done, we’ll be back to the main window.
- Click on the new VM entry and select the Start button.
Voila! we can find the same virtual machine that we created in Windows up and running on the other Operating system: Linux or Mac.
Between Mac and Linux
- Boot into Linux, and launch the VirtualBox.
- Now, make a new virtual machine, and then go to the Creation Wizard and select Expert mode.
- Give it a name, and type, followed by clicking on the Hard Disk dropdown tab. Now, click the Hard Disk Location and Size icon, and select any folder in the external disk.
- Let the installation process complete, and once done, reboot into macOS, and again make a new VM that uses an existing VDI file.
That’s it!
Read: How to install VirtualBox Guest Additions on Windows 11/10?
How do I share VirtualBox VM between computers?
There are two ways to transfer VirtualBox VM between computers. The first method involves copying the VM files to the new host and registering them there. The second method is to export the VM as an appliance and import it on the target PC.
Read: Hyper-V did not find virtual machines to import from location?
How do I share a virtual machine between users?
To share a Virtual Machine between users, we are going to create a new Virtual Machine for each user upon login, assigning a new name for each one of them. When setting up the VM, choose the option for a new or existing hard drive, and then select the existing VM associated with the login. Complete the setup process, and you’re good to go.
Also Read: Convert VirtualBox to VMware and vice-versa.
Leave a Reply