If you want to create a document outline in Google Docs, here is how you can do that. You do not need to use third-party add-ons since Google Docs has the option by default. This article explains the difference between the Table of Contents and the Document Outline so you can use them as needed.
What is a document outline?
Let’s say that you are writing a project for your college. Almost all the projects include some texts, headings, pictures, graphs, charts, etc. If you want to show the headings inside the document, you can use the Table of Contents. However, if you do not want to insert an Index but want to show the headings in a separate place so that you can quickly navigate from one place to another, you need to insert the document outline.
When you add the document outline, Google Docs displays a separate section on the left side, containing all the headings. You can click on any heading and quickly move to that section of the document without scrolling up or down manually.
Before getting started, you must know a couple of things about the document outline in Google Docs:
- You can manually turn the document outline on or off.
- To insert a text into the outline, you need to convert it into Heading 1 or Heading 2.
- You can manually add or remove headings as needed.
- You can display normal text in the outline, but you need to make the text size bigger than usual.
How to create Document outline in Google Docs
To create a document outline in Google Docs, follow these steps:
- Open a document in Google Docs.
- Go to View > Show document outline.
- Enter a summary of the outline.
- Select any text and make it Heading 1 or Heading 2.
- Find the heading in the document outline.
- Select any normal text and make the font size bigger.
- Find the text in the document outline.
To learn more about these steps, continue reading.
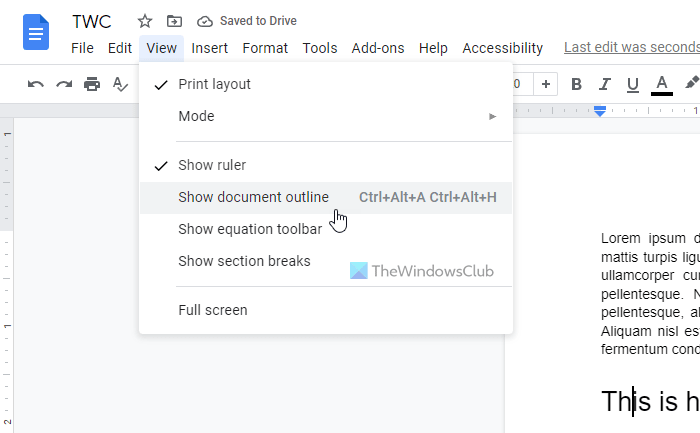
First, open a document in Google Docs. However, if you want to create the document from scratch, you need to do that first. Then, go to View and select the Show document outline option.
You can find a separate panel on the left side. You need to click the edit icon and enter a summary. However, it is not mandatory, and you can skip this step if you like.
Then, select a text that you want to include in the document outline. This text will be a heading. Once the text is selected, expand the corresponding section, and choose either Heading 1 or Heading 2.

Right after that, you can find the newly created heading in the document outline section.

As mentioned earlier, you can display any normal text in the document outline. For that, you need to make the text size bigger than the rest of the texts. To do that, select the text and click on the plus icon to increase the font size.
Once you do that, it will be included in the document outline. If you do not want to show a heading in the outline, hover over the heading and click the cross icon.
That’s all! Hope this guide helped.
How to add an outline in Google Docs?
To add an outline in Google Docs, follow the steps above. First, go to View and select the Show document outline option. Then select any text and convert it to Heading 1 or Heading 2. It will be automatically included in the outline.
How to use the Google Docs Outline tool?
The Outline option or tool in Google Docs helps you create a document outline instead of a Table of Contents. You can display the outline of your benefits and quickly navigate from one heading to another with this option. To use the Google Docs Outline tool, you can follow all the steps mentioned above.
Read: How to insert Table of Contents in Google Docs.