LAN Manager Authentication Level lets you set the authentication protocol for network logons. You can change the LAN Manager authentication level using the Local Group Policy Editor and the Registry Editor.

Connecting your computer to a network printer or any other computer in the same network requires an authentication protocol for the network logons. It establishes a link between your host computer and the network computer or any other device. There are six different authentication levels you can choose from, and they are:
- Send LM & NTLM responses
- Send LM & NTLM – use NTLMv2 session security if negotiated
- Send NTLM responses only
- Send NTLMv2 responses only
- Send NTLMv2 responses only. Refuse LM
- Send NTLMv2 responses only. Refuse LM & NTLM
Now, let’s say you want to connect to a network printer, but you are ending up getting an error message saying Windows cannot connect to the printer. At such a moment, changing the LAN Manager authentication level may solve the issue.
What is the LAN Manager authentication protocol?
The LAN Manager authentication protocol is a security protocol used in Windows operating systems to authenticate client devices. It includes LM, NTLM, and NTLMv2 variants and facilitates operations like domain joining and cross-forest authentication in Active Directory environments.
Change LAN Manager Authentication Level in Windows 11/10
You can change the LAN Manager authentication level using the Local Group Policy Editor and the Registry Editor. If you use Windows 11/10 Home version, use the REGEDIT method. Otherwise, either method does the same job.
Using Local Group Policy Editor
Search for gpedit.msc in the Taskbar search box, and click on the result to open the Local Group Policy Editor on your computer. Next, follow this path-
Computer Configuration > Windows Settings > Security Settings > Local Policies > Security Options
Double-click on the Network security: LAN Manager authentication level policy on your right-hand side and choose the Send LM & NTLM – use NTLMv2 session security if negotiated or any other required option from the drop-down list.
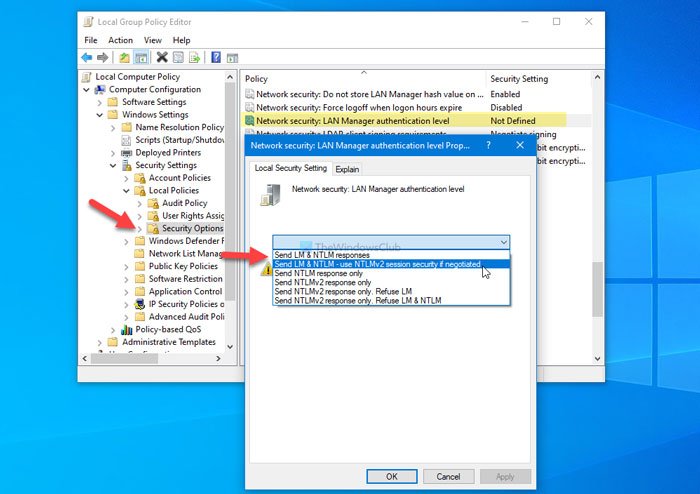
Click on the OK button to save the change.
Then, restart your computer and check if you can use your network printer or not.
Using Registry Editor
Search for registry editor in the Taskbar search box, click on the search result, and select the Yes option to open the Registry Editor on your computer.
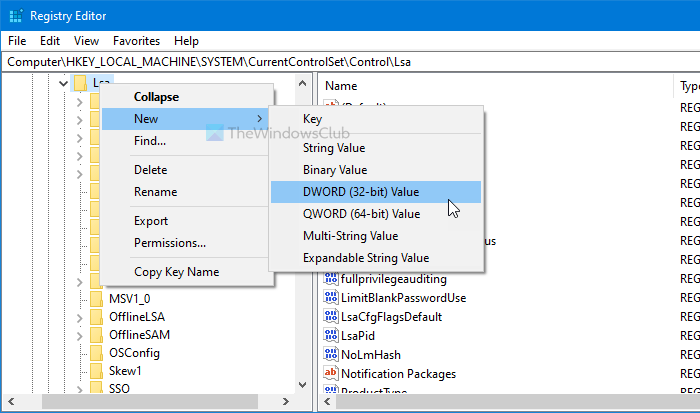
Then, follow this path-
HKEY_LOCAL_MACHINE\SYSTEM\CurrentControlSet\Control\Lsa
Here you have to create a REG_DWORD value. To do so, right-click on the Lsa key, select New > DWORD (32-bit) Value, and name it LmCompatibilityLevel.
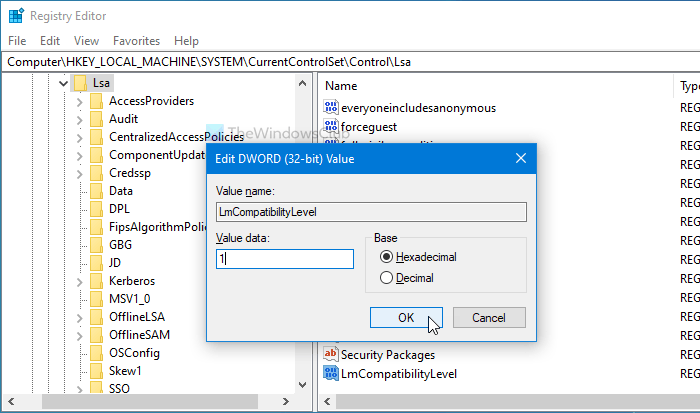
Now, enter the Value data as mentioned below.
- Send LM & NTLM responses: 0
- Send LM & NTLM – use NTLMv2 session security if negotiated: 1
- Send NTLM responses only: 2
- Send NTLMv2 responses only: 3
- Send NTLMv2 responses only. Refuse LM: 4
- Send NTLMv2 responses only. Refuse LM & NTLM: 5
For that, double-click on the REG_DWORD value, enter 1 or any other Value data in the box, and click the OK button.
Next, restart your computer to get the change.
That’s it! This is how you can change LAN Manager authentication level in Windows 11/10.
How to check NTLM version in Windows?
To check the NTLM version in Windows, use the command line tool by running nltest /sc_query:domain in Command Prompt. This displays domain controller details showing which authentication protocols, including NTLM version, are in use. Regularly updating Windows ensures the latest security protocols are utilized, keeping your system secure.
What is the default value of Lmcompatibilitylevel in Windows?
The default value of LmCompatibilityLevel in Windows 11/10 is 3. This setting allows the system to use LM and NTLMv1 authentication if necessary but prefers NTLMv2 if the server supports it.