Windows Sandbox makes use of the Hyper-V feature to run on a Windows 11/10 computer. But when this is enabled any third-party virtualization software cannot be run. This includes software like VMWare, VirtualBox, and so on. But this limitation can be overcome using a workaround. It can be useful for those who upgraded to Windows 10 (or Windows 11) with Windows Sandbox mainly but rely on Virtual Machines on their computer for certain work.

Use Windows Sandbox and Virtual Machines together
We will be covering two main aspects of this guide. They are as follows:
- Enable the use of Windows Sandbox and Virtual Machines together.
- Disable the use of Windows Sandbox and Virtual Machines together.
1] Enable the use of Windows Sandbox and Virtual Machines together
Open the Command Prompt command line with Administrator level rights.
Type in the following command:
bcdedit /copy {current} /d “Windows 10 – No Hyper-V”
This command will create a new boot entry which will be the exact replica of your active boot entry but will be without Hyper-V.
One must be careful while modifying the Boot Configuration Data (BCD) of a computer. This is so because of even the slightest misconfiguration in these BCD entries can lead to your computer not booting up.
You will now get a GUID.

Make sure you copy and save it safely.
Copy that GUID and execute the following command inside the Command prompt command line:
bcdedit /set {<ENTER NEW GUID HERE>} hypervisorlaunchtype off
Once the commands are executed, just reboot your computer.
You will enter the Windows Boot Manager.
Select the Windows 11/10 – No Hyper-V entry to boot into Windows 11/10.
2] Disable the use of Windows Sandbox and Virtual Machines together
Type msconfig in the Start search box and select System Configuration
Navigate the boot tab
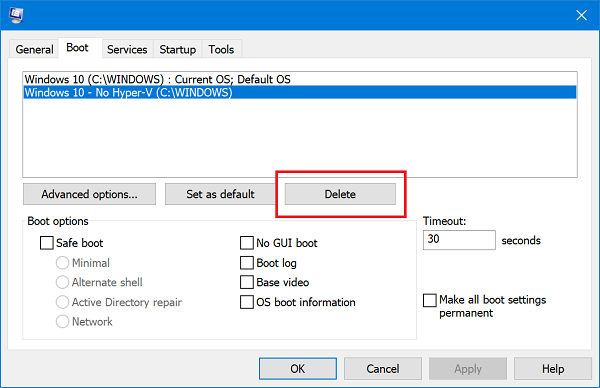
Delete the entry for the Windows 11/10 No Hyper-V from the list that populates
Select Apply and then select OK
Reboot your computer, and the entry should now be gone.