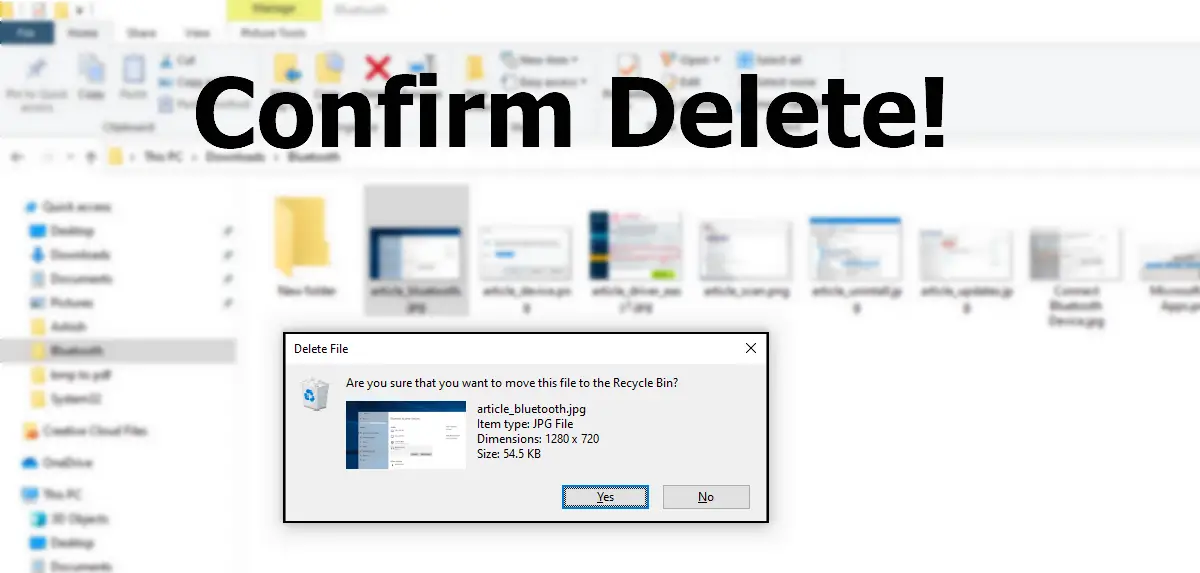
In Windows 11/10, the Delete Confirmation Box is enabled by default. Windows 8 users may have noticed that when you delete a file to the Recycle Bin, unlike in Windows 7 and earlier versions, the new operating system will no longer show you the Delete Confirmation Box. This is because Microsoft found that most users preferred to turn off this delete warning. As a result, it is turned off by default.

Enable Delete Confirmation Box for Recycle Bin
If you wish you can enable the Delete Confirmation Box. This post will show you how to enable or disable the Delete Confirmation Box in Windows 10/8/7
1] Via Recycle Bin Properties
To do so right-click on the Recycle Bin and select Properties.

Check the Display delete confirmation dialog box and click on Apply/OK.

The next time you delete any file to the Recycle Bin, you will get to see the Are you sure you want to move the folder/file to the Recycle Bin box.
2] Using the Group Policy Editor
Hit the WINKEY + R button combination to launch the Run utility, type in gpedit.msc and hit Enter. Once Group Policy Editor opens, navigate to the following setting-
User Configuration > Administrative Templates > Windows Components > File Explorer
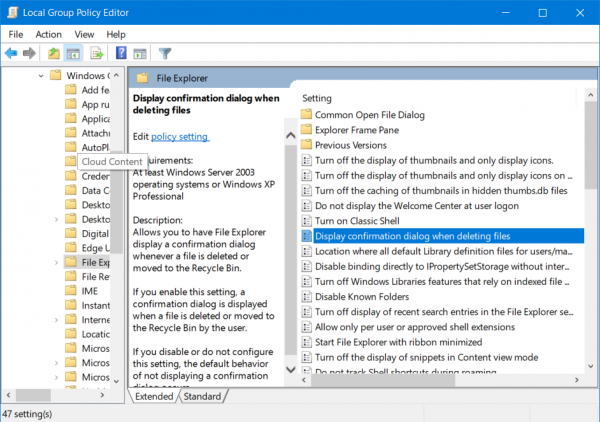
Now, on the right side panel and double click on Display confirmation dialog when deleting files and set the radio button to Disabled for it.
Allows you to have File Explorer display a confirmation dialog whenever a file is deleted or moved to the Recycle Bin. If you enable this setting, a confirmation dialog is displayed when a file is deleted or moved to the Recycle Bin by the user. If you disable or do not configure this setting, the default behavior of not displaying a confirmation dialog occurs.
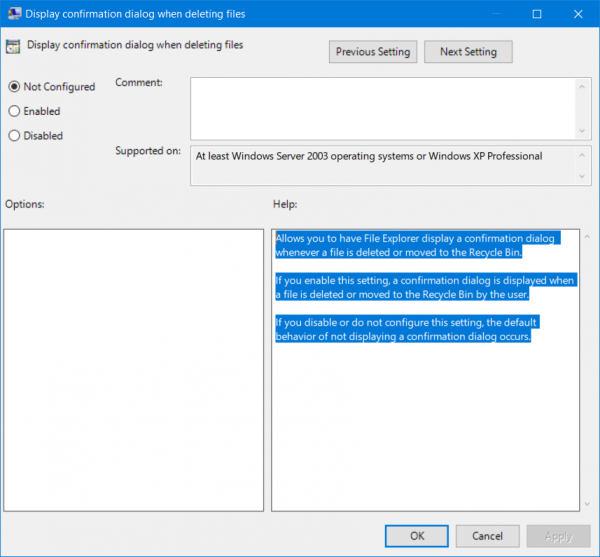
This will turn off the delete confirmation prompt. Setting the radio button as Enabled or Not Configured will turn on the delete confirmation prompt.
Exit the Group Policy Editor and then reboot your computer for the changes to take effect.
TIP: You can protect Files or Folders from being deleted accidentally.
3] Using the Registry Editor
Hit the WINKEY + R button combination to launch the Run utility, type in regedit and hit Enter. Once Registry Editor opens, navigate to the following key-
HKEY_CURRENT_USER\SOFTWARE\Microsoft\Windows\CurrentVersion\Policies\Explorer
Now, right-click on the right-side panel and click on New > DWORD (32-bit) Value.
Set the name of this newly created DWORD as ConfirmFileDelete.
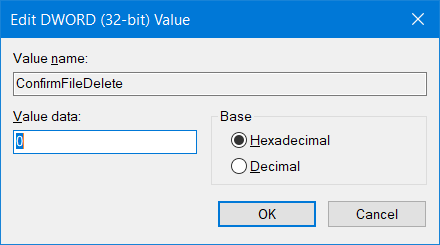
Double click on the newly created DWORD and set its value as 0 This will disable the delete confirmation prompt. A value of 1 will enable delete confirmation prompt.
Exit the Registry Editor and then reboot your computer for the changes to take effect.
4] By setting a Maximum Size
To do so right-click on the Recycle Bin and select Properties.
Under the section of Settings for the selected location, select Custom size.
Set the value in the data field to higher than what is already entered.
Click on OK for the changes to take place.
I personally prefer to have the setting – not have the delete confirmation box displayed.
These links may also interest you: