Windows 11/10/8/7 has improved the capabilities of ReadyBoost over Windows Vista. In this post, we will see what the ReadyBoost feature in Windows 11/10 is and how to enable ReadyBoost in Windows 11/10 for USB, Flash Drive, and SD card storage media & use it to speed up your computer.

Windows Vista introduced a feature called ReadyBoost. In a way, Ready Boost for hard drives already exists in the form of Page files. Please note that this does not put the paging file onto a flash disk; the file is still backed on disk; this is a cache. If the data is not found in the ReadyBoost cache, it falls back to the HDD. With this feature, you can speed up your PC with a USB memory.
ReadyBoost in Windows 11/10
Windows supports the following form factors for ReadyBoost:
- USB 2.0 flash disks and later
- Secure Digital (SD) cards
- CompactFlash cards.
Normally Windows uses a portion of your hard disk as a sort of a scratch pad, writing temp data to it while it works. But hard drives are much slower than memory cards. So the ReadyBoost feature lets you use a USB drive (or any of the three above) instead. As soon as you plug it in, you get a popup screen asking you to open the files or to ‘speed up the system’. Clicking on the latter lets your USB drive act as a ‘scratch-pad’.
ReadyBoost takes advantage of the fact that flash memory offers lower seek times than hard disks. Essentially that means that your system can get to a given location on a flash disk more quickly than it can to a corresponding spot on a hard disk. Hard disks are faster for large sequential reads; flash disks are quicker for small, random reads.
ReadyBoost compatible USB devices
The baseline requirements are :
- The USB Key must be at least USB 2.0
- The device must be able to do 3.5 MB/s for 4 KB random reads uniformly across the entire device and 2.5 MB/s for 512 KB random writes uniformly across the device.
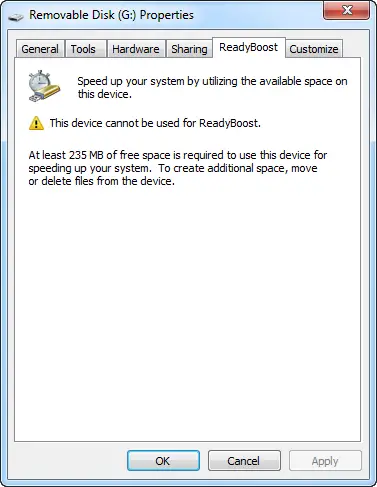
- The USB Key has to have at least 230MB of free space
How much of a boost can you expect from Ready Boost? Well, as with so many other performance issues, it depends. If your internal memory is above the amount you need, Ready Boost won’t do much for you. If not, expect to see some REAL improvement.
Is ReadyBoost useful, effective, or worth it?
ReadyBoost can be of use if your Windows computer has less RAM – say less than 1 GB. If you have a ReadyBoost compatible USB, you may use it to see some difference in the performance – especially when SuperFetch/SysMain Service is also enabled.
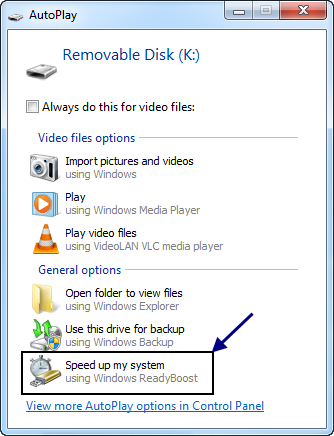
ReadyBoost has undergone a lot of change. It can speed up your computer by using storage space on most USB flash drives and flash memory cards. When you plug a ReadyBoost-compatible storage device into your computer, the AutoPlay dialog box offers you the option to speed up your computer using ReadyBoost.
Enable Readyboost in Windows 11/10

To enable or turn on ReadyBoost feature in Windows 10/8/7:
- Plug a flash drive or flash memory card into your computer.
- In the Autoplay dialog box, under General options, click Speed up my system.
- In the Properties dialog box, click the ReadyBoost tab, and then do one of the following:
- To turn ReadyBoost off, click Do not use this device.
- To use the maximum available space on the flash drive or memory card for ReadyBoost, click Dedicate this device to ReadyBoost. Windows will leave any files already stored on the device, but it’ll use the rest to boost your system speed.
- To use less than the maximum available space on the device for ReadyBoost, click Use this device, and then move the slider to choose the amount of available space on the device you want to use.
- Click Apply > OK.
For ReadyBoost to effectively speed up your computer, the flash drive or memory card should have at least 1 gigabyte (GB) of available space. If your drive or card doesn’t have enough available space for ReadyBoost, you’ll see a message telling you to free some space on it. For best results, use a flash drive or flash memory card with at least double the amount of available space as the amount of memory (RAM) on your computer.
Windows ReadyBoost tips
If you select this option, you can choose how much memory on the device to use for this purpose. When you set up a device to work with ReadyBoost, Windows shows you how much space it recommends you allow it to use for optimal performance.

For ReadyBoost to effectively speed up your computer, the flash drive or memory card should have at least 1GB of available space. If your device doesn’t have enough available space for ReadyBoost, you’ll see a message telling you to free some space on the device if you want to use it to speed up your system.
If you want to use a USB device specifically for this feature, you can turn on or turn off ReadyBoost – it eliminates the requirement of setting up your device for ReadyBoost every time you plugged it in.
Here are some tips on what to look for when selecting a USB flash drive or flash memory card to use with ReadyBoost:
- The ReadyBoost tab lets you decide how much storage space on a removable device to use for boosting your system speed.
- The minimum amount of available space recommended for ReadyBoost to effectively speed up your computer is 1 GB.
- For best results, use a flash drive or flash memory card with available space of at least double the amount of memory (RAM) in your computer, and preferably four times as much memory. For example, if your computer has 1 GB of RAM and you plug in a 4 GB USB flash drive, set aside at least 2 GB on the flash drive to get the best performance gain from ReadyBoost, and preferably the entire 4 GB. How much memory you need depends on how you use your computer. Keeping a lot of programs open at once uses more memory.
- Give ReadyBoost 2 GB to 4 GB of space for the best results on most computers. You can reserve more than 4 GB of space for ReadyBoost on most flash drives and flash memory cards. (Storage devices formatted with the older FAT32 file system can’t store more than 4 GB.) You can use a maximum of 32 GB of available space on any single removable storage device with ReadyBoost and up to 256 GB total per computer (by inserting up to eight USB flash drives or flash memory cards into the same computer).
- To work with ReadyBoost, a USB flash drive must support USB 2.0 or higher. Your computer must have at least one free USB 2.0 port where you can plug in the flash drive. ReadyBoost works best if you plug the flash drive into a USB port directly on the computer, rather than into an external USB hub shared with other USB devices.
- If you want to be sure a USB flash drive works with ReadyBoost, look for a note from the manufacturer that the flash drive is “Enhanced for ReadyBoost.” Not all manufacturers list this on their packaging. If there is no mention of ReadyBoost compatibility, the flash drive still might work with ReadyBoost.
- There are many different kinds of flash memory cards, such as CompactFlash and Secure Digital (SD) memory cards. Most memory cards work with ReadyBoost. Some SD memory cards don’t work well with ReadyBoost due to issues with the SD card interface. ReadyBoost will display a warning message if you attempt to use one of these cards.
What types of memory devices may not work with ReadyBoost:
- If your computer has a hard disk that uses solid-state drive (SSD) technology, you might not see an option to speed up your computer with ReadyBoost when you plug in a USB flash drive or flash memory card. You may instead receive the message, “Readyboost is not enabled on this computer because the system disk is fast enough that ReadyBoost is unlikely to provide any additional benefit.” This is because some SSD drives are so fast they’re unlikely to benefit from ReadyBoost.
- In some situations, you might not be able to use all of the memory on your device to speed up your computer. For example, some flash memory devices contain both slow and fast flash memory, but ReadyBoost can only use fast flash memory to speed up your computer.
ReadyBoost tweak which does not work
There are several ways being suggested on the net as to how to make your USB compatible with some hacks or tweaks. Here is one dubious tweak I came across:
Plug the device and open the Device properties. To do this, click Start > My Computer > Right-click Device > Properties > Readyboost Tab
Select, “Stop retesting this device when I plug it in.” Remove the device.
Open Regedit and go to:
HKEY_LOCAL_MACHINE/SOFTWARE/Microsoft/Windows-NT/CurrentVersion/EMDgmt
Change the Device Status to 2, ReadSpeedKBs to 1000, WriteSpeedKBs to 1000. Re-Plug the device. ReadyBoost should work.
But using such methods only fools Windows into thinking that such USB drives are compatible. Expect no performance gains in such cases! You also risk losing data if you remove the device before shutting it down in Windows. So always use the ‘Safely Remove Hardware’ option.
In reality, you are not speeding up the operating system since the computer is using the computer’s hard drive and not the USB memory for the Ready boost.
Read: How to add or remove ReadyBoost tab in Drive Properties in Windows
ReadyBoost Monitor

If you want to monitor ReadyBoost peaks, cache size, graph, read and write speed, you may want to check out the portable freeware ReadyBoost Monitor.
Let us know if you use ReadyBoost on your computer.